A Glass Bowl Christmas Tree in 5 Easy Steps
Have you seen the Christmas trees made from glass bowls? They seem to be popping up all over the internet and I've got all the details on making one of your own.
In 5 Easy Steps!
That's right, five. In all honesty, you can really get it done in three. Although, the last two are the ones that make it absolutely gorgeous.
Let's get started, shall we?
Welcome to the 'Do It Over' Designers blog hop. We are a group of bloggers who love to recycle/upcycle/DIY. I'm happy to host this hop and I hope you'll visit everyone to see what they have to share with you. The links will be listed at the end of this post.
This post may contain affiliate links.
Step 1: Find Your Glass Bowls
First, do NOT use real crystal! That's right, no going to Grandma's house and taking the crystal from her hutch or china cabinet. Not only will she probably chase you down and beat you with her cane, it's just wrong to use real crystal for a project like this one.
Go to thrift stores, estate sales, yard sales and look for pressed glass. The pieces that are smooth - not sharp, have mold marks, aren't all that heavy for their size, and don't 'ring' when tapped.
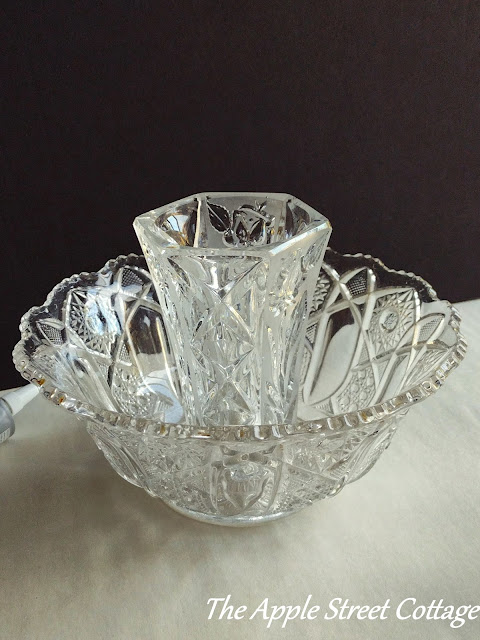
I was fortunate enough to go to a yard sale hosted by a local non-profit where they had tables FULL of glass. The Enabler (aka my husband) and I chose several pieces we thought would work. Yes, we stood there stacking each piece and yes, we did get some funny looks! Here are the pieces we found:
Step 2: Clean your Glass Bowls
Short and sweet: Put them in the dishwasher. After all, they're not crystal!
Step 3: Glue the Bowls Together
The glue will need plenty of drying time so this step will take the most time. I used E6000 and it IS smelly. The label contains warnings so I cracked the window. You may want to do this outside and/or wear a mask. You get it - do as I say, not as I do!
The first pieces glued together were the vase and the largest bowl. I ran a line of glue around the bottom edge of the vase...
...and centered it inside the bowl.
Using gravity and weight, I left the two pieces to dry overnight.
Once those two pieces were set aside, I glued the next two.
Since the one bowl had feet, that's where the glue went and then it was centered in the bottom portion of the candy dish (remember that one from the first pic?). These pieces were also left to dry overnight.
It was now time to glue the four pieces together. Once again, using gravity and weight, the larger bowl (with the vase) was centered on top of the smaller bowls.
A line of glue was run around the edge and...
...you guessed it, they were left to dry overnight!
The next day they were turned over and the last piece was glued on.
The glass bowl tree was complete!
Step 4: Embellish
You must admit, at this point the tree is pretty plain. So I dug out some Christmas greenery to dress it up.
Step 5: Light
Some fairy lights were added to the inside of the vase.
See there was a reason I used a vase as the trunk of the tree!
In addition to the fairy lights in the trunk (vase) of the tree, a string of them were wrapped around the bowls. I didn't need to attach them in any way. The wire from the lights clung to the bowl edges.
Off you go now to find some glass bowls to make your own tree. It may take a little searching, but it's worth it!
If you'd like to see some of my other Christmas Tree Creations, have a look:
Before you run off, don't forget this is a blog hop and the rest of the team has some amazing upcycle/recycle/did-it-over projects to share with you. The links are all listed below:
Featured at:


I've been waiting for this one, Ann and it does not disappoint! It's absolutely gorgeous and the instructions are perfect. Of course, now I want to make one for myself. Good thing it's a weekend, because off I go indeed...to find the pieces to copy you! Ho ho ho!
ReplyDeleteThank you, Kim. I've wanted to make one for a long time and those tables full of glass were just what I needed. Happy glass hunting!!
DeleteWow - that's magical Ann! You find the most amazing things at yard and estate sales!
ReplyDeleteThank you, Sara. I guess 'finding the things' is my super-power!
DeleteAnn, I think your glass bowl Christmas tree and my glass bells compliment each other, lol! All kidding aside, your glass tree looks fabulous! It's amazing and inspiring what you can create with glass bowls! Thanks for hosting this wonderful hop! Enjoy the holidays!
ReplyDeleteI absolutely agree, Gail. If we only lived closer! I love hosting this hop - Happy Holidays to you and your family!
DeleteThis is such a lovely Christmas decorating fashion, I love seeing these glass trees and yours is a beauty. The lights really do make it special. This kind of glassware pops up in UK charity shops a lot so I don't think it would be too difficult to collect a suitable selection.
ReplyDeleteThank you , Julie. I hope you find the right pieces to make one - they ARE out there!
DeleteWow, what a stunning upcycle, Ann. Thank you for the tips on what to look for in glass too. This will look so pretty and elegant at night, in particular.
ReplyDeleteThank you, Rachel. I agree. It's prettiest at night!
DeleteAs a matter of fact, I have seen those and you did not disappoint with your addition to the trend, it's beautiful!
ReplyDeleteThank you, Tania. I still have a few leftover pieces...there may be a mini glass tree in my future!
DeleteYour tree is gorgeous Ann! I am in love... it is beautiful, elegant, and so high end! I have been wanting to try one of these for a while, but I cannot seem to find the pressed glass. It used to be easily found in my area, we were a glass town, but I cannot seem to find it as easily anymore. I guess everyone else is scooping it up when it becomes available too. I will be on the lookout now that I know how to put one together! Great finds my friend, love it so much.
ReplyDeleteThank you so much, Cara. I know it isn't yard sale season anymore, but check in thrift stores, online garage sale sites - even fb Marketplace for glass. You may be surprised!
DeleteThis is so beautiful. Thanks for sharing it and the tips on how to make sure you are not using the good crystal. I see glass bowls like this all the time in thrift store but now I will look at them differently and with a project goal in mind.
ReplyDeleteThank you, Donna. These glass bowls are everywhere and you're right, we look at them differently when we have a project in mind!
DeleteYour glass tree is gorgeous Ann! The lights are definitely the finishing touch, but it's even beautiful without them. A few of these would look amazing along the middle of a dinner table.
ReplyDeleteI agree, Tuula. A few in the middle of a table would be beautiful...I do have a few extra bowls...hmmmm
DeleteLove this - you chose the best shapes for this!
ReplyDeleteThank you, Patti. I got lucky with so much to choose from!
DeleteYou found the perfect bowls! It looks so pretty. #AnythingGoes
ReplyDeleteThank you so much. There was a lot to choose from!
DeleteThat is beautiful!
ReplyDeleteThank you, Joanne!
DeleteHow pretty! I am going to go look for some glass bowls at the thrift store after work today. Thanks so much for sharing!!!
ReplyDeleteThank you so much - Good luck with your search for glass bowls!
DeleteSo clever - and pretty! Thanks for providing the clear instructions.
ReplyDeleteSheila
Thank you, Sheila and you're very welcome!
DeleteSuch a gorgeous project. I love how it turned out. I am happy to feature your pretty Christmas tree project at Love Your Creativity.
ReplyDeleteThank you so much, Linda. I'll be sure to stop by!
DeleteVery pretty!
ReplyDeleteThank you so much!
DeleteHonestly at the price of thrift store glass---this is a win win...I have glass in my shop I can't give away...perfect idea...and maybe it will start a trend of reusing ...some of these gorgeous pieces! Sandi
ReplyDeleteAbsolutely, Sandi. I made this tree for less than $5. The glass is out there, we just need to look at it in a different way!
DeleteHow elegant is your stacked bowl Christmas tree?! What a beauty, especially illuminated!
ReplyDeleteThank you so much!
DeleteThis is so special! I love how the light catches the facets of the etched glass. Featuring when my party opens next week. Getting an early start since we're off for a little getaway.
ReplyDeleteThank you so much, Carol. Enjoy your getaway!
DeleteAbsolutely LOVE this project. Thank you for sharing it with us on Farmhouse Friday. I'll be featuring it this week. Hope you link up again soon. pinned
ReplyDeleteThank you so much, Cindy. I'll be sure to stop by!
DeleteI love this beautiful glass tree. I'll start looking for a vase and glass bowls; hopefully by next fall I'll have enough to make my own tree.
ReplyDeleteThank you so much, Carol. I want to make another one and recently found more glass. Now I just need to combine the right pieces!
DeleteCrystal is about the same price as glass at Goodwill. Is it too heavy to use?
ReplyDeleteIt is heavy but I think it could still be used. The only drawback may be a very heavy glass tree.
DeleteHow much do you typically charge for an approx. 18” tree (3-4 bowls)? Thanks
ReplyDeleteSince this is the only one I've made, I haven't sold any trees. A big consideration would be shipping since this tree is very heavy!
Delete