Posts

Showing posts from July, 2016

The Celery Rocking Chair

Image
According to my husband, I never met a chair I didn't like.  That goes double for rocking chairs!  I found this one at a yard sale last summer.  It was solid and the price was right, so it came home with me.  The only problem was the finish.  It was old, checked, and worn. I debated for quite a while about what to do and thought about stripping it down to bare wood and refinishing it, but with my shoulder the way it is, I decided against that option.  I decided chalk paint was the easiest and headed to the store.  The paint used can be found at your local discount store for under $5.  The color is Celery . Wink-wink! There was absolutely no prep.  The chair got two coats of paint, some distressing, and two coats of satin polyurethane.  Done! Apologies for the 'after' photos.  Naturally, the day it's finished and I need photos for this post, it's a rainy day! This was a 'No Muss, No Fuss' transformation.  If you haven't trie

A Little Vacation & a Feature

Image
Happy Monday, All.  The Apple Street Cottage is taking a little vacation this week.  No worries, though, I've featured a post on the right from last summer and I'll be back next week. Have a fabulous week! Ann Since the feature will change, Click HERE for the link to the Shabby Chic Planter Linking to: Happiness is Homemade Silver Pennies Sunday Do It Yourself Party Dishing It & Digging It Merry Monday Inspire Me Monday Amaze Me Monday Inspire Me Tuesday Make It Pretty Monday Wonderful Wednesday Party In Your PJs Creative Spark Homemade & Handcrafted Shabbilicious Friday Featured at: Do It Yourself Party

Friday Find

Image
Strawberry Pie I'm calling it a 'find' because I found the recipe on Pinterest.  You can find it on my dessert board. Super Easy - Super Tasty.  Make one.  You won't regret it! Have a wonderful weekend...that includes pie! Linking to: What To Do Weekends Sweet Inspiration

The $10 Bar Makeover

Image
I've been working on this project over the past 2 weeks in short bursts and now it's finally done! If you've been following here for a while, you'll remember we brightened up the basement with white paint.  You can read about that HERE .  The lighting isn't very bright and the pine walls just made it darker.  We weren't sure what we wanted to do with the bar, so we just waited - until now!  Here's a before pic: It didn't fit-in with the rest of the room, so it got 3 coats of white paint, leftover from painting  the room.  The footrest was covered with red linoleum, so I removed the metal edge using a screwdriver, taped it off, and spray painted it with hammered gray - also a leftover from a previous project, and reused the same edge. I must confess, though.  One of the screws would not come off, so I had to get out my sawsall and cut the screw.  Yay, power tools! I finally found a use for all of those synthetic corks I had stashed away

Friday Find

Image
First harvest from the garden: It was a cold Spring around here, so the garden was planted a little later than usual.  I was so excited to have fresh green beans for dinner the other night.  You can't get green beans with this much taste from the grocery store! Have a wonderful weekend and I hope you're able to enjoy some fresh produce from your garden! Linking to: Friday Feature What To Do Weekends

Pallet Wood Boxes & A Vote!

Image
*Updated Pallet Boxes* Since I made these original pallet boxes, I dressed them up a bit with some lettering (the knobs were not a huge hit).  Here's a peek: To see how I did the lettering, click HERE . Original Post: It rained all day yesterday, so I decided to pull out some of my pallet wood and build something.  Since I'm a beginner, I started with something simple, a box. Styled with some hydrangeas, mason jars, and candles, it makes the perfect centerpiece. Here's a little "How-To: After cutting the pieces with my jigsaw and nailing them together, I had a box that measured about 19" long. White paint was dry-brushed on: When that dried, walnut stained was rubbed over the entire box. A palm sander was used to smooth the box a bit (pallet wood is really rough).  I still kept the box rough, but I didn't want anyone getting splinters.  It looks like old barn wood now, don't you think? Next came the 'styling

Friday Find

Image
Just some beautiful flowers that were growing along the side of the road. They came home with me.  Note to self:  Keep scissors in car! Have a wonderful weekend! Linking to: Shabbilicious Friday Feathered Nest Friday What To Do Weekends Friday Feature Sweet Inspiration Saturday Shuffle

Wine Cork Trivet

Image
Admit it.  You save wine corks.  They're in a jar, a zip-loc bag, or rattling around the junk drawer.  It's time to do something with them.  I've made a large wall hanging and a wreath (I'll show you those another time).  But, this time, I decided to be practical and made a trivet. How about a little how-to? First, let me say, I used all natural corks, none of the synthetic ones that are so popular now.  I just don't know how the synthetic corks would hold up against the heat of a casserole dish! Using my jigsaw, I cut a 9" X 9" square of plywood and sanded the edges.  So the trivet wouldn't scratch any tables, I cut a piece of felt and glued it to the bottom using regular white school glue. Since I forgot to take a pic when I did it, here's a look at the felt on the final product. Out came my collection of corks and I decided on the pattern I wanted on this trivet.  Using E-6000, all of the corks were glued on the plywood.

Friday Find

Image
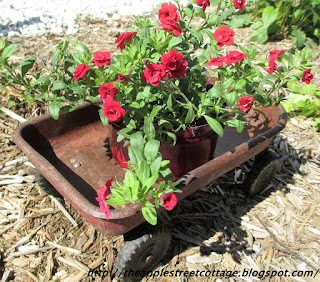
Just a quick post to share this little wagon found at a yard sale: I thought about painting it, but decided to leave it a bit rusty.  A plant was added and it was put it in the spot that used to have my hydrangea.  Yes, I said, "used to".  The roofers kinda smashed it.  It was a sad day, but, plants DO regrow!  Besides, I've been getting compliments on the wagon just as it is! Have a safe and happy July 4th weekend! Linking to: Friday Feature Sweet Inspirations Saturday Shuffle Bouquet of Talent