Posts

Showing posts with the label 'Do It Over'Designers

Ribbon Holder

Image
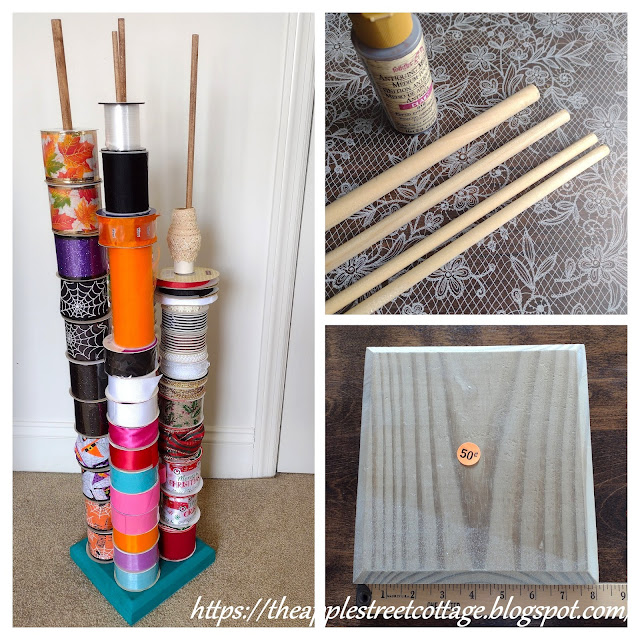
  As soon as I saw this plinth sitting on a table at a yard sale, I knew exactly what it was destined to become - A Ribbon Holder!   Trust me, I don't always have this much clarity when shopping, but this time I did!  The price was definitely right, so it came home with me. W elcome to the 'Do It Over' Designers blog hop.  We are a group of bloggers who love to recycle/upcycle/DIY.  I'm happy to host this hop and I hope you'll visit everyone to see what they have to share with you.  Their links will be listed at the end of this post. Back to the project... A little measuring with spools of ribbon showed me I could get 4 dowels on this plinth with ease.   I bought 4 dowels: a 1/2", a 3/8", and two 5/16" and  marked the spots with pencil before drilling the holes. Sorry, no pic.  I haven't mastered drilling and taking photos at the same time yet!   The reason for the different sized dowels was based on the holes in the spoo...

Vintage Magazine Stand Makeover

Image
I found this magazine stand at an Estate Sale a couple of years ago...yes, that's the one I went to 4 times! I finally finished it's makeover last Spring, but with moving and the holidays, I'm just getting around to sharing it with you.  W elcome back to the 'Do It Over' Designers blog hop.  We are a group of bloggers who love to recycle/upcycle/DIY.  I'm happy to host this hop and I hope you'll visit everyone to see what they have to share with you.  Their links will be listed at the end of this post. The quick story behind this magazine stand?   It was 5 bucks.   My husband said it was ugly.   I said, "SOLD!"   One of the antique dealers there said it might be mahogany.  I wasn't convinced, but it sure was dirty! A good scrub with soap and water and it was looking much better, but I was curious to see what was under that paint, so out came the Citristrip. And there was green and blue paint under there too!  Take a ...

Sparkle & Glam Christmas Tree

Image
This project got it's start last Spring at an Estate Sale.  No one knew what they were, but I knew I could do something with them, especially that one that one with the arrow pointing to it. To me, it said, 'Christmas Tree' and that's what it became.    W elcome back to the 'Do It Over' Designers blog hop.  We are a group of bloggers who love to recycle/upcycle/DIY.  I'm happy to host this hop and I hope you'll visit everyone to see what they have to share with you.  Their links will be listed at the end of this post. After some research, we came to the conclusion that I had purchased some wooden bobbins from an old textile mill.  You can guess the purpose of the giant staple (that was not coming out - no way, no how!) Since I have quite a collection of vintage costume jewelry, I decided to go with a 'glam-look' for this makeover.  The first step was to give it a coat of silver spray paint.  I also included a few pieces of jewelry I was think...

Cookbook Stand Makeover

Image
W elcome back to the 'Do It Over' Designers blog hop.  We are a group of bloggers who love to recycle/upcycle/DIY.  I'm happy to host this hop and I hope you'll visit everyone to see what they have to share with you.  Their links will be listed at the end of this post. There wasn't the usual amount of yard-saling (that's a word, right?) this year, but I did manage to catch a couple of them between putting the house on the market, packing, moving, and unpacking.  It was at one of them I found this cookbook stand: It was pretty, but the bracket wasn't attached, the base needed re-gluing and the flower design was a decal.  I decided to give it a makeover.  The first step was to get rid of the finish and decal on the front.  Citristrip took care of that for me.  Once I saw the wood was different colors, I decided to paint it, so I added a little stain to the edges for distressing. I gave it two coats of white spray paint and use some sandpaper to dist...