Posts

Showing posts from 2016

Christmas at the Cottage

Image
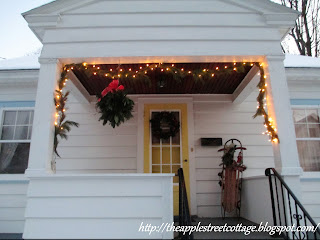
It's been a busy couple of weeks at the Cottage - we'll talk about that in a later post, but, for now, here are a few pics of our holiday decorations: Keeping it simple with a wreath, sled, pine-bough swag, and a handmade kissing ball. Lenox Santa Cookie Jar Charlie Brown Tree - my favorite! This bowl is always displayed at Christmas. The dining room in non-traditional colors. Ornaments that bring back so many memories! It wouldn't be Christmas without (at least) one pig decoration! There is so much more, but, for now, Merry Christmas from our house to yours! Linking to: Make It Pretty Monday Creative Spark To Grandma's House We Go Home & Garden Thursday Shabbilicious Friday Vintage Charm Craft Frenzy Friday What To Do Weekends

The Wreath My Daughter Made

Image
OK, I might have helped a little... 😉 We spent Thanksgiving at our daughter's house this year and she always wants to try to do one 'crafty project' while we're together. This year, she wanted to make an ornament wreath, and if you ask me, she 'knocked it out of the park'. We headed out to the discount store and chose these ornaments: Let me give you one word of advice.  Take the time to remove the caps from your ornaments and hot-glue them back on .  I made an ornament wreath a few years ago and left out that important step. Many of the ornaments fell off and I had to re-make the wreath. Save yourself some trouble! Take a wire hanger and bend it into a circle - here's how we started: Then open up the top of the hanger and you're ready to start adding ornaments. Let give you 2 more tips.   First, when you hot-glue the caps on the ornaments, wear rubber gloves.  Many people don't have finger caps for protection and, belie

Santa Claus Is Coming To Town

Image
Of course he is, it's December!  The jigsaw has been getting a workout creating Christmas goodies and today I want to show you Santa. I am loving my pallet wood and things you can make with it.  I wanted a Santa so I started searching on Pinterest for ideas.  After looking at several options, I created a pattern (using the various ideas) to create my own original design.  I wanted the main piece to be 4 boards wide and I wanted to fit 2 of them on the full-length of the board.  Does that make sense?  Since my pallet wood is about 40" long, I made each Santa 19" in height. Here are the pattern pieces I drew on newsprint: After tracing them on the wood with a marker, the jigsaw got to work: You'll notice I chose 2 lighter-colored boards for the center pieces. That way I didn't have to paint Santa's face.  After sanding to smooth the wood,  I used super glue to attach the 4 main pieces and finishing nails to give it more support.   Time to paint:

Cider Donut Muffins

Image
I want to share this recipe with you before all the apple cider disappears. I made them a few weeks ago and they were a huge hit. I can't take credit for this one, though, because I found it over at Baked By Rachel . Be sure to stop over and send her some love, OK? Doesn't that look delicious?  Here's the recipe: Muffin Ingredients: 1 & 1/2 C all-purpose flour 1/2 C sugar 1/2 C brown sugar 1 tsp. baking powder 1/2 tsp. baking soda 1/4 tsp. salt 3/4 tsp. cinnamon 1/4 tsp. nutmeg 3/4 C apple cider 1 egg 1/2 tsp. vanilla Topping Ingredients: 7 tbsp. unsalted butter - melted 3/4 C sugar 1 & 1/4 tsp. cinnamon Preheat oven to 350 degrees Grease muffin pan. Combine apple cider, egg, and vanilla in a medium bowl. In a large bowl, combine flour, sugars, baking powder, baking soda, salt, cinnamon, and nutmeg.  Slowly add wet to dry ingredients with mixer on low.   Once combined, pour batter into muffin pan.  I used a 1/4 cup measure f

The "Tool" Box

Image
This idea has been rattling around my brain for a while, and I finally made it happen.  I wanted to make something special for my son and since he loves to work on trucks, it had to be tool-related.  I found an old wrench at the flea-market for $1 and decided to combine it with some pallet wood. I wanted the wrench to be the handle and that was the tricky part. The ends had to be built from two pieces of wood notched to fit around the wrench.  I used my jigsaw to notch the wood little-by-little until the wrench fit.  Here's how they looked before assembly: The pallet wood was cut, dry-brushed with white paint and rubbed with dark stain.  The pieces,  in the above picture,  had just been dry-brushed. A piece of scrap wood was used for the bottom and more pallet wood was cut for the sides. Once everything was cut, sanded, dry-brushed, stained, and sanded again, it was assembly time.  I don't have pictures of this part because I needed both hands!  After fittin

Tea Cup & Mug Exchange

Image
I recently had the privilege of participating in the Tea Cup & Mug exchange hosted by Stephanie at The Enchanted Rose .  I learned about the exchange after visiting her blog from a link party.  When I learned about it, the deadline for participating had ended, but after commenting that I'd sign-up for the next one, Stephanie e-mailed me and invited me to join this one.  I was ecstatic! After completing a questionnaire on wanting to exchange a mug or tea cup & things I liked/collected, all I had to do was wait.  Soon, this beautiful package came in the mail from Pam @ Virginia Retro . As you can see, she really spoiled me.  In my questionnaire, I shared that one of my favorite colors was yellow and my favorite teas were Earl Gray and Chai.  Pam sure delivered!  She also included some vintage linens, coasters, a creamer, and chocolate (another favorite that I listed).   I sent a package to Barbara from Texas.  I learned that she liked black tea and vintage hand

Frankenstein & His Bride

Image
Halloween will be here in a couple of days and if you need a quick craft - I've got you covered! This was another of my "Spur Of The Moment" ideas.  I was working on a Christmas craft (that I'll share soon) using paint stirrers. This part of the paint stirrer was actually 'scrap' from the other project, but I hated to waste it, so, I grabbed some paint and got to work.  This shade of green wasn't my first choice, but, since this project was 'spur of the moment', and I wasn't running to the store, I couldn't be picky.   After the green paint dried, I painted some black hair and glued on two eyes.  With a sharpie, a nose, mouth, and some scars were added.  On the 'Bride' some red lips and white streaks completed her look.   So what do you do with them?  Add a magnet to the back and you have a new refrigerator magnet, or, glue a pin on the back and wear it on your jacket.   This would also be a great project to do

Fall/Halloween Porch Decorating

Image
The other day it was sunny and 80 degrees.  Today it's in the upper 30's and raining.  What a difference! Fortunately, the nice weather made it easy to get the front porch decorated.  As I said in an earlier post, I don't really 'do' scary for Halloween, so here's what the front porch looks like: Here's a closer look: For more information on making the brooms, click HERE .                                                  'Broom Parking' sign, click HERE .                                                                 Black Cat, click HERE . Mother Nature has also been doing her part: I can't top that! I hope you're staying warm in your part of the world.  I'm afraid the rain and wind are going to blow all the leaves off the trees - just when they looked so pretty... Have a wonderful week and thank you for stopping by the Cottage. I hope you'll follow, pin and/or share! Linking to: B

Candy Corn

Image
October seems to be flying by and before you know it, Halloween will be here.  I had some wood scraps sitting in a pile, so I decided to make some candy corn.   I made myself a pattern in two different sizes.   This was a "spur of the moment" project, and it fought me every inch of the way.  For starters, while I was cutting one of them out, it split right down the middle.  Thanks to a little super glue, you can't tell which one, can you? Next, I started painting and didn't use a base coat/primer.  Needless to say, I needed many coats of paint.  Yes, it was my own fault!  Finally, I got the paint to cover and I used a sponge to transition one color to the next.  Out came the sander and the candy corn was distressed! Time for sealer.  While I was spraying, I ended up with a drip. Because I'm so patient - NOT - I decided to fine-sand it off and re-spray it.  Well, I made a mess of it!  Not to be out-smarted by a piece of wood, I drilled a little hole:

Morning Glory Secret

Image
Even though it's October and the mums are all in bloom, my morning glories are still going strong.   What you don't know is that these beautiful flowers are camouflage for the gas meter.  Last winter, our gas meters were upgraded and place on the outside of our houses. The only place for ours was on the front corner.  Not my idea of the ideal spot, but, it had to be done. This is called, "getting creative".  I didn't want to look at it and the hydrangea I had planted was still very small, so this was my solution.  A small trellis and several morning glory vines certainly did the trick! Would you ever guess what's hiding behind this plant? In a few years, the hydrangea will be large enough to do the job, but in the meantime, I'm pretty pleased with this solution!   Have you ever had to hide anything outdoors with plants?  If so, please share, I'd love to hear how you solved your problem area. I hope you're enjoying your Colum