Posts

Showing posts with the label Christmas trees

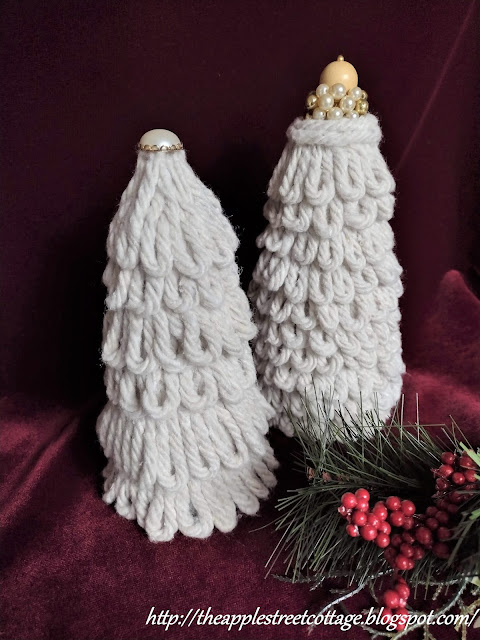
Creating a Charming Ruffled Christmas Tree

Image
It's November and even though I don't start my Christmas decorating until Thanksgiving weekend, I definitely start crafting it much sooner!  This is an easy craft that can be completed in less than an hour.  Ready?  Let's get started! You'll need a few supplies: Styrofoam cone Lace - mine was thrifted Ruffle - also thrifted Pins Glue An old pin or earring - thrifted This post may contain affiliate links. Start by covering your styrofoam cone with lace.  I spread glue on the cone and then attached the lace. While that was drying, I cut the ruffle off a vintage slip . Starting at the bottom of the cone, pin the ruffle and wrap it around the base.  Cut off the excess. Continue up the cone layering your ruffles. As you get to the top, you may want to trim the ruffles so they are shorter. I had to use a running stitch on the trimmed pieces to help them hold their shape. At the top, run a line of glue...  ... and attach a piece of lace trim to finish the edge. Ad...

The $5 Ceramic Christmas Tree

Image
  I know what you're thinking...a ceramic tree...for $5?  But, if you know me, you know I am the most frugal (aka 'cheap') gal around sooo, when I saw these two trees on Marketplace for $10 I couldn't message the seller fast enough!  W elcome to the 'Do It Over' Designers blog hop.  We are a group of bloggers who love to recycle/upcycle/DIY.  I'm happy to host this hop and I hope you'll visit everyone to see what they have to share with you.  Their links will be listed at the end of this post. I was on my way in minutes and came home with these two little beauties: The tree on the left is today's focus.   It's about 11 inches tall.   That green crackle finish?  Not my favorite.    It was also from PartyLite - R emember those home parties? I gave it a good cleaning with soap and water and let it dry.  Next, it went outside for some white paint.  There were some chips (see the top?) but I didn't care.  The chi...

Sparkle & Glam Christmas Tree

Image
This project got it's start last Spring at an Estate Sale.  No one knew what they were, but I knew I could do something with them, especially that one that one with the arrow pointing to it. To me, it said, 'Christmas Tree' and that's what it became.    W elcome back to the 'Do It Over' Designers blog hop.  We are a group of bloggers who love to recycle/upcycle/DIY.  I'm happy to host this hop and I hope you'll visit everyone to see what they have to share with you.  Their links will be listed at the end of this post. After some research, we came to the conclusion that I had purchased some wooden bobbins from an old textile mill.  You can guess the purpose of the giant staple (that was not coming out - no way, no how!) Since I have quite a collection of vintage costume jewelry, I decided to go with a 'glam-look' for this makeover.  The first step was to give it a coat of silver spray paint.  I also included a few pieces of jewelry I was think...

'No Yarn' Loop Yarn Christmas Trees

Image
  That's right, my friends they are Loop Trees and there isn't a bit of yarn in them! I'm back with another crafty project that is made with a mop from the dollar store.  If you missed the last two projects, be sure to check out the Five Little Ghosties and The 'Sweater-Look' Pumpkin .  You'll also see the mop I used. Let's move on to the trees and how they were made beginning with the loop tree on the right. You will need a mop and a styrofoam cone.  After removing the mop strands, begin cutting them in 3-inch lengths. I honestly can't tell you how many you'll need since it depends on your cone.  Just cut a bunch and go from there. I began attaching the loops on the cone with a little overhang on the bottom. In the interest of full disclosure, I started putting the hot glue on the cone and discovered it melted the styrofoam.  Of course it did - Silly me!  Then I put the glue on the ends of the loops first, pressed them on the cone, and had much mor...

Three Little Trees

Image
It's no secret that I love to repurpose items and use reclaimed/pallet wood, so when I spotted these wood blocks at an estate sale, a plan began to form.   The second part of the plan involved the square nails, also found at the same estate sale: So I grabbed the scraps of pallet wood that I refused to toss and started drawing some triangles with my speed square. My jigsaw made quick work of them - sorry, no pics.  I like my fingers and my hands are on the saw when it's operating.  I'm sure you understand! After a little sanding to smooth any rough edges, holes were drilled in the bottom of each tree to accommodate the 'trunks'.  The 'trunks'? Remember those blocks?  Let's talk about them. They were vintage children's blocks made by Playskool.  I did nothing to them but drill a hole through each one.  Since I was using vintage square nails, I didn't want the blocks to split when I hammered them in. The square nails...