Posts

Showing posts from July, 2017

Christmas in July...with Baseball Bats??

Image
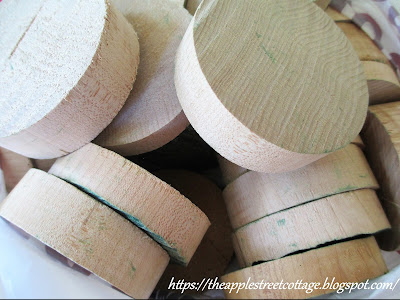
Nothing like waiting till the last minute. right?  With 2 more days left, it's time for the 'Christmas in July' post. We were at a friend's for a BBQ, when he came to find me saying, "Your husband says I need to show you what's in my garage."  I couldn't imagine what it could possibly be until he showed me these: He had garbage bags full of them!  Do you know what they are? Well, wait no longer...they are cast-offs from a baseball bat factory. They were being thrown away and he gets them to burn in his fire pit.  Since he knew I was crafty, he offered me as many as I wanted. He also had some bigger pieces, but those I'll save for another post!   I took them home and thought about what I could do with them. After giving them a good sanding (believe me, they needed it) I decided to turn them into Christmas ornaments. After painting and sealing them, I wrapped the edges in burlap ribbon and added a cord for hanging. Here are a co

Really? Five Dollars?

Image
Let me just say I had an entirely different post planned for today, but after last night, I had to change my plan.   I was at a Summer Festival/Craft Fair at a local church when I noticed this box: It was a little worse for 'wear & tear', but look at that beautiful wood: But, the real treasure was inside: Yes, it was an almost  complete set of silver for 8.  With a little quick research this morning, I've discovered it is silver-plate from the Holmes & Edwards Company.  The pattern is "Youth" and was made in the 1940s. The most amazing part of this find was the price.  Take a look: I had to ask, "Really, $5 for the box and everything in it?"  The lady said "Yes" and I said, "Sold"! Here are a few close-ups of the contents:  Apologies for the coral in my shirt reflecting on the silver! Dinner Forks: Salad Forks: Knives: Teaspoons: Tablespoons: Serving Pieces: Iced Tea Spoons:

Jammin' in the Summertime!

Image
We've had some perfect days with temperatures in the mid to upper 70s, along with a few hot, humid days with a few scattered showers.  Yes, it's summer and that means it's time to make jam!  Every summer, when my children were small, we'd head to the strawberry fields near our house to pick sweetest, most beautiful strawberries.  You were allowed to eat as you picked, and I'm sure my kiddos ate more than they actually picked - you could tell by the red stains around their mouths!  That was OK because we headed home with several pounds of berries and I got right to work making jam - you can't get fresher than that! These days, my children are grown and still want jam, so I buy my berries and get to work.  Let me show you how I do it.   Gather what you need:  a few pounds of strawberries, jars & lids, fruit pectin, and sugar - LOTS of sugar!   First you have to sterilize your jars and lids.  If you have a dishwasher, send the jars through a was

Recycling To The Rescue!

Image
Last weekend we were invited to a July 4th BBQ.  In addition to bringing my favorite pasta salad, I wanted to bring our hostess a baby jade plant.  My jade plant is absolutely huge and is producing baby plants at a rapid rate!  Since I didn't have a small pot for it, I headed to the recycle bin.   That's right, an aluminum can, wrapped in scrapbook paper, makes a great little planter!  I 'dressed-it-up' with a piece of jute tied into a bow, and this little plant was ready to go. It doesn't get any easier than that! If you'd like one, send me your address.  I have a few more! Now, before you ask about that pasta salad.  No worries, I'll share that recipe soon.  There's still plenty of summer -  and summer parties left!   Have a great week everyone.  Don't forget to follow, pin, share!   Linking to: Saturday Shuffle Bouquet of Talent Snickerdoodle Sundays At Home Sunday's Best That DIY Party Happiness is Homemade

Pink Flamingo Planter

Image
This planter has been 'in the works' for a few months. I've been on a 'flamingo kick' for a while and wanted to make a planter. So, before we moved, I made patterns and then cut, sanded, and primed all the pieces.  Here are a couple of pics from the 'cutting stage'. The pieces were leaning together to check for fit. Recently, I took out all of the primed pieces and gave them two coats of paint.  After the paint was dry, they were distressed with 220 grit sandpaper.   Everything was sealed and it was assembly time.  I used E6000 to attach the wings to the sides and then added screws from the inside. Next came the beginning of the box.  This is where my dear hubby helped.  Since I'm not known for drilling exactly straight, he volunteered to help - love that man! The sides (with wings) were attached next. The last part to attach was the neck & head. The screws were sunk a bit so they could be filled with wood dough an