Posts

Showing posts from 2022

It's That Time Again

Image
  Yes, my friends, it's time for this gal to take a break.  I don't usually share a lot of personal information here so let me just say i t's been a tough year and  I need some time off to rest and recoup.  I'll be back in January with more repurposed, recycled/upcycled, DIY, & 'trash to treasure' projects. Wishing you and your families a  joyous holiday season.   I'll see you in 2023!  

The $5 Ceramic Christmas Tree

Image
  I know what you're thinking...a ceramic tree...for $5?  But, if you know me, you know I am the most frugal (aka 'cheap') gal around sooo, when I saw these two trees on Marketplace for $10 I couldn't message the seller fast enough!  W elcome to the 'Do It Over' Designers blog hop.  We are a group of bloggers who love to recycle/upcycle/DIY.  I'm happy to host this hop and I hope you'll visit everyone to see what they have to share with you.  Their links will be listed at the end of this post. I was on my way in minutes and came home with these two little beauties: The tree on the left is today's focus.   It's about 11 inches tall.   That green crackle finish?  Not my favorite.    It was also from PartyLite - R emember those home parties? I gave it a good cleaning with soap and water and let it dry.  Next, it went outside for some white paint.  There were some chips (see the top?) but I didn't care.  The chipped side could be turned to the ba

Mini Tart Tin Ornaments

Image
Thanksgiving is upon us and Christmas, well, you know, it's been in the stores since August!     I've been trying to decide what to do with a collection of mini tart tins found over the summer at an estate sale.  At first, I thought I'd make a wreath and even though I had a bag full of them , it would be a small wreath.  Plan B?  Make some ornaments!   I started by punching a hole in the top using my Crop a Dile Big Bite. To decorate, I pulled out my box of vintage jewelry and started sifting through it.  There was a bracelet in pieces that I saved - knowing I'd find something to do with them.   Today was that day!  I picked the piece that was the best fit and dipped the edges in some E6000. I placed it in the tin and left it to dry.   Some silver ribbon was looped through the hole and the ornament was done. How's that for quick and easy? Next came the poinsettia pin.  I removed the block of wood from a mini bottle brush tree and glued it in the center of the tin. I

Vintage Satin Ornament

Image
November is here and, for many of us, our thoughts turn to the holidays.  If you have scraps of fabric taking up space I have the perfect way to use them and create new ornaments for your Christmas tree.   It's time once again for  The Sustainable Pinterest Challenge , a group of bloggers who are challenged to recreate a pin from Pinterest focused on sustainability. Many thanks to  Julie from Sum of Their Stories   for hosting.  This month we are sharing something 'Christmas'.  My inspiration came from this pin but I decided to 'glam it up' a bit with some vintage satin.   It all started with a clear plastic ornament from the dollar store. It came with a nice silver cord that could be used for hanging. Cut a square of fabric large enough to go around your ornament.  This was a piece of satin from a vintage wedding gown.  I can't give you a size since it depends on the size of your ornament.  Wrap it around the ornament and use a rubber band to secure it around t

The Haunted House

Image
 Today's   project was inspired by something I saw at the Dollar Spot in Target.  Naturally, I forgot to take a photo of it, but it was a simple haunted house made from chipboard or balsa wood ( I can't remember which) with a place for a tealight behind it.  I knew I could improve upon it, so I did!   Welcome to the  Creative Craft Hop  hosted by Sara from  Birdz of a Feather .   If you just came from Niki @ Life as a LEO Wife , welcome to the Cottage.  At the bottom of this post I'll direct you to the next stop on this hop, but be sure to visit all of the other stops too for some amazing inspiration. They will all be listed. The first thing I did was head to Design Space to search for a haunted house. As you can see, the one I chose was pretty detailed, but since my Maker was cutting it, I was fine with that.  Full disclosure:  It took HOURS to cut!  If you don't want to run your Cricut that long or you don't have one, cut a simpler design with an craft knife.  I a

Autumn on a Tray

Image
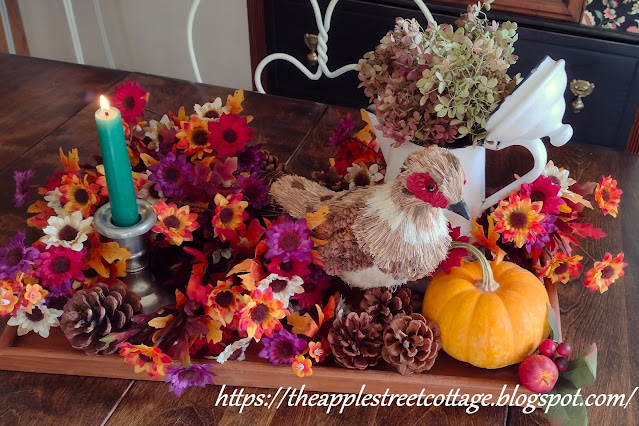
I'm feeling a crispness in the air. The apple trees are are loaded with fruit, the pumpkins have turned a beautiful orange, and the trees are showing their gorgeous red, orange, and yellow hues.  Yes, it's Autumn and it's time to bring some of that beauty indoors.   Welcome to the Autumn on a Tray Blog Tour hosted by Katherine at Katherine's Corner.   She's gathered a group of bloggers to share how to decorate a tray for Autumn and the results are amazing.  If you're coming from Sandra @ Dinner at 8 , welcome to the Cottage!     I created my tray with things I have around the house.  Let's get started, shall we? I started with a teak tray and this fabulous bird I found last year on sale.   Clearly the tray has seen better days, but that won't matter once I'm done decorating. I added my enamel coffee pot , a yard sale find, filled with hydrangeas. At the other end of the tray, I added a pewter candlestick for a little balance.   A small pumpkin was