How to Create A Unique Jewelry Tree
It's Thanksgiving weekend and the Holidays are here! Today I have a Christmas idea that's been around for quite a while, but I put my own little twist on it. Read on my friends, and tell me what you think.
Welcome to the 'Do It Over' Designers blog hop. We are a group of bloggers who love to recycle/upcycle/DIY. I'm happy to host this hop and I hope you'll visit everyone to see what they have to share with you. Their links will be listed at the end of this post.
This post may contain affiliate links.
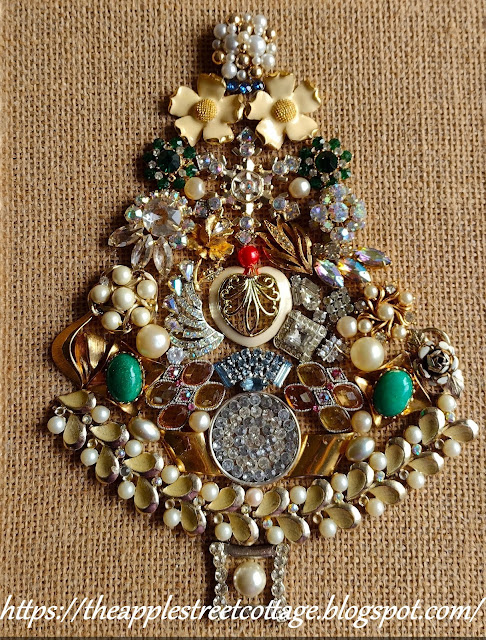
For years, I've seen jewelry trees on velvet. I thought they were beautiful and always wanted to make one. I even bought some velvet and played with tree designs on it, but it never really 'spoke' to me, so I ended up putting it all away and temporarily forgetting about it.
Then I saw these burlap canvases and it hit me. That was the background for my tree!
The first thing I did was cut a piece of chipboard and glued it in the center. Jewelry gets heavy and I wanted more stability for it.
Once that was done, I pulled out my jewelry and started playing with some of the pieces I thought I'd like to use.
Before anything was glued, I found the center of the burlap.
Then I glued on the bottom pieces. The same procedure was repeated at the top.
Then I just started adding jewelry.
Nothing was glued until I was sure I liked the look.
I alternated from the bottom to the top.
Again, no gluing until I was sure.
Some pieces didn't make it to the final cut, but it was fun moving, adding, and taking them away to decide.
I started using jewelry glue, but found it didn't hold, so I switched to E6000 and had no problems.
When it was done, I thought it needed a frame.
Some jute trim was the perfect addition.
The trim was attached with Tacky Glue.
One Jewelry Tree on Burlap!
I also made a lace tree on burlap, if you missed it, be sure to take a peek. It's a quick and easy project!
Before you run off, don't forget this is a blog hop and the rest of the team has some amazing upcycle/recycle/did-it-over projects to share with you. The links are all listed below:
Featured at:


.jpg)


Ann, your jewelry tree is just dreamy! I love that bracelet at the base, it really sets the tone for the whole design...and yes, the burlap is perfect! Beautiful!! Happy hopping!!
ReplyDeleteThat bracelet was the first piece I pulled out and somehow I knew it was going to work this time. Thanks, Kim!
DeleteBrilliant idea to add the chipboard; I wouldn't have thought of that! So stunning Ann and the jute trim is like the cherry on top :).
ReplyDeleteThank you, Sara. It makes a huge difference with the weight of the jewelry. I'm so glad I finally got around to making this!
DeleteHow glitzy!! I love playing with old jewelry, too! Happy Holidays!
ReplyDeleteThanks, Patti. Vintage jewelry is so much fun!
DeleteFabulous, Ann! Your jewelry tree is very creative and artistic! I love the way you balanced your jewelry pieces in the tree design! Quite clever! Have a great Christmas and New Year!
ReplyDeleteThank you, Gail. It was so much fun to create. Merry Christmas to you too!
DeleteOMW, I love this!! I have jewelry boxes full of vintage pieces that I no longer wear and there are a whole bunch that have lost bits that would be perfect for something like this. I just need to find a backing board. Thanks for the idea, Ann.
ReplyDeleteMy pleasure, Michelle. Have fun with your stash of vintage jewelry!
DeleteOh, I love it! I made a skull with jewelry and I've been wanting to make other things, I'll have to see if I have enough old jewelry to make a tree. Yours is beautiful!!
ReplyDeleteYou probably do have enough, Tania. Keep in mind, pearls make great filler!
DeleteI absolutely love how your tree turned out. I've always been a fan of rustic and sparkle, so the combo of the burlap and jute trim with the jewelry totally works for me. Love it!
ReplyDeleteRustic & Sparkle - that's the perfect description, Tuula. Thank you!
DeleteI have always loved seeing jewelry trees but haven't tried to make one yet myself. Now that I have more of my mom's things in house I really should try this. Yours turned out so pretty! Thanks for the inspiration.
ReplyDeleteThank you, Donna. Have fun making yours!
DeleteI've admired these kind of trees on Pinterest for a while now and yours is one of the nicest I've ever seen. The burlap (or hessian as we call it across the pond) really sets off the jewels perfectly . It's really beautiful.
ReplyDeleteThank you, Julie. I didn't know you had a different name for burlap! I really like it better than velvet.
DeleteSometimes I feel like we have a different name for everything! Cushions, lolly sticks, lifts, pavements, taps, car parks, jumper, trousers, candy floss, biscuits, green fingers, rubbish bin, chips, crisps, wadding, cotton reels... the list goes on an on! :-D
DeleteAnd I usually like your version better!
DeleteLove the jewelry tree! You did a great job. I had not seen a bracelet at the bottom before and really like how that looks! - Patty
ReplyDeleteThank you so much, Patty. The bracelet was the first piece I pulled out of the box!
DeleteThis is so lovely!! What an amazing way to re-purpose old jewels!! The tree is just dazzling. Thanks so much for sharing at Home Imagined this week!
ReplyDeleteThank you so much!
DeleteThanks for sharing with Creatively Crafty Link Party.
ReplyDeleteHappy to share!
DeleteOh my gosh I love it, Ann! As a jewelry designer and vintage jewelry addict this is complete heaven for me. I've always wanted to make one of these. Maybe this is the year!? Thanks for sharing at Vintage Charm Party. xo Kathleen
ReplyDeleteThank you, Kathleen. I'm not a jewelry designer but I do love all things 'Vintage'. I can't wait to see the one you make!
DeleteAnn,
ReplyDeleteI was just thinking about using some vintage jewelry, especially Christmas pins, to make some sort of jewelry Christmas tree and there was your post!! Perfect timing...Thanks for sharing how you did it and I hope to try to do the same!!! Thanks too for taking the time to stop by and let me know that you did by leaving such a sweet comment!! I hope you have a great weekend!!
Hugs,
Deb
I'm so glad I inspired you, Debbie. I can't wait to see what you do!
DeleteAnn, this is gorgeous. I have seen these before, however I have attempted to make one. I also saw some at a craft fair where the lady made precious memory jewelry out of a loved one that passed on. It is beautiful. I am happy to feature your lovely jewelry tree at Love Your Creativity.
ReplyDeleteThank you so much, Linda. This is a project that's been on my 'to-do' list for quite a while!
DeleteAnn, this is so pretty. And what a great idea.
ReplyDeleteVisiting today from Crazy Little Love Birds 16 #40
Thank you, Paula!
DeleteI have always wanted to make one of these, but never seem to find vintage costume jewelry. Your tree looks lovely, I love the switch to burlap Ann! I have a brooch collection, but I wear them so I can't seem to part from them. I will have to search out jewelry when I am shopping next, this would be the perfect addition to Christmas festivities.
ReplyDeleteThis has been on my list for a long time, and I finally did it. I really like the burlap as a background...it's a little 'out of the box'! Keep looking, jewelry shows up quite a bit, but sometimes it's expensive.
DeleteOh, I just love this. It's absolutely beautiful! I'll be featuring this post at Thursday Favorite Things this morning. :)
ReplyDeleteThank you so much, Pam.
DeleteBeautiful! I've seen these on Pinterest and yours turned out so great. I'm featuring when my party opens. I have managed to become the repository for the family jewelry pieces so saving this to do next year!
ReplyDeleteThank you so much, Carol. You definitely need to make one!
DeleteI was intrigued when I found your post on Thursday Favorite Things. Shortly after my grandmother passed away my mother gathered her jewelry (she had been a jewelry lover all her life and had a number of pieces from the '20s through the '70s) and created a jewelry tree made from plaster. I now have it in my home. It's far too heavy to display in any way other than laying on a tabletop, but It reminds me of both of them.
ReplyDeleteYour tree is a true treasure - made from your grandmother's jewelry. What a wonderful way to remember both your mother and grandmother!
DeleteThank you for this great tutorial! The result looks gorgeous
ReplyDeleteYou're very welcome. I'm so glad you like it!
Delete