Polymer Clay Ornament - Christmas in July
Welcome back to Christmas in July at The Apple Street Cottage. This time I have a quick and easy project for you that doesn't cost much at all. Why, you ask? Because it's also Ten on the 10th - when a group of bloggers share ideas and inspiration for under $10. 'Christmas in July' is the theme for the hop and I've got a sweet little ornament you can make.
The first step is to roll it out. The instructions mention a thickness of 1/4" so I used two pencils and rolled out the clay between layers of waxed paper.
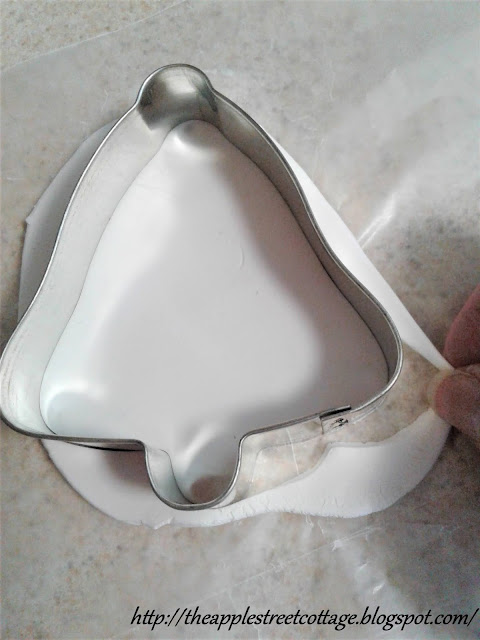
I needed a little more surface area for my cookie cutter, so I rolled it a bit thinner until I had the size I needed. I used my bell cookie cutter and peeled the excess clay from around the edge.
Since it looked a bit plain, I grabbed an embossing folder that I had to give it some texture. If you don't have any embossing folders laying around, rubber stamps, a piece of lace, or anything with a pattern can be used - even a pretty spoon handle!
Don't forget to make a hole with a straw at the top and bake according to the directions on the package. Sorry, I forgot to take pictures of this step.
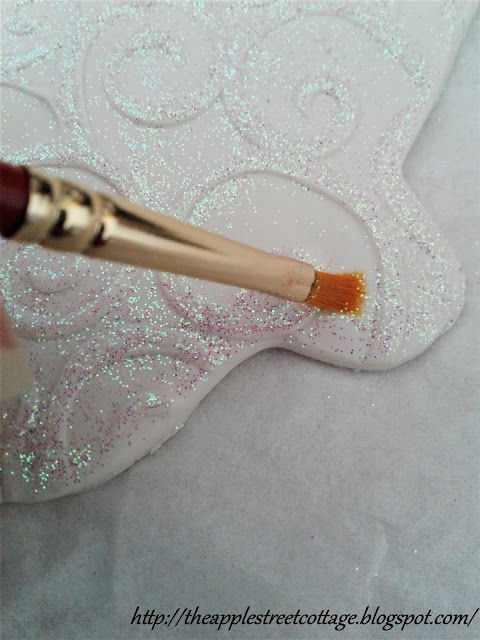
Once cooled, the raised design was traced with some glue and sprinkled with prisma glitter.
A glue pen would be perfect for this step, but sadly, mine was dried-up so I improvised!
When dry, a paint brush was used to remove the excess glitter.
A red ribbon was added for hanging and the ornament was done.
Here's a close-up of the glitter detail:
I may (or may not) have missed some stray glitter...LOL
I did not seal my ornament because I've heard mixed reviews on it. The most common complaint was the clear spray left it sticky.
This is an inexpensive project to make and most of the materials needed are things you have around the house: rolling pin, waxed paper, pencils, drinking straw, and ribbon. The clay was $1.98 and a container of prisma glitter is about $5 and you don't even use a dollar's worth of it. Honestly, the stuff lasts forever! So, for less than $3 you have a cute ornament to hang on your tree. Take a look at your cookie cutters - bells, trees, sleighs - SO many possibilities. This would also be a great summer project for the kids. Don't you agree?
It's also Ten on the 10th and you don't want to miss the projects that everyone else has prepared. All the links are listed below:
Featured at:


Ann this is such a cute ornament to place on a tree or give as a gift. Great tutorial. Thanks for sharing.
ReplyDeleteThanks, Terrie. There are lots of possibilities for ornaments like this - and they're so easy to make!
DeleteAnn this is a beautiful ornament. I can just see a tree full of them with beautiful colorful bows. The glitter added really made the design stand out. Great inspiration!
ReplyDeleteThanks, Tammy. I'm not usually a big fan of glitter, but it does put the finishing touch on the ornament.
DeleteCute idea...polymer clay is so much fun to work with! This would be adorable tied onto a package or a bottle of wine for the hostess!
ReplyDeleteI love those ideas, Patti! I may need to make more just to add to gifts.
DeleteYou created quite a lovely ornament, Ann! I love the way you embossed the bell and adding glitter was the icing on a fabulous project!
ReplyDeleteThank you, Gail. Embossing really is the way to go for these ornaments, and everyone needs a little glitter in their life, right? lol
DeleteSuch a cute idea, Ann!! This would be a fun idea to use with cookie cutters. The glitter is a perfect addition!!! Happy making more of them!
ReplyDeleteHugs,
Barb :)
Thanks, Barb. Cookie cutters give you so many options!
DeleteThis is so pretty and will look great on your Christmas tree.
ReplyDeleteThank you, Paula. Although, I think there will be glitter all over the house! lol
DeleteSo pretty Ann. Love it, Pinned
ReplyDeleteThank you, Cindy. I appreciate the pin!
DeleteAnn,
ReplyDeleteI have never worked with polymer clay but after seeing this cute project, I just may have to!! This is such a cute ornament!! Thanks for sharing and thanks so much for taking the time to stop by!!
Hugs,
Debbie
You should give it a try, Debbie. The possibilities are endless!
DeleteAnn,
ReplyDeleteHow many ornaments can you get out of the 2oz ploymer clay? Once dried, are the ornaments fragile like glass ornaments? Thanks for sharing and inspiring others with your DIY project. :)
It depends on the size of your cookie cutter. Mine was about 4" x 3.5" and I got one with a little left over for a small round ornament. The ornament is not fragile like glass at all. Since it's clay, it may break if dropped on a hard floor, though.
DeleteThank you so much for asking!
Thanks, Ann! I'm going to give this a try!
DeleteYou're welcome - have fun with it!
DeleteAnn,
DeleteI mentioned you in today's post crediting you for this idea and showing off a few of my test ornaments. ; ) Thanks for the inspiration!!
Thank you so much, Cathy. Please send me the link so I can read your post!
DeleteThat is so pretty. Thank you for sharing with us on the Classy Flamingos.
ReplyDeleteThank you, Linda. I'm happy to share!
DeleteWhat a cute ornament! Great project to do with the kids or grand kids! Thanks for sharing at Vintage Charm. xo Kathleen
ReplyDeleteThank you, Kathleen. Polymer clay really is a lot of fun!
DeleteWhat a lovely idea. I actually love glitter, so it is perfect :) We will feature your project in the next Blogger's Pit Stop.
ReplyDeleteKathleen
Glitter...you either love it or hate it! LOL Thank you so much for the feature
DeleteThis is so cute. I have that same embossing folder, so I'd love to try this. I've featured it at Thursday Favorite Things today. :)
ReplyDeleteI'll be checking to see what you make, Pam. Thank you so much for the feature!
DeleteWhat a great idea and I have this exact embossing folder ( along with a whole bunch of others). You've given me some wonderful inspiration and featuring when my link party opens.
ReplyDeleteI'm happy to have inspired you, Carol and thank you so much for the feature!
DeleteThis is so pretty. And so simple to recreate too. Thank you for sharing every week. #HomeMattersParty
ReplyDeleteThank you, Donna. Polymer clay is a lot of fun!
DeleteThis is awesome. I'm really going to try to make this one myself too! Did you mean you punched the hole using a straw or something else? I'm confused about "make a hole with a straw at the end", as if there's supposed to be a straw in your ornament somehow. (FYI: I'm blind so I can't see your pics.) Sorry if this is a dumb question.
ReplyDeleteThere is no such thing as a dumb question, Astrid. I used a straw to make a hole in the clay ornament for hanging. This was done before baking it...that's why I said not to forget. LOL
DeleteI'm so glad I've inspired you to make one!