The Chair Table
I know, the title is a bit odd, but that's exactly what I'm going to share with you today. This is a project I've wanted to try for a long time and thought it would be perfect for the debut of the 'Do It Over' Designers, a group of bloggers who love to recycle/upcycle/DIY. I'm thrilled to be hosting this blog hop and hope you'll visit everyone involved to see what they have to share with you. Their links will be listed at the end of this post.
On to the project..........................


On to the project..........................

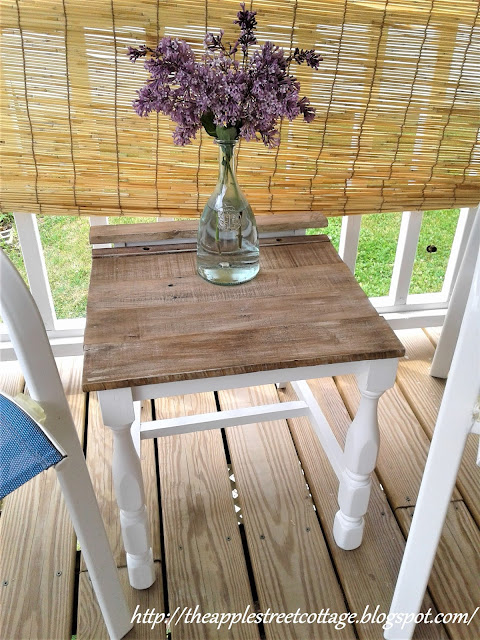
This little table came from very humble beginnings. It actually was a chair that was given to me and since it was free, it was perfect for trying this upcycle. This is how it looked when it arrived:

The first thing I did was remove the seat and cut off the back. Don't worry, I have plans for that too, but that's a post for another day.
Update: Take a look at the Chair Back Shelf.
I gave it a good cleaning with Murphy's Oil Soap, let it dry, and gave it a coat of primer and two coats of exterior latex paint.

Then I took a look at my wood stash. I grabbed enough pieces of pallet wood for the top and cut them to size, but there was just about an inch or so left. I also grabbed a piece of that drying rack I was given to finish it off, and a smaller piece of pallet wood for the top 'step'.

You may notice that the wood doesn't look quite like pallet wood right off the pallet. That's because I gave it my 'aged barnwood treatment'.
'Aged Barnwood Treatment' you ask? Here's how I do it:
'Aged Barnwood Treatment' you ask? Here's how I do it:
Aged Barnwood Treatment:
Sand your wood. I don't like it too smooth for this technique. Just make sure you won't get splinters!

Dry-brush some white paint on it. There is no right or wrong here - any white paint you have and as much/little as you want.

Let it dry.

Now get out your dark walnut stain and a rag.


Yes, this can has seen better days!
Dip the rag in the stain and stamp it off a bit on a piece of cardboard. Rub the stain into the wood.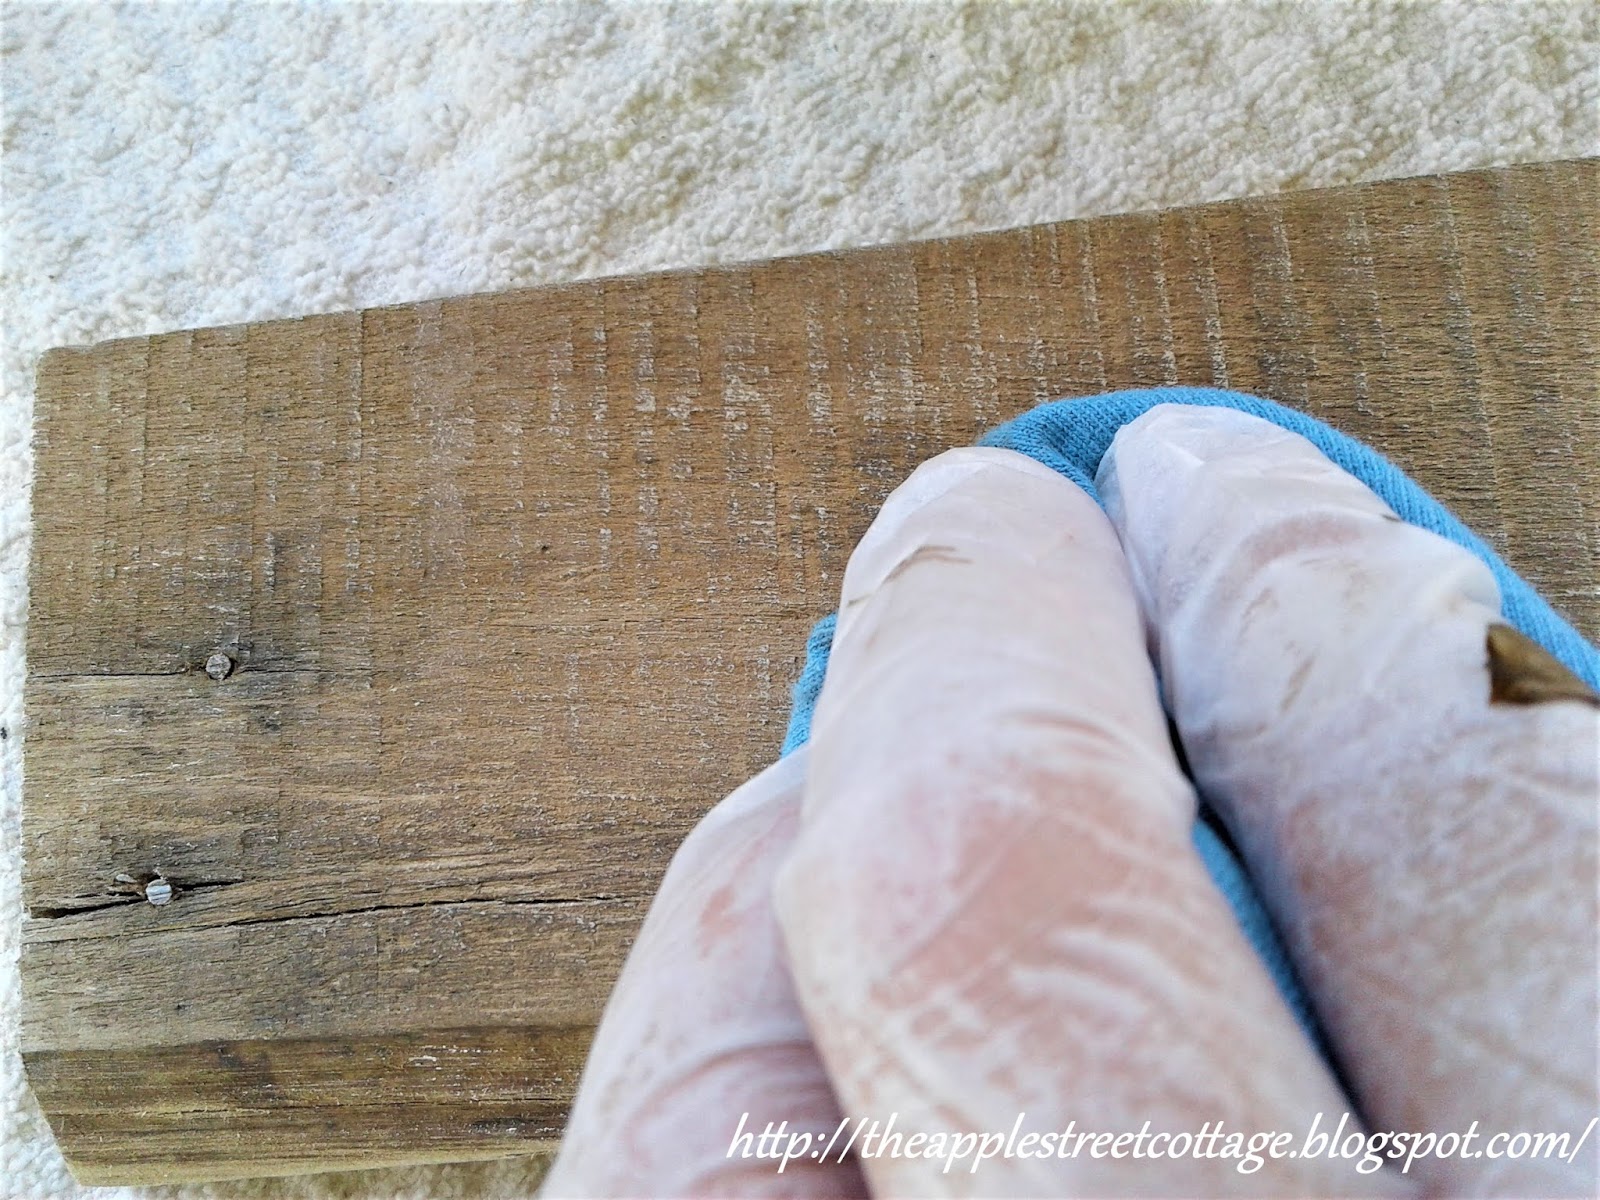
When you have the look you want, stop.

Keep in mind, there are a LOT of factors that come into play.....the type of wood, how it was cut, how much it was sanded, how much paint/stain you used, etc. Here are some close-ups of the wood on the table and the different looks I achieved:


There are a lot of variations, but it's a fun technique. I hope you'll give it a try!
Shall we get back to the table?
All of the pieces of wood were nailed to the chair base, along with that small piece for the top. Since this little table would live outside, the wood was sealed with 3 coats of polyurethane and it was done!

Time for a close-up:

We now have a sweet seating area on our back porch with a table that cost me nothing but a little labor.

I just love projects like that. Don't you?
It's time for more ideas:
Be sure to visit my friends to see what they've been busy upcycling/recycling/DIYing. Their links are all listed below:
Exquisitely Unremarkable


I hope you'll pin, share, comment, and follow. If you click on those 3 little lines at the top left of the blog (on the Home page), you'll see where to find me...or click on the icon below to share.
Featured at:


Absolutely adorable, Ann! The top is beautiful and looks perfect with those legs!
ReplyDeleteThank you, Kim...and I don't have to worry about it being outside!
DeleteVery clever. Love the technique you used on the table top!
ReplyDeleteThanks, Patti. I've been doing this for a few years now and it never disappoints me.
DeleteLove repurposing and upcycling! What a great use of an old chair and it looks great. Thanks for sharing and wonderful creating with you.
ReplyDeleteMe too, Chas! I've been wanting to try this for quite a while now, so when this chair showed up on my doorstep I knew it was time.
DeleteAnn this adorable, love it! Such a great way to upcycle and the look of the wood is perfect. I love dry brushing.
ReplyDeleteCindy
Dry brushing on pallet wood is great because you never know how it will turn out. Thanks, Cindy!
DeleteOh my goodness Ann, that is so cute!! And what a great pallet wood technique!
ReplyDeleteTania
Thanks, Tania. It's a fun technique and it never turns out exactly the same twice!
DeleteSo cute! The patina is perfect! I'm always afraid to use dark stain but you've inspired me:) Also love that bamboo shade. xo Kathleen
ReplyDeleteIt's really amazing what that dark stain does when combined with dry-brushed white paint. That's the west side of our porch and that shade is a life-saver in the afternoon!
DeleteYour table turned out so cute! Great idea!
ReplyDeleteThank you, I'm glad you like it and glad you stopped by!
DeleteThe transformation is stunning. It breaks my heart to "have to" dump any broken furniture. There's always 'Something' good that can come out of it !! (my motto)
ReplyDeleteMy name is Naush. I blog and diy at www.doodlebuddies.net
I would love to join the "Do it over designers" - please let me know if and how it is possible.
Your blog is full of inspiration !!
Naush
Thank you, Naush! I love saving furniture whenever I can. I will message you.
DeleteLove how you saved the chair and repurposed it to another piece you can use. Great idea for adding a backsplash where the cut off part was. You did good!
ReplyDeleteThanks, Terrie. A makeover like this has been on my list for a long time and I finally did it!
DeleteSuch a great upcycle project! I would love to have you come and join Centerpiece Wednesday Linky Party and share your idea with us.
ReplyDeletehttps://karinskottage.com/2020/07/centerpiece-wednesday-party-time.html
Karin
I'm glad you like it, Karin and I'd love to share it at Centerpiece Wednesday. Thank you for asking!
DeleteGreat upcycle!!! I love the pallet wood you added to make the table top. Thanks so much for sharing at the Snickerdoodle Create Bake Make Link Party!!!
ReplyDeleteI'm happy to share. Thank you for stopping by!
DeleteYour aged barn wood treatment really makes the wood look so pretty! Your table turned out great and I like the contrast of white with the wood top.
ReplyDeleteThank you Allyson. I love that this treatment gives wood a whole new look.
DeleteAnn,
ReplyDeleteWhat a great job of repurposing this hair into a table!!
Thanks so much for your visit!! We actually had a nice day with low humidity and a nice breeze so I took advantage of it and sat on the front porch and did some reading!! It was great to be able to spend some time outside!!
Hugs,
Debbie
Thank you Debbie. It sure was nice to have a day with lower humidity. I spent most of the day outdoors, too!
DeleteWhat a very clever makeover. well done I love it.
ReplyDeleteThank you, Anita. This was a fun makeover and gave me just what I needed for our porch.
DeleteThis is fabulous Ann. I'd love nothing more than to be able to pop across the pond and join you on that porch! I'd love to be able to have a natter and put my cup of tea on your sweet table (with a coaster of course!) This will be one of the features at Handmade Monday later today :-)
ReplyDeleteAnd I would love to have you here, Julie! We would have SO much to talk about. Thank you from the bottom of my heart for the feature!
Delete