Silverware Box to Office in a Box
To fully appreciate this post, you should go back to the original one where I shared the silverware box I found for $5. Did I mention it was full of silverware?? The post is HERE.
Let me give you a peek at the finished product and then I'll explain how I got there.


Let me give you a peek at the finished product and then I'll explain how I got there.

This silverware box was solid wood, but the finish was very orange and not to my liking.

I sanded off all of the old finish:

And used a red mahogany stain to bring out the beautiful grain.

A big improvement!
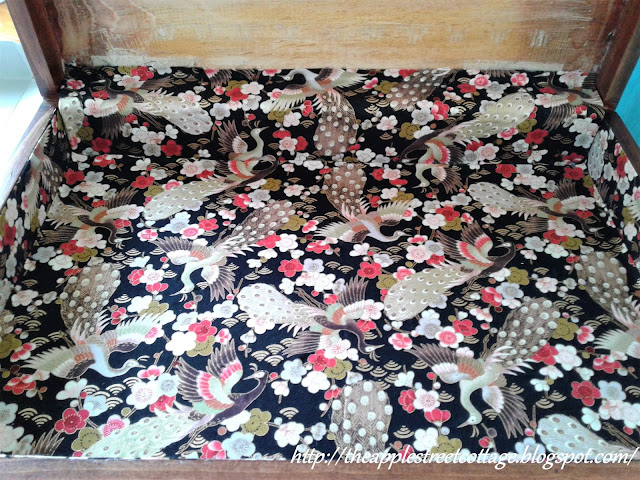
The inside looked like a typical silverware box:

Everything was torn out and the wood was sanded smooth.

The fabric was on sale for $2. The first thing I did was measure the perimeter of the bottom portion of the box and it's depth. I cut a strip of fabric to fit (plus a little extra) and folded over the edge. I used Alene's Tacky Glue to keep it in place.


I hope you'll pin, share, comment, and follow. If you click on those 3 little lines at the top left of the blog, you'll see where to find me...or click on the icon below to share.

Starting in the back, right corner, I began gluing the fabric in place.

You can see, I started with a little extra on the back and pressed the fabric into the corner. I also cut the strip of fabric wide enough so it rested on the bottom of the box. I continued gluing around the edge of the box, clipping the corners so the extra fabric would lay flat on the bottom of the box.

Prior to attaching the fabric on the edges, I cut another piece to fit over the back hinge between the top and bottom pieces.

It is not attached in this picture. After the edges were covered in fabric and glued, this piece was glued in place and the bottom of the box looked like this:

The next step was to measure the area of the bottom and cut a piece of fabric to fit. The edges were pressed under and glued. The glue was poured over the bottom.

It was spread with a scraper so that the entire surface was covered in glue.

The fabric was carefully place on one side of the box and rolled across the surface, smoothing it as I went. When it was done, it looked like this:

I wanted a spot for pens, pencils, etc., so I grabbed a piece of lattice wood, cut it to fit, and glued fabric on it.

It was glued in place on the right side of the box.
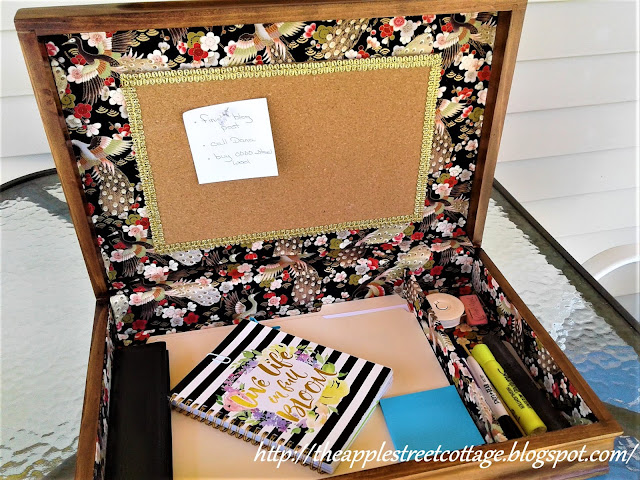
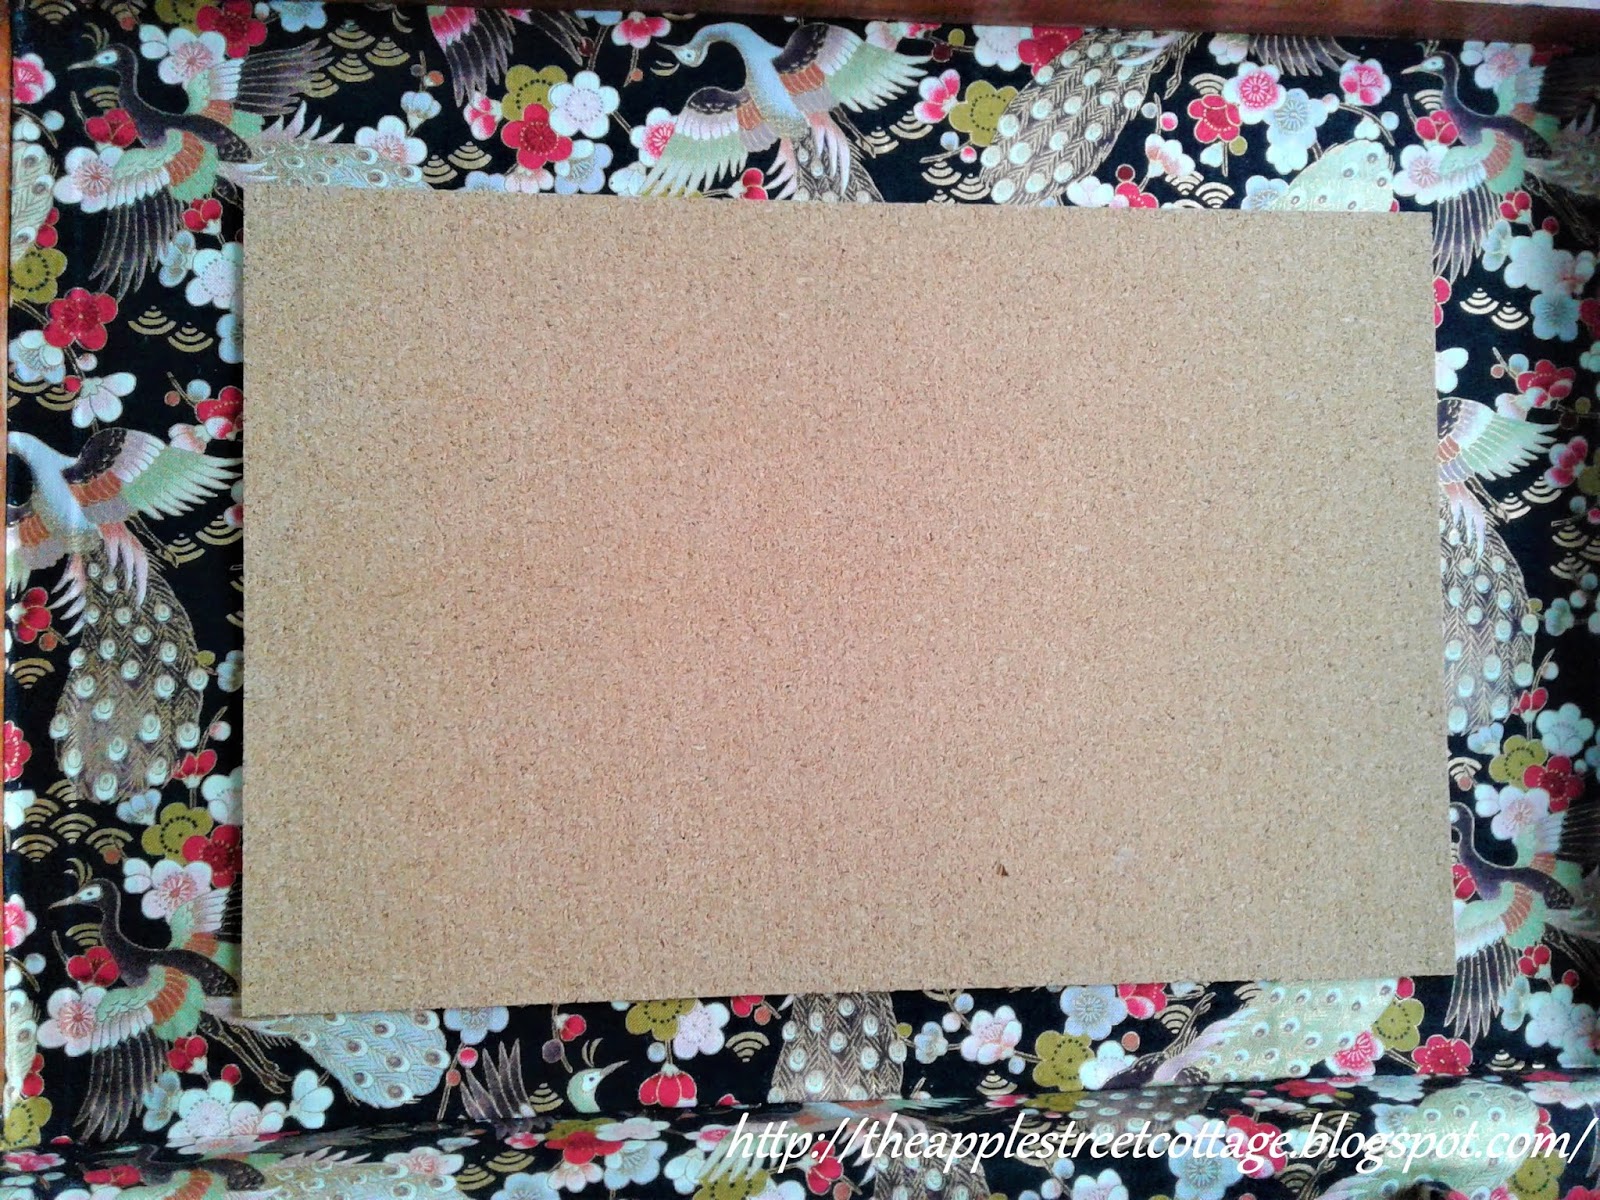
The top portion of the box was easier. The sides were not covered with the original felt, so they were sanded and stained. The center was covered in fabric using the same method used on the bottom. I also added an adhesive cork sheet to the center.
It was a little too plain, so I added some gold trim that matched the gold in the fabric.

The Office in a Box was done!

As you can see, it holds plenty of 'stuff'.

And, no, it doesn't normally look this neat and tidy!

If you're wondering why I need an Office in a Box, it's because I don't have a desk. My laptop sits on a table in my craft room and this is the perfect way for me to keep everything organized.
The total cost of this project was $8. The box was $5, the fabric, $2, and the adhesive cork sheet, $1. I already had the glue, gold trim, and lattice wood.
To see other Silverware Boxes, click these links:
The total cost of this project was $8. The box was $5, the fabric, $2, and the adhesive cork sheet, $1. I already had the glue, gold trim, and lattice wood.
To see other Silverware Boxes, click these links:
I hope you'll pin, share, comment, and follow. If you click on those 3 little lines at the top left of the blog, you'll see where to find me...or click on the icon below to share.


What a great transformation. Office in a box means if you go somewhere you can take your office with you. Love the idea of keeping everything nice and neat and in it's place. Happy Mother's day Ann!
ReplyDeleteThank you Terrie. Yes, it absolutely is portable!
DeleteWhat a clever project! This is a perfect idea to keep everything together and would even be great for a child! Love your choice of fabric and the professional way you adhered it!
ReplyDeleteIt would be great for a child! I love these boxes and always have my eye out for them.
DeleteOh wow! This looks so amazing. I can't believe you scored that (full of silverware) for only $5. That is the deal of the century. I just love how you transformed it. Great job!
ReplyDeleteThank you so much. I couldn't believe it was only $5 either. Guess what we use now instead of our old stainless???
DeleteLove this idea would be great for art supplies too.
ReplyDeleteI never thought of that, but it would be great for art supplies! Thanks for stopping by...
DeleteI really love this fabric and the usefulness of this project. So many possibilities too!
ReplyDeleteThank you, Jemma. The fabric jumped right out at me from the clearance bin!
DeleteThis is darling. I love the fabric.
ReplyDeleteThank you, Katie.....and it was on sale!!! I SO miss shopping for sales!
DeleteLove this idea, Ann!!! I have a silverware box that I have thought of painting the outside. I'd still keep it for holding silverware as my SIL bought at the base thriftshop there at RAF Molesworth, England, for my birthday one year. The box has just been scratched with moves, sitting in storage, live. ;)
ReplyDeleteThanks for the fun idea and I'm glad you have a little office now! It is nice to have a writing box and I had one from a store that began with a B......... It was perfect for writing from the couch, bed, wherever. Hope yours brings you lots of joy!!!
Hugs,
Barb :)
I'm always on the lookout for boxes now, since there are so many possibilities for them. Yours holds special meaning. I hope you take it out and enjoy it!
DeleteOh my! I actually have a silverware box somewhere hidden in my house. I need to find it now and copy this idea! It would be perfect to hold my desktop clutter. (Goodness knows I'm a mess.) Thank you so much for this wonderful project! *Hugs*
ReplyDeleteI'm so glad I've inspired you to find that box. The great thing about it is when you want to hide the clutter in it, you just close it! Thank you for stopping by....
DeleteYou are such a creative lady! I'm always in awe of your makeovers and I really love this one. Stay safe my friend!
ReplyDeleteYou are so sweet, Kim! Hope all is well with you!
DeleteWhat a super project, perfect for anyone who has to work from home, and of course everyone is right now. Love that you used things you already had...and it worked so well!
ReplyDeleteI didn't even think of it from the 'work from home' angle. Thank you Sandi!
DeleteThis looks great. It must have been a lot of work sanding off the old finish but it turned out so nice. Your fabric choice really take it up a notch and makes it look so elegant. Kathy
ReplyDeleteFortunately, my orbital sander made the job much easier. Thank you for stopping by, Kathy.
DeleteWhat a lovely upcycle, Ann! Thanks for sharing at Vintage Charm!
ReplyDeleteThank you so much. I'm working on another one right now with a different purpose...stay tuned!
DeleteThis is so creative!! I love this idea. And I can't believe how much it cost to make. Amazing!!
ReplyDeleteThank you, Michelle. I'm pretty pleased with the way it turned out!
DeleteThis is just lovely! I am soooo NOT crafty when it comes to things like this, but you have made me think about at least sanding and restaining this wooden box that came from my husband's grandmother. It's in the attic and I've been thinking it should serve a good purpose. Thanks for the idea:) I'm dropping over from Pandora's Box...please visit me sometimes at cherischatter.blogspot.com. Stay well and healthy:)
ReplyDeleteI'm so glad to get you thinking about that box! I'd love to see it when it's done. Thanks for stopping by and come back again soon! I will stop by shortly.
DeleteI have a silverware box just like this one! What a creative idea.
ReplyDeleteThanks for joining the Grace at Home party at Imparting Grace. I'm featuring you this week!
Thank you so much, Richella. I'm working on another one right now with a different purpose. Stay tuned!
DeleteThis is such a practical and pretty upcycle!
ReplyDeleteThank you!
Delete