It's a Picnic Basket
Welcome back to the 'Do It Over' Designers blog hop. We are a group of bloggers who love to recycle/upcycle/DIY. I'm happy to host this blog hop and I hope you'll visit everyone to see what they have to share with you. Their links will be listed at the end of this post.
Let's get the story started...
There it sat...at an Estate Sale...in a corner...

...with this label:

For that price it HAD to have a giant hole, right? So I turned it around, over, upside down.....nothing. OK, maybe a small chip or two, but nothing major.

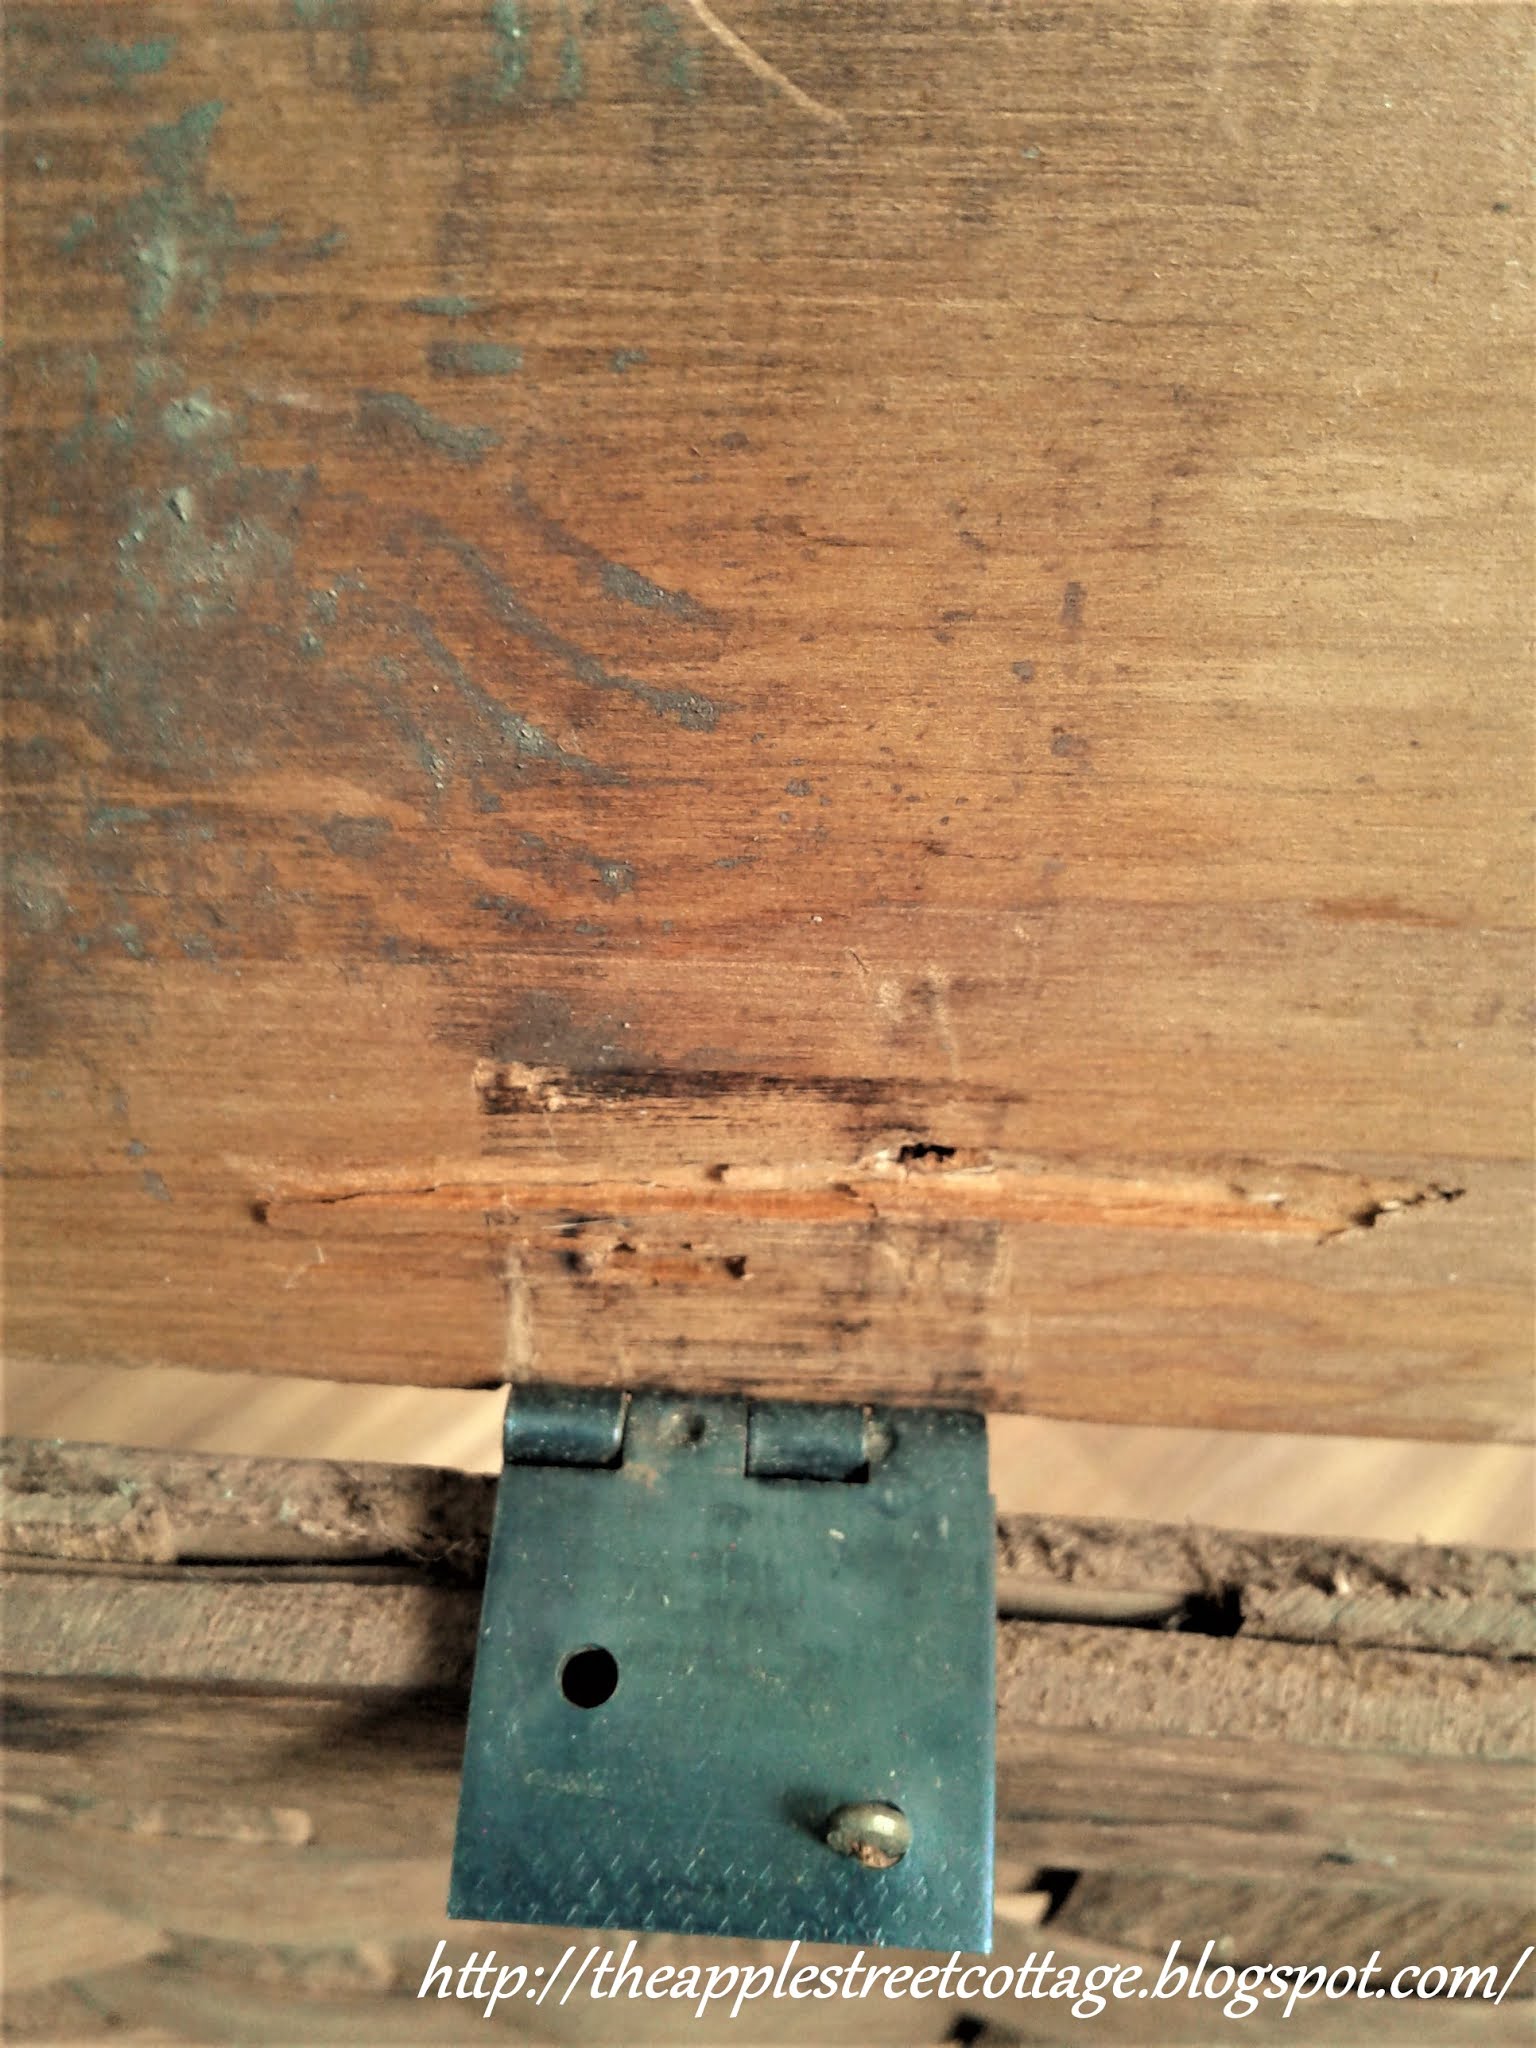
This was the most noticeable bit of damage.
Then I opened it up and there it was...
Let me back out and show you how I think it happened.

Footprints! Who steps on a picnic basket lid??
Clearly, someone did, but knowing that it was an easy fix, I brought it home, cleaned it with Murphy's Oil Soap and got to work. First, I removed the staples holding the elastic in place on the lid. It was pretty dirty.


When dry, they were sanded smooth.

While I was at it, I filled-in the area behind the hinge.

When everything was sanded and the hinge was reattached, I decided to paint both sides of the lid before applying fabric. Upon closer inspection, there was an oil stain that I really didn't want to deal with so I used spray primer to seal it in. There was a maker's stamp on the inside, so I created a sticker to go over it with contact paper so it could be preserved.

I glued the fabric on with Mod Podge, carefully wrapping it over the edges and trimming with scissors. Both the inside and outside of the lid were covered.

I cut a hole for the maker's stamp to show through:

After it was cut a small brush was used to apply Mod Podge under the edges.
Once everything was dry, Some trim was applied with a hot glue gun to hide the raw edge.

The same trim was applied to the edge of the lid.

And it was done!

The $3 picnic basket was clean, repaired, and pretty again.

So, what am I doing with it? Right now it stores some craft supplies, but it definitely has potential to be a picnic basket! 😉 Any other ideas?

As I mentioned, this is the 'Do It Over' Designers Blog Hop and there are some amazing projects! Be sure to click on the links below for inspiration.
I hope you'll pin, share, comment, and follow. If you click on those 3 little lines at the top left of the blog (on the Home page), you'll see where to find me...or click on the icon below to share.
Featured at:


That is just the sweetest basket and perfect for summer picnics, with its dainty floral trim. I'm always so inspired by your ability to see past the imperfections and find the beauty lying beneath instead. Thanks for hosting the hop and I hope you are feeling good today!
ReplyDeleteThank you so much, Kim. You know me - The more damaged and dirty, the more I like it! lol
DeleteFabulous Ann! And how wonderful that you saved the makers mark - such a wonderful touch! Maybe it's just me, but I'd use it in the bathroom to store toilet paper. I've been looking for a pretty way to store it AND keep the dust off and I think this could work :). I hope you're well on the road to recovery by now and feeling great again!
ReplyDeleteWhen I saw the mark was still there, I knew it had to be saved. Storage for tp is a great idea, Sara. Now I'll have to see how many rolls it will hold!
DeleteSo cute, and perfect for picnics, or just placing some faux flowers tucked into one side at part of a vignette. Magazines or a knitting project would make it functional.
ReplyDeleteThank you for hosting and inviting me to the hop!
Those are all wonderful ideas, Rachelle. It's my pleasure to host and I'm so glad you've joined us!
DeleteYour updated picnic basket is quite adorable and looks so dainty, Ann! I would partially prop the lid up and fill it with flowers!
ReplyDeleteThank you, Gail. Some blue hydrangeas might just be the perfect choice of flowers!
DeleteAnn this has to be the best basket I have every seen. I love how you went around the name on the bottom. Looks like a flower. Awesome job lady! Pinned!
ReplyDeleteIt was as fun and great hop! Love this talented group.
It certainly came a long way from the original condition. I really felt the maker's stamp had to be preserved....it's part of the story, and you know how I love a story!
DeleteI love this group, too. Thanks for being part of it!
Very pretty picnic basket upcycle, Ann! I love how you saved the maker's stamp too. It could be used for so many purposes but a pretty knitting/crochet basket came to mind right away.
ReplyDeleteIt would be perfect for knitting or crochet since it's large enough to hold the project you're working on too. Great idea, Marie!
DeleteHow pretty! I'm glad you rescued that basket.
ReplyDeleteTania
The price didn't leave me a choice! lol
DeleteWhat a fabulous makeover - I love that you didnt cover the maker of the basket and highlighted it with cute trim.....Now you need to go on a picnic and show it off!
ReplyDeleteThank you, Patti. Since we're finally having great weather, you're right. A picnic needs to be planned!
DeleteWhat a cute makeover. Most people would just walk away when they see this sort of damage. You did a great job, and the fabric is so pretty.
ReplyDeleteI seem to want things even more when they're damaged, Anita. I love the challenge of fixing and making them pretty and useful again!
DeleteWow! And I just sold one of those Putney VT baskets for $30 in our booth last month. ;) Great job!
ReplyDeleteWow! That would be a great profit margin for this basket! Thanks for stopping by.
DeleteWhat a great find and you made it over beautifully. I was happy to see that it was handmade in my second favorite state, beautiful Vermont.
ReplyDeleteThank you, Paula. Vermont is a beautiful state. I spent quite a bit of time there on Lake Champlain during my childhood.
DeleteOh my goodness, this is such a wonderful idea! We are in need of a new picnic basket but I’ll be looking for a “fixer upper” now. Thanks for the inspiration! Zenda
ReplyDeleteI'm so glad I've inspired you, Zenda. Good luck with your search!
DeleteI wouldn't have left it! You transformed it beautifully!
ReplyDeleteThank you, Maya. I originally thought I'd stencil it, but then I discovered that pesky oil stain. Sometimes Plan B is the best one!
DeleteWow, that is a gorgeous transformation! You did a great job.
ReplyDeleteThank you so much, Pam!
DeleteYou're welcome! Also, I'll be featuring it tomorrow at Thursday Favorite Things. Congrats!
DeleteThank you so much for the feature, Pam!
Deletelooks great Ann. Love the little daisy trim you used.
ReplyDeleteThank you, Terrie. It was the first one I picked up!
DeleteDelightful upcycle! So cute & practical.
ReplyDeleteThank you, Jennifer. I'm pretty pleased with how it turned out!
DeleteGreat upcycle. I especially enjoyed how you featured the original label with pretty trim. Great job.
ReplyDeleteThat label just touched my heart! Thank you.
DeleteLove little baskets like these - they are so versatile. What a nice little makeover!
ReplyDeleteThank you, Alexandra. I was so excited to find this one!
DeleteGorgeous upcycle! I love that daisy trim. Saving the maker's mark so nicely was awesome! In the last 1 1/2 years, I have collected 6 picnic baskets to use for storage rather than plastic totes. I love them.
ReplyDeleteLucky you, Kathy - 6 picnic baskets! I'm so glad you like what I did with this one.
DeleteI love what you did with this basket! And what a deal for 3 bucks! I'd like to invite you to share your creativity at the Sundays on Silverado link party, which is open now!
ReplyDeleteNiky @ The House on Silverado
Thank you, Niky. I'll stop by...
DeleteThis makes me want to go on a picnic!
ReplyDeleteIt's on my list of things to do!
DeleteWhat a lovely makeover, the way you covered and saved the makers mark is a wonderful touch. How nice to make something forlorn look so useful again.
ReplyDeleteThank you so much. I think that mark was my favorite part of the basket - well, almost!
DeleteYou gave it new life! Thank for the tips and inspiration.Thank you for sharing on Classy Flamingos blog party. You've been PINKED!
ReplyDeleteThank you so much, Linda. I'm thrilled!
DeleteI love this vintage picnic basket makeover.
ReplyDeleteHave a great day,
Kippi
Thank you so much, Kippi. I'm so glad you stopped by!
DeleteWow, what a difference, Ann! I love the fabric and trim you've chosen and that you took the time to preserve the maker's mark. From forlorn to fabulous! I hope you get to take it out for a real picnic! Thanks for sharing with us at Creatively Crafty #ccbg :)
ReplyDeleteThank you, Lydia. I'm looking forward to picnic season!
DeleteBeautiful makeover. I glad you decided to save it. #HomeMattersParty
ReplyDeleteThank you, Donna. I am too!
Delete