Winter Scene Light Box
Welcome back! I've titled this project the Winter Scene Light Box because I don't know what else to call it.
 Remember that Estate Sale I went to a few weeks ago?
4 times?
Yeah, that's the one!
Well, I found this treasure peeking out from under the bed. The scene inside was broken in two pieces with the yellow building on it's side, and I could hear smaller pieces rattling around inside. I HAD to have it, so it went in the box of goodies I got for $20. If you haven't read that post, you really should. It was a little crazy - and did I mention I went 4 times?? Anyway, I digress...
The first order of business was to get inside of it. The back was held on by one screw at the bottom and finishing nails on the other 3 sides.

First the screw came out, allowing the bottom portion to slide down and out.

The wiring and lightbulb were revealed, along with those pieces I could here rattling around.

The three finishing nails were removed and the rest of the back slid out revealing this:

Things were now getting interesting. The sides were painted light blue and the entire scene was backed with a curved piece of plastic. It was loose on one side, so a swung it over to expose the buildings that looked like they were made of plaster.

The scene was in two pieces and lifted right off of the platform they were sitting on, revealing the trees, painted on a piece of plastic (or celluloid?)


It was repair time and some of the loose pieces were required:

I started with the painted window and light post.

It fit right in and this is how it looked when I turned it around:

The piece of loose snow was critical to this repair.

I was concerned that this piece was too damaged to put back in, but after a little playing, it went in nicely.

You can see the piece right under the lamp post and toys sign. It isn't perfect, but considering the condition, I was pleased just to have the missing piece.
It was time to turn my attention to the outside of the box. The wood had some nicks and scratches, so I taped off the glass and gave the whole thing 3 coats of tung oil.

Here's a peek at the top. I have no idea what that slot is for...maybe a title for the scene? I just don't know.

It certainly needed a little TLC. Here it is after the tung oil:

I was very careful cleaning the glass because I had to go between the trees and the glass. The trees were attached to the side with some very old glue.


Looking much better!
It was time to reassemble. The plaster scene itself was reglued with super glue.
The bottom was missing several of the plaster 'dots' and, at first I thought they needed to be glued on again.

As I looked at it and the platform it rested on, it occurred to me that those plaster dots were poured from underneath, after the plaster scene was place on the platform as a way to keep it in place. Since I couldn't repour them, I smoothed the bottom so the entire scene would sit flat on the platform. I spread some E6000 on the platform and set the scene on it. To help it set, I clipped the edges with clothespins.


btw....There's that little piece of acetate that was reattached for the windows!
The rest of the box was reassembled and it was time to turn on the light. In case you're wondering, no, I didn't test it before I bought it, but I did when I got home. I turned the switch and nothing happened! Once the back was off, I saw that the bulb was loose. I tightened it and it immediately lit up...WHEW!
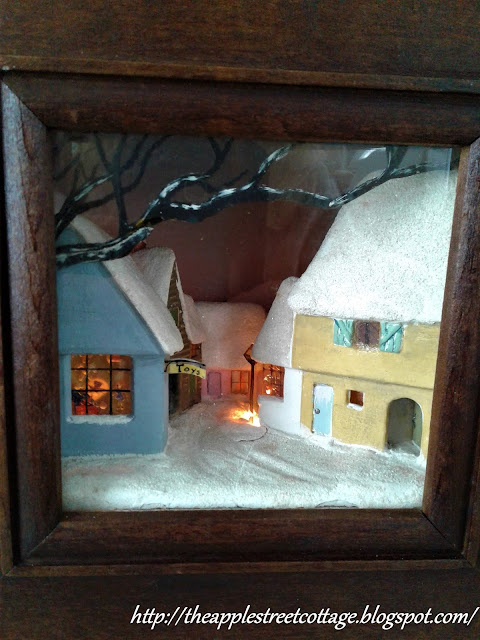
Here are a few close-ups of the scene:

I love the details in the Toy Store window.

A child waving at the door.
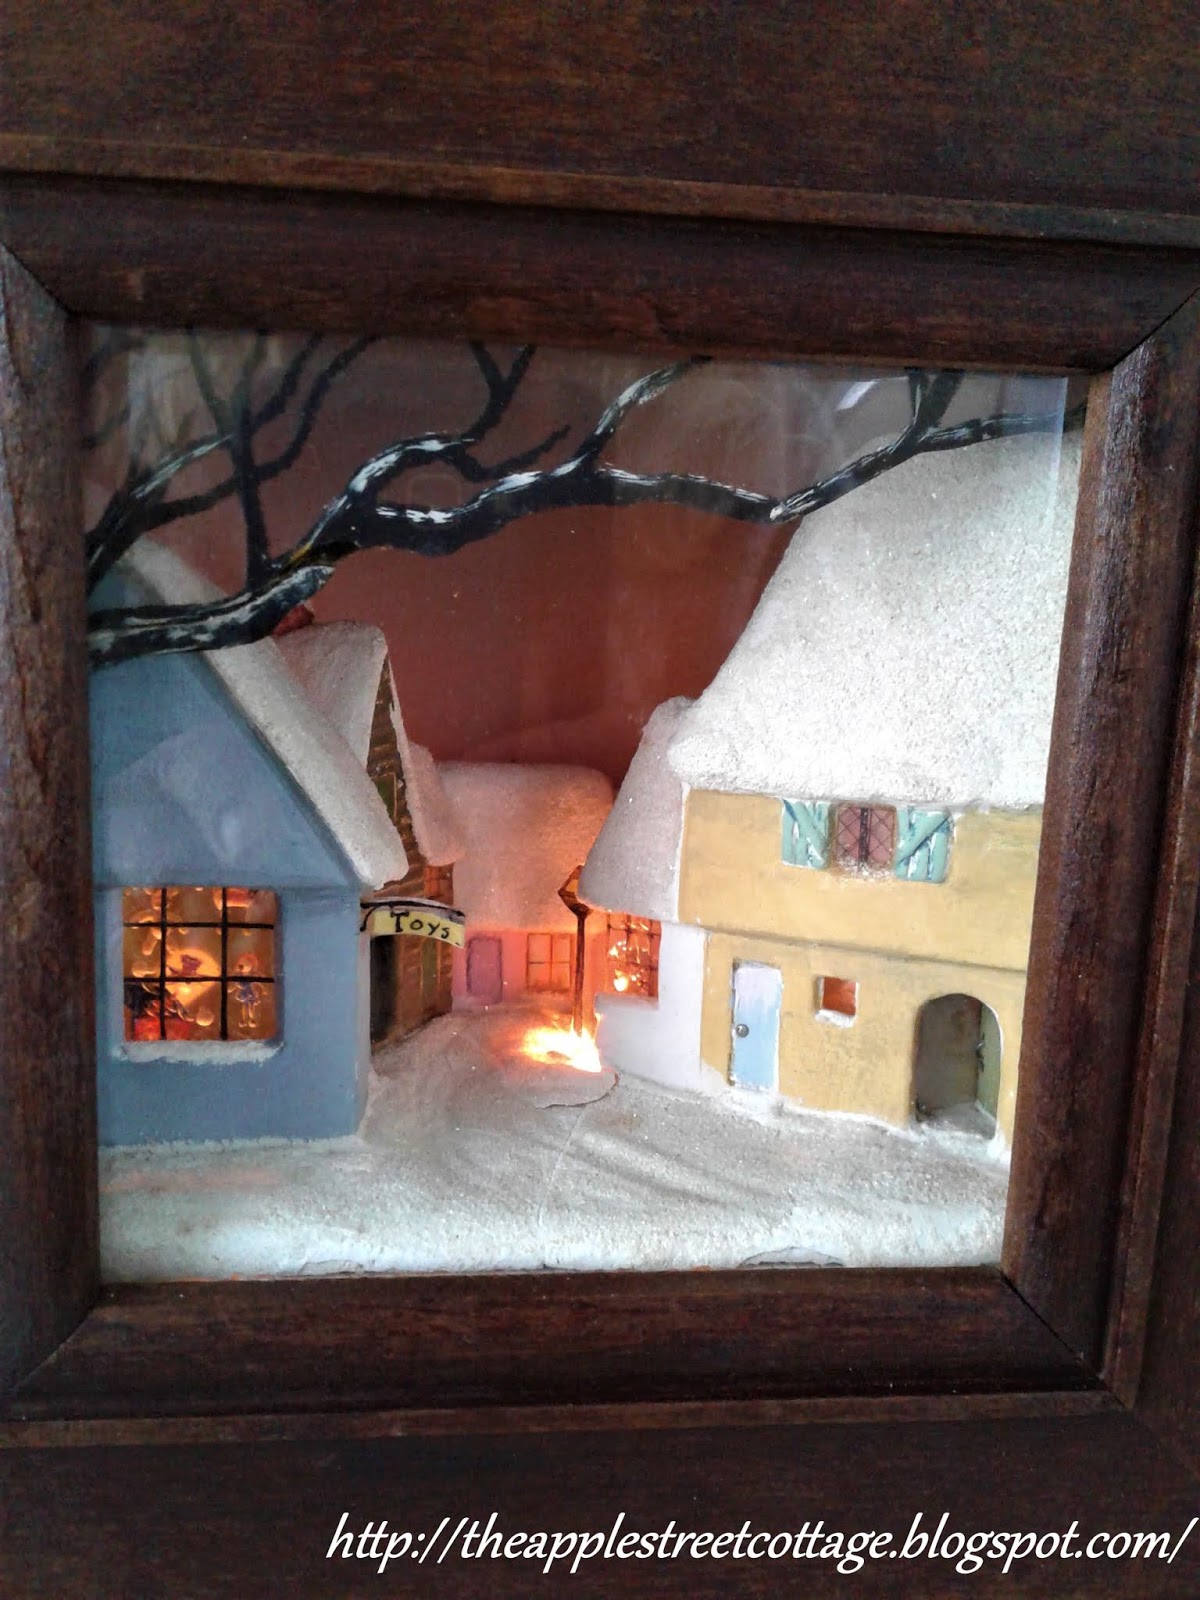
By far, this is one of the most unique things I've ever found at an estate sale and I'm thrilled I was able to put it back together. It sits on a table at the top of my stairs so it's the first thing you see as you go up.
I know nothing about this piece. Have you ever seen one? Please tell me your thoughts in the comments, I'd love to learn more about it.
Featured at:
To Grandma's House We Go!

Little Cottage Link Party

I hope you'll pin, share, comment, and follow. If you click on those 3 little lines at the top left of the blog, you'll see where to find me...or click on the icon below to share.
To Grandma's House We Go!

Little Cottage Link Party


This is beautiful!!! You did an amazing job repairing this piece. What a lucky find!
ReplyDeleteThank you, Michelle. It really is unique and I wish I knew more about it. I'm so glad you stopped by!
DeleteThis is amazing, Ann! I am so impressed. It's darling.
ReplyDeleteThank you, Kim. I've never seen anything like it...that's why I HAD to have it!
DeleteYou are amazingly clever and patient! This is such a treasure!
ReplyDeleteYou are so sweet, Beth. Patience is not one of my virtues, but when it comes to repairing/restoring old things, I take it in steps.
DeleteThank you so much for stopping by!
You did a lovely job repairing this piece. I have been known to put a new layer of glitter over everything to camouflage repaired cracks! I wonder if that "bank slot" was to let heat from the light bulb to escape.
ReplyDeleteI thought about adding extra glitter, Kathy, but decided to keep it 'as is' since it tells part of the story. As for the bank slot, it only goes down about 1/8". I'm thinking some sort of title??
DeleteWhat an amazing job putting it back together. You may consider it a steal for that amount but sadly there aren't too many people willing to put the time into restoring something like this. All too often it would end up in a trash pile. Congrats for saving such a beautiful piece. You have a real gift.
ReplyDeleteHow sweet of you to say this. I love old things and, if I can, I enjoy bringing them back from ruins. Thank you so much for stopping by!
DeleteThis is amazing. I just love it and now I am wondering how I can make one. It's so precious. The painting detail on the windows is gorgeous and charming.
ReplyDeleteThank you Katie. I've never seen anything like it and was hoping someone might know something about it, but so far, no. Maybe it was handmade by someone and that's why there's no information about it...the search will continue!
DeleteOh my gosh, I just love this and how it turned out. What a unique find and it's stunning. Pinned and thanks for sharing with To Grandma' House We Go, I'll be featuring you next week!
ReplyDeleteThank you, Chas. I really love it too and I'm so pleased that you will be featuring it!
DeleteVery cute, Ann! Thanks for sharing at Vintage Charm!
ReplyDeleteThank you, Cecelia. I think it's one of a kind and I'm so glad I found it!
Delete