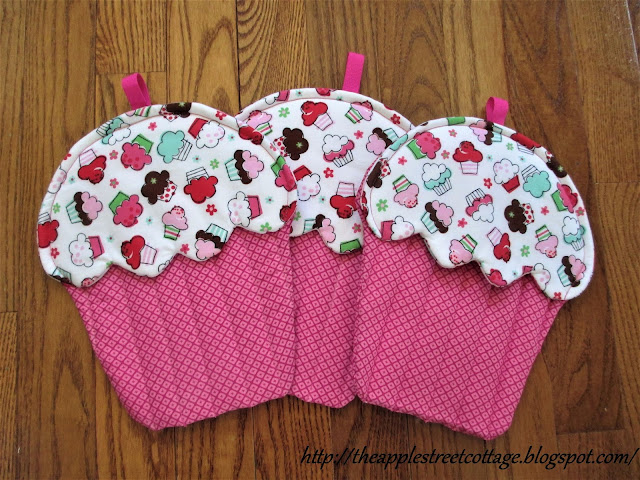
Cupcake Potholder Tutorial
If you're like me, potholders take a beating in the kitchen. They end up stained, burned, and looking pretty humble after a while. That's the state mine were in, so I bought some fabric and got busy. WARNING: This post has LOTS of pictures!


The patterns have been in my stash for a while, but in addition, here are the things you'll need: contrasting fabric, matching thread, cotton batting, Insul-Bright, pencil, chalk, scissors, sewing machine, ribbon (optional).


Start by placing your patterns on the wrong side of the fabric and trace with a pencil.


You will now layer the pieces in this order: one piece of batting, one piece of Insulbrite, and the two pieces of fabric with right sides together.

At this point, you are going to cut an opening in the top piece of fabric only. This will be for 'turning' after you sew the pieces together.

Do this for the cupcake base and the top. Next, pin your layers together and sew along the pencil lines.

Sorry for switching back and forth from the base to the top with pictures, but I'm trying not to overload the post with pics!
Next, trim close to your stitching with scissors:

Here's the top sewn and trimmed:

Using the opening that you cut, turn each piece right-side-out.


After turning each piece, I took them over to the ironing board and pressed them.
I'm sure, at this point, you're wondering about those cuts you made and what to do about them. You're going to hand-sew them closed. Don't worry about being neat because they will be hidden when the two pieces are put together. Take a look:


Now it's time to topstitch the cupcake base. I started in the middle and made lines one-inch apart with chalk.

Pin a piece of ribbon on the cupcake base for hanging.

Place the top over that, matching the edges (remember to place the two hand-stitched openings facing each other). Pin and sew the two together.

Don't forget to take the pin out that was holding the ribbon in place!
Your potholder is done! There are so many looks you can get with this potholder. I went with a fun, playful look with this one, but I think they'd be elegant with a toile or floral fabric. If you don't have a pattern, you can follow these instructions with a square and a rectangle.
The pattern came from here: https://www.susiecshore.com/
***It has come to my attention that this link no longer works. I guess she went out of business. My apologies.***
Featured at:
Featuring You @ Mix It Up Monday
Beautifully Made

Wonderful Wednesday
Featured at:
Featuring You @ Mix It Up Monday
Beautifully Made

Wonderful Wednesday


Very cute and easy tutorial! Would be great for a cupcake-themed gift basket.
ReplyDeleteI agree, perfect for a cupcake-themed basket! Thank you for stopping by the Cottage, Victoria. Come back again soon!
DeleteAnn
So cute! Thanks for sharing your pattern!
ReplyDeleteHappy to share, Roseann. Thanks for stopping by, come back again soon!
Deletewhere is it i can find the pattern please?
Deletehttps://www.susiecshore.com/ Sorry it took so long, Beth. I had to find the paperwork!
DeleteGot it thank uou
DeleteGood Morning,
ReplyDeleteyour potholders are just great and above all, they make me think of delicious muffins right away.
Have a nice day and best regards the Nähbegeisterte
You're right, Nahbegeisterte, they make me hungry too! Thanks for stopping by the Cottage and have a great week!
DeleteSuch great and practical idea!
ReplyDelete#handmademonday
Thank you, Caroline. These were made out of desperation...my old ones were embarrassing!
DeleteI'm so glad you stopped by - come back again soon!
Is there a print version of the pattern? This is so cute. Looks like fun to make but I couldn’t find the pattern to print
DeleteThe pattern came from here: https://www.susiecshore.com/
DeleteThis is very cute!! Thank you for the tutorial.
ReplyDeleteThank you so much...Happy sewing!
DeleteThese are so darn cute, and the tutorial seems like something I can do. Thanks so much for sharing!
ReplyDeleteI KNOW you can do it, Lisa! Thanks for stopping by...
DeleteYou did a great job making the pot holder. Thanks for sharing this tutorial at our Cooking and Crafting with J & J.
ReplyDeleteThank you, Julie. Happy to share!
DeleteThese pot holders are adorable. They would be fun to use in the kitchen, and make a great gift for the cupcake lover. Thanks for sharing on Sunday's Best.
ReplyDeleteThank you, Rhonda. It's always a pleasure to share at your link party!
DeleteThose are just darling! And I love the trick to turning without having to close up any side openings! :) Lisa
ReplyDeleteCan I tell you a secret? The original instructions said to leave an opening at the side for turning...and it looked TERRIBLE! I just couldn't get it smooth, so I did it MY way! LOL
DeleteThanks for stopping by the Cottage, Lisa.
These are just so cute, what great house warming gifts they would make.
ReplyDeleteGreat idea. Thanks, Julie!
DeleteSo super cute! Thanks for sharing on To Grandma's House We Go!
ReplyDeleteThanks, Chas...happy to share!
DeleteThose are adorable!
ReplyDeleteThank you, Christine...so glad you stopped by!
DeleteThese are adorable! Really so cute! Thank you for sharing on Merry Monday! Hope to see ya next week!
ReplyDeleteKim
Thank you, Kim, happy to share and I will see you next week!
DeleteThat's a fun idea! Great for gifts all seasons! What are dimensions of your pattern?
ReplyDeleteThank you, Becky. The base is 9 1/4" high X 8 1/4" wide at the top and 5" at the bottom. The top is 8 1/4" wide X 5 1/4" high.
DeleteMay I ask the length of the ribbon please?
DeleteOf course! I cut it at 5 inches and folded it in half.
DeleteThese are so cute, Ann. I love the fabric you chose and the sweet cupcake shape! Thanks for sharing at Vintage Charm!
ReplyDeleteThank you, Cecelia...happy to share!
DeleteWhat a CUTE pot holder! I love that it forms a little pocket for your fingers! -Marci @ Stone Cottage Adventures
ReplyDeleteThank you, Marci. Having experienced burned fingers, it's one of my favorite features!
DeleteSo glad you stopped by the Cottage - come back again soon!
These are SO CUTE! Thanks for sharing with Party in Your PJs!
ReplyDeleteThank you, Lynda - happy to share!
DeleteThank you so much...Happy sewing!
ReplyDeleteYou're very welcome. Enjoy!
DeleteThanks for the tutorial. A friend gave me this pattern, but the directions were missing. Your tutorial helped to fill in the "missing links." My friend loved her new oven mitt!
ReplyDeleteI'm so glad I was able to help, Judy!
DeleteYour oven mitt is adorable - love the fabric and I'm so glad I was able to help with directions. Thanks for the tip about closing the opening - great idea
DeleteI love the cupcake potholder but I don’t see the pattern. Can you send it to me by way of email? Thanks! Patti..........craftpal878@gmail.com
DeleteThe pattern came from here: https://www.susiecshore.com/
DeleteOh! It's so sweet! I fell in love with this work!
ReplyDeleteThank you so much!
DeleteAnn, thank you so much for the tutorial! I once had the pattern ??? Fortunately I made a freezer paper copy of the two pieces, but I made so many years ago, and also had meningitis 3 years ago, which caused memory loss, that I had no idea how to put together! I was thrilled to come across! Thank you again from an 81 year old quilter, who hasn’t sewn since being so sick. My granddaughter asked me to make a couple for my great-grand-girls, and of course I am tickled to oblige! (I had made her one when she was in pharmacy school and she still uses!). Did not intend to be so long-winded! lol 🤦🏼♀️. Sew on, my dear Ann! 🩷
ReplyDeleteI'm so happy you found my tutorial and are ready to sew again! Glad you're feeling better and I'm sure your great-grand-girls will love their new potholders!
Delete