How to Make a Wine Bottle Torch
This post may contain affiliate links.
It's Summertime and that means more outdoor time. I've been busy using my bottle cutter to make some 'pretties' for our balcony. I'm an avid Upcycler/Recycler/DIYer and this is an easy one. Come along and let me show you what I did!
Blue is my color. I wear it, I decorate with it, and I'm always drawn to it. How lucky am I to find a wine that comes in a beautiful blue bottle?
This is the larger (1.5L) bottle. Definitely one to be shared with friends!
After drinking the wine and removing the label, it's time to get out the bottle cutter. This is the one I use:
I've had it for a few years and now that I've figured out the trick to clean breaks I can honestly say it's the best!
The first step to bottle cutting is etching a line where you want the bottle to break or separate. After adjusting the cutter (it's very easy) for where you want the cut, it's a simple as rotating the bottle on the cutting wheel.
When you're done, this is what you'll see on your bottle.
It's time to separate the bottle along that etched line and there are LOTS of methods recommended...almost boiling water, ice water, etc. For the most part, they never worked for me. I ended up with something like this:
Not good. Not good at all!
It's time for The Apple Street Cottage Method:
First, put on safety goggles. You're working with glass and you only get one set of eyes! I've never had a bottle shatter/spray glass while doing this, but, better safe than sorry!
After etching your bottle, put it in the refrigerator for 15-20 minutes. When it's nice and cold, take it out and start rotating the etched line over a candle flame.
Do this for a few minutes and then place the bottle in a bowl of ice water. You will need to repeat these last two steps a few times before the bottle will separate.
One way to tell if the process is working is to listen. While rotating it over the flame, you will hear little 'tink' noises. I'm sure that's not a real technical term, but that's what it sounds like to me!
Now that you have a bottle in two pieces with a nice clean edge, it's time to sand it since it is very sharp. You can use polishing powder, but I just used the sandpaper that came with the cutter.
Now let's 'bird-walk' and talk about old springs. While removing the upholstery on an older rocker, I discovered these springs.
As soon as I saw them, I had a plan. So I got to work removing them from the main metal pieces.
After straightening them and cutting off the long tails, they were ready for this project!
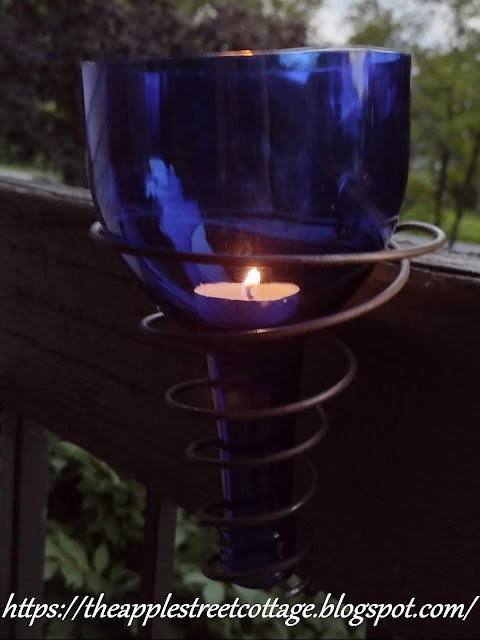
The top of the bottle slid right inside the spring.
It doesn't get any easier than that!
Off to the balcony where a hook was waiting...
Add a tealight and you have some beautiful patio/balcony lighting!
To help with any pesky mosquitoes, add some citronella tealights!
These could hang on a railing, a wall, or mount a few on a wall or latticework.
What do you think?
If you're wondering what I did with the rest of the bottle, I turned it into a beautiful blue vase for some summer flowers!
Now, if you'll excuse me, I'm off to cut more bottles....but be sure to come back on the 22nd of this month when I'll be sharing another bottle project. It's the 'Do It Over' Designers Hop and we are 'doing over' all things Glass. You don't want to miss it!
Featured at:


Wonderfully and beautiful. Very creative.
ReplyDeleteI visited you via the Linkup Party at "Anything Goes" Pink Saturday - July 1, 2023
My entries this week = 23+24 as I would love to invite you to come and share your posts and you will have an opportunity to get featured.
We're open Monday through Saturday every week.
You will find the linkup information (1) In the Top bar under Blogging: Weekly Senior Salon Pit Stop OR 2nd image In the sidebar
We hope to meet you there virtually.
DeleteThank you so much. I'll be sure to stop by!
Sorry to trouble you again but I am busy designing and creating an access database of IG and FB links and handles as you share your links with SSPS.
DeleteIf you have an account please let me know your IG and FB information then I can add and easily tag you when you're in the top 5 and I promote your post. Feel free to email me at esme@esmesalon.com or in the comments
Sent you an email!
DeleteWhat a great idea. This is lovely.
ReplyDeleteVisiting today from Unlimited Linky 118 #90&91
Thank you so much!
DeleteMy dad used to do this but now I'm wondering why? I have no idea what he did with the cut bottles....#YourMoment
ReplyDeleteNow I'm wondering, too! Time for a little research?
DeleteI haven't cut glass in years! Cute idea!
ReplyDeleteThanks, Patti. I'm on a roll with it now!
DeleteThose are beautiful! I love the way they turned out!
ReplyDeleteThank you!
DeleteAnn, these are just so beautiful. The color of the bottles is just beautiful and I can't believe how perfectly you get those cuts. I bow down to your craftiness!!
ReplyDeleteThank you, Kim. You know how I love blue!
DeleteI love using colored bottles outside in different ways. They catch the sun so nicely.
ReplyDeleteThey sure do!
DeleteAnn, Love this project! Thank you for the details. I'll be adding this great project to my summer project list.
ReplyDeleteI'm so happy to have inspired you!
DeleteThey look great! Nicely explained, thanks so much for sharing with SSPS #268!
ReplyDeleteThank you, Melynda!
DeleteI use to make wind chimes but I used my sink for ice water and had my canning pot on stove - your method of refrigerating and candle flame is so much easier. I’m ready to make your candles now. Thanks
ReplyDeleteI did the same thing. This is SO much easier!
DeleteSuch a great project. i love this idea, so pretty and pratcical. I am happy to feature your wine bottle torch at love Your Creativity.
ReplyDeleteThank you so much, Linda!
DeleteThat turned out lovely!
ReplyDeleteThank you so much, Joanne!
DeleteAnn this is so creative and such a wonderful idea! Thank you for sharing at my weekly link party! I'm happy to be featuring you this week!
ReplyDeletehttps://www.ourtinynest.com/2023/07/12/weekly-link-party-356/
Thank you so much, Nicolle!
DeleteLove these Ann! I'll be featuring them on tomorrow's Crafty Creators. Thanks for sharing, & I hope to see you there!
ReplyDeleteThank you so much, Niki. I'll be sure to stop by!
Delete