Now It's a Jewelry Box!
Yes, my friends I have another silverware box to share with you. This one is a bit smaller than the others (10" x 10") which means a new repurpose. Due to it's smaller size, I thought it would make the perfect jewelry box! What do you think?

Clearly, it didn't start out this pretty so let's talk about how it began. It was a small box containing some random stainless flatware.

It wasn't anything special and I bought it for a dollar.

Upon closer inspection, I discovered it wasn't even real wood.

There was the thinnest layer of veneer on the top and after two swipes with sandpaper, I went right through it.

Paint was the choice for this box. I painted it a light green and stenciled a design on the top.

I know it looks gray. No matter how hard I tried, I couldn't get the true color.
But the magical part was the interior. I lined the interior of this box the same way I did the other two. If you would like details on that process, you can visit Silverware Box to Office in a Box and The Peacock Office in a Box.
This box involved more sections, a place for rings, and hooks for necklaces. The sections involved a little more measuring, cutting, covering, and gluing. This is how I configured it using lattice wood, fabric, and tacky glue:
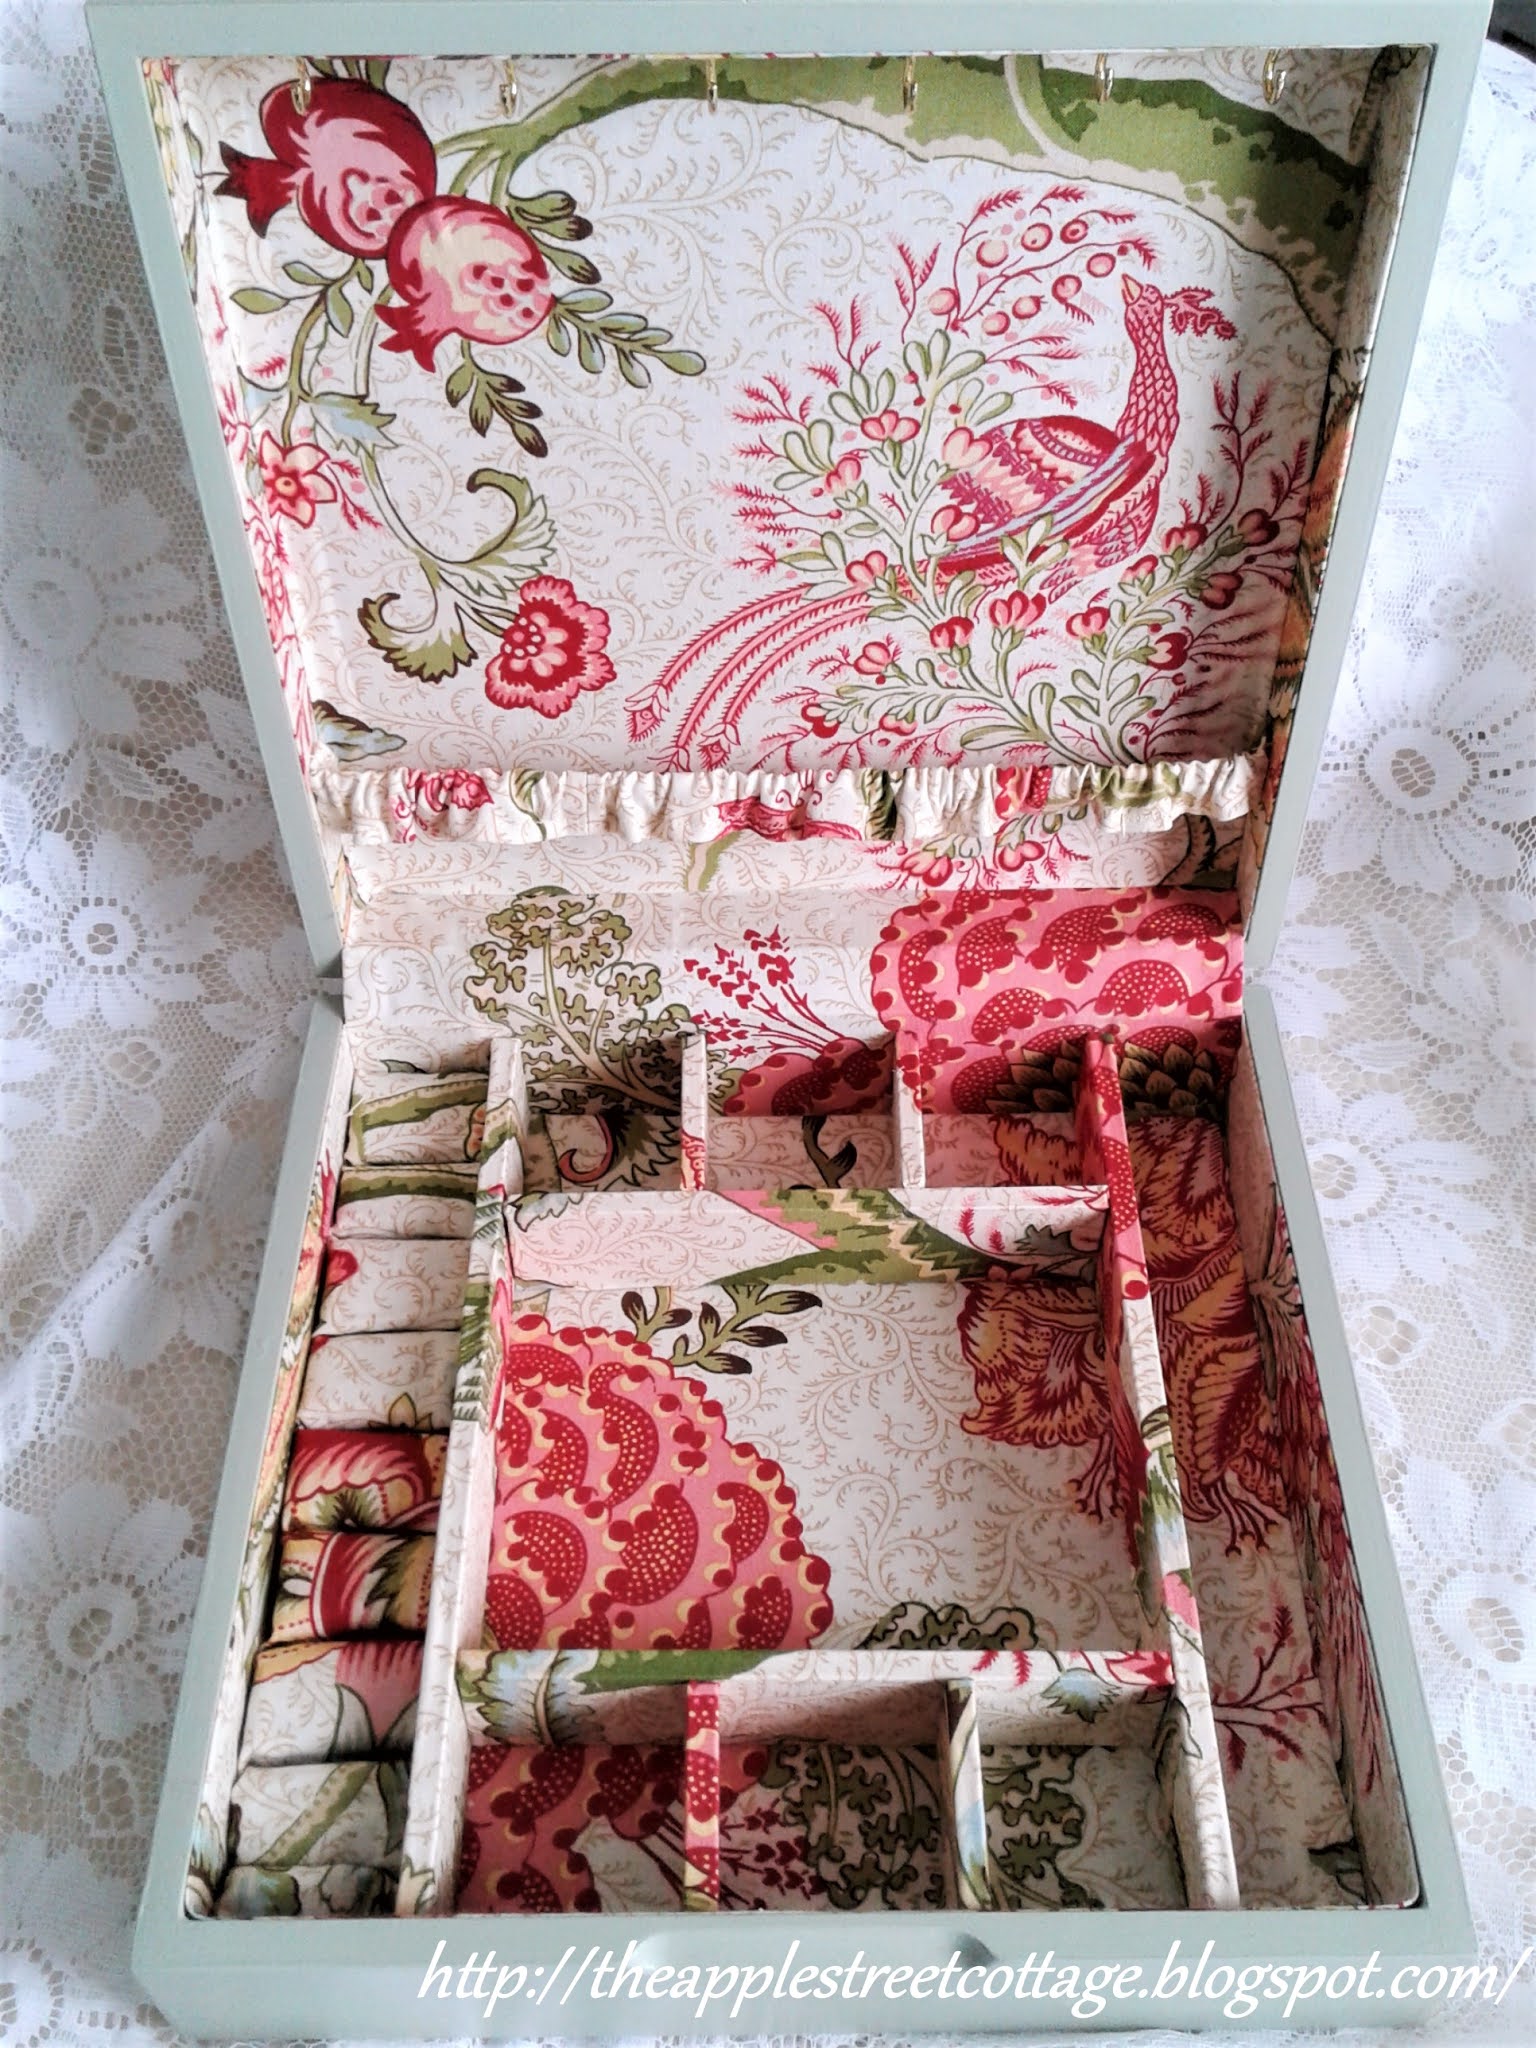
The base had a place for earrings, bracelets, and rings. After laying out the grid for everything, I grabbed a piece of foam for rings. I measured the space for it and cut it to length. Then I made several cuts for the rings.

Then I cut a length of fabric to go over it. A tip: Fit your fabric into each cut first. Then cut the fabric. You'll need more than you think! I added glue into each cut:

And fit the fabric into the cuts.

When the entire piece of foam was covered it was glued in place on the left side of the box.
Next came the hooks for necklaces. I couldn't get them started by hand so I thought I'd start a hole with a small drill bit. Guess what? The drill wouldn't fit in the space! So I got creative.

That's right, I used a push pin to start the hole. The hooks went in easy as pie!

That part was done in no time at all!

Since the necklaces would be hanging from the lids, something was needed to hold them in place. I cut a length of elastic and covered it with fabric. It was attached to either side of the box with small nails.

Here's a close-up of how it works:

The only thing left to do was add jewelry.

I can add a few pair of earrings in each of the small sections, and there's plenty of room for bracelets and rings. You may want configure your box differently to fit your needs and the jewelry you own.
So don't pass-up that silverware box the next time you're out thrifting. It has lots of potential!
To see other silverware box upcycles, click these links:
I hope you'll pin, share, comment, and follow. If you click on those 3 little lines at the top left of the blog (on the Home page), you'll see where to find me...or click on the icon below to share.
Featured at:


this is beautiful - well done!
ReplyDeleteThank you, Patti. I'm pretty pleased with it!
DeleteWow, this is just lovely. I adore the colors in the fabric and the creative way you've upcycled it.
ReplyDeleteThank you, Kim. I fell in love with the fabric as soon as I saw it!
DeleteI have an old jewelry box that I would love to re-cover the insides of...hmm...
ReplyDeleteI hope I've inspired you, Gina!
DeleteWow, great makeover! The fabric you used is so pretty.
ReplyDeleteThank you, Allyson. The fabric is my favorite part!
DeleteThis is beautiful! I live the fabric too.
ReplyDeleteThank you, Cindy. I wish I could find more of it!
DeleteWhat a great idea. Beautiful job on your jewelry box!
ReplyDeleteThank you, Debbie. I'm glad you like it!
DeleteWhat a magnificent transformation Ann! I love it!
ReplyDeleteThank you so much, Maya. I'm pretty excited about this upcycle!
DeleteThat is so beautiful and a wonderful transformation! I love the fabric you chose.
ReplyDeleteThank you, Pam. The inside really is the best part!
DeleteWow, you did such an amazing job on the interior of this flatware box! The fabric is so pretty too. I'm definitely referring to your tutorial for a box I want to add dividers inside, so thank you. 😀
ReplyDeleteThank you, Marie. It's easier than you think!
DeleteWhat an excellent tutorial...I'm really tired of seeing the next 'new' thing that is 'IN' bought through some promotional Ad on blogs. Loving seeing someone utilizing what would end up in the dump.
ReplyDeleteGorgeous and so applicable with any style!
Thank you so much, Sandi. I tend to be a bit 'out of the box' and love to save old things!
DeleteThat is a beautifully done repurposing! I love the colors and patterns you chose!
ReplyDeleteComing to you from Creatively Crafty Link party! Have a lovely day!
Thank you so much. It's nice to hear others like it as much as I do!
DeleteLove the fabric! Amazing re-purpose :)
ReplyDeleteThank you, Debbi. I'm so glad you like it!
DeleteSuch a beautiful job with all the little details!
ReplyDeleteThank you, Donna. It was fun to make!
DeleteJust lovely - I've enjoyed all your box transformations - the fabric always takes it to the next level.
ReplyDeleteThank you so much, Leanne. You are correct - the fabric is the key!
DeleteYou did an amazing job on this project Ann. It really does look fabulous ♥
ReplyDeleteThank you for sharing your box transformation at Create, Bake, Grow & Gather this week. I'm delighted to be featuring your jewellery box at tomorrow's party and pinning too.
Hugs,
Kerryanne
Thank you, Kerryanne. I'm so pleased that the jewelry box is being featured!
DeleteWow, this is amazing work Ann! Thank you for sharing this little gem at the FWF link party.
ReplyDeleteRR
Thank you, Rachelle. It's one of my favorite upcycles!
Delete