Linen Closet Update
I was so happy to find a nice, large linen closet in the new house, but I wasn't happy to find that the shelves were made of rough plywood. The simple solution? Peel & Stick floor tiles. Off I went to the local builders supply store for a box of tiles that cost about $20.


Here's what the closet looked like before starting this project...keep in mind these are photos taken inside a closet!

After wiping them down, I started laying the tile in front, mostly because I didn't want any 'piecing' to show and, seriously, who looks in the back of your closets/cabinets??


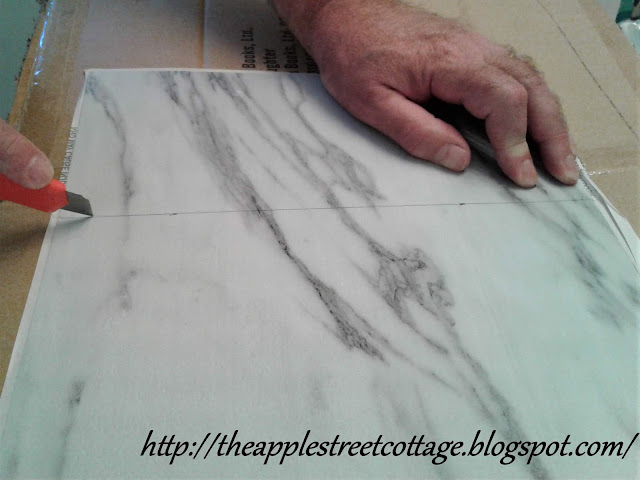
Then it was time to measure and cut a piece to fit in the back:

In the interest of full-disclosure, I have to tell you that my husband did most of the measuring and cutting. He's faster than I am and we were still moving in!
As you can see, on the right, we only needed part of a tile, so we measured the width and cut the tiles with a utility knife.

Notice there's cardboard under the tile? Be sure to protect the workspace!

Before you knew it, the shelves were done. Thanks to my speedy husband!

We finished three 30-inch deep shelves in about an hour, in spite of the fact that this is an old house where nothing is square. That's right, even though we measured carefully, we still had to trim some of the tiles with scissors to get them to fit. Oh, the joys of old houses!

I had 2 reasons for choosing floor tiles to finish the shelves:
1. The shelves were rough and I didn't want to spend time sanding and smoothing them enough for something like contact paper.
2. Peel & stick floor tiles are very durable. If something spills or leaks on one of the shelves it can easily be wiped up. In fact, they're so durable, I used them to cover the cabinets under all of the sinks - remember easy clean-up!

I still have some extra tiles in the box that I'm sure I'll find a use (maybe another bar? You can see that project HERE). Till then, the heatwave finally broke yesterday, now I can get back to my list of other projects!
Thank you for stopping by - have a great week!
I hope you'll pin, share, comment, and follow. If you click on those 3 little lines at the top right of the blog, you'll see where to find me!
Featured at:


It looks great! I used those same tiles in one of my bathrooms and underneath my kitchen sink!
ReplyDeleteTania
Thanks, Tania...Great minds think alike!
DeleteLooks amazing! Those tiles are so pretty
ReplyDeleteThank you, and the price was right!
DeleteSo much better than contact paper! Looks great! 😍
ReplyDeleteThank you, Lorin!
DeleteWhat a pretty update! Thanks for sharing at Vintage Charm!
ReplyDeleteThank you. Happy to share!
Deleteit looks great, I might do that under my sink - I think I have a box of those tiles. The blog/comment glitch was fixed weeks ago. You have to go to your dashboard, and email and delete your email address. Save. Then re-enter the address and save again. You'll then get a message asking if you want to receive the emails, click the link and you're done.
ReplyDeleteThank you, Wendy. I love the fact that they can be wiped off easily if anything spills! Thanks for letting me know about the glitch being fixed. I had heard something about that and then someone said it wasn't working. I'll give it a try!
DeleteWhat a great idea! I have some kitchen pantry shelves that need re-sanding and painting, but this looks like a much better idea!
ReplyDeleteGlad you like it, Donna. It's a lot less work than sanding and painting!
DeleteWhat a great idea! Such easy cleanup when something spills! Thanks for sharing at The Blogger's Pit Stop! Roseann from This Autoimmune Life
ReplyDeleteThank you, Roseann. I'm all about the easy cleanup! So glad you stopped by!
DeleteGreat idea and so much better than contact paper! Thank you for sharing.
ReplyDeleteThank you, Carol. The tiles are easier to work with, too!
DeleteYou just solved my closet problem. I must buy these tiles. I may cover my entire ugly closet in the back bathroom , think that will work on the whole inside closet?
ReplyDeleteI'm so glad I inspired you! As far as covering the entire closet, it might just work! Good luck!
DeleteThis is a great idea Ann! I just picked up a rubber liner, but I am using this idea for under our sinks! This will be perfect to cover the spot where the contractor cut into the cabinet and left a large hole. Grr, but this is perfect, thank you for the ideas and tips!
ReplyDeleteIt worked great for me, Cara. I also used them under the sinks - easy clean-up if anything spills!
Delete