Posts

My Vintage Coat

Image
Last summer, while digging around some antique/vintage shops, I came upon this coat.  Honestly, I am not usually a 'Vintage Clothes Gal', but this coat spoke to me.  I slipped it on and fell in love. My husband took one look and said, "Buy it".  Eighteen dollars (that's right, $18) later, the coat was mine. This pic was taken on a hot August afternoon! It's from the 1950's and it's is great shape: That's the arm - not a tear in sight! It's wool and very warm. I did a quick search of this company.  They started in the 1950's in New Jersey. I bought a pair of dark brown leather gloves to match.  Yes, I paid more for the gloves that I did for the coat! The coat has been worn many times this winter and I can tell you, it's very warm!  Short and sweet this week, my friends.  I hope you enjoyed hearing about my 'Vintage Find'.  Thanks for stopping by and have a wonderful week! 

It's Still Winter...

Image
...so the snowman stays! I made this guy last fall.  I drew a pattern on paper, traced it on the pallet wood, and cut it out. Here's a close-up: After sanding the pallets, I screwed a piece of wood across the back to hold it together.  The hat was painted and a thin piece of wood was attached with Liquid Nails for the brim and more stability.  The rest of the snowman was painted and distressed with my palm sander.   The final touches: painting a face and adding a red burlap scarf. The snowman was done! I'm keeping him on my side porch, where he's not exposed to the weather.  The red burlap might 'bleed' and I don't want to re-paint! I plan to put a piece of burlap outside for a test. If it 'bleeds' I'll have to find a new scarf.   I'll let you know what happens. I'm so glad you stopped by.  Please be sure to share, pin, follow, etc.  I love having new friends at the Cottage! Linking to: Saturday Shuffle...

Cabinet Do-Over

Image
My daughter makes and sells her own nail polish.  As you can imagine, she has a LOT of nail polish bottles.  For over a year, we've been talking about some sort of rack/cabinet to hold all of those bottles.  I spent some time 'trolling' her Pinterest boards to see what she liked and, low and behold, I found a little cabinet at a yard sale that need ed a do-over.  Here's what I did: This little beauty started out off-white with a plastic window and knob.   Cute, but not the look I was going for... As I 'trolled' my daughter's Pinterest boards, I noticed she liked 'distressed-black'. So, I got to work.  The first thing to do was remove all the hardware and that plastic window.  The window was hot-glued in and I thought I would have to heat-up the glue.  My husband gave it a little push and it popped right out!  Problem solved! I gave the entire cabinet 2 coats of black chalk paint.  The hardest part was getting all the no...

Rope-Handle Pallet Box

Image
The holidays are over and it's a brand new year.  We've been rather busy with some big news here at the Cottage.  In a few weeks I'll be able to share, but for now, let me share another project that was a Christmas gift. I made this box for my daughter's boyfriend.  After making the wrench-handled one (see that one HERE ), I decided it was time to use some rope.  I'm starting to run low on pallet wood, so I've been using up my scraps...man, am I glad I saved them - they're perfect for the ends! After cutting all the pieces and adding the paint/stain finish, I drilled holes in the ends for the rope.  This is the easiest handle since all you have to do is tie a knot! For Christmas, I filled it with some favorite 'goodies' and a gift card.   There are so many ways to use these boxes:  Gift-giving, table centerpieces, flower boxes, mail collector, the list goes on and on.   I still have a few more scraps waiting for me, along with a ...

Christmas at the Cottage

Image
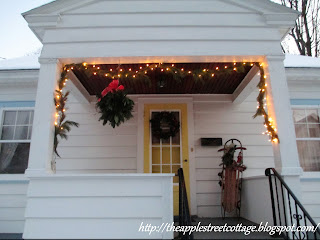
It's been a busy couple of weeks at the Cottage - we'll talk about that in a later post, but, for now, here are a few pics of our holiday decorations: Keeping it simple with a wreath, sled, pine-bough swag, and a handmade kissing ball. Lenox Santa Cookie Jar Charlie Brown Tree - my favorite! This bowl is always displayed at Christmas. The dining room in non-traditional colors. Ornaments that bring back so many memories! It wouldn't be Christmas without (at least) one pig decoration! There is so much more, but, for now, Merry Christmas from our house to yours! Linking to: Make It Pretty Monday Creative Spark To Grandma's House We Go Home & Garden Thursday Shabbilicious Friday Vintage Charm Craft Frenzy Friday What To Do Weekends

The Wreath My Daughter Made

Image
OK, I might have helped a little... 😉 We spent Thanksgiving at our daughter's house this year and she always wants to try to do one 'crafty project' while we're together. This year, she wanted to make an ornament wreath, and if you ask me, she 'knocked it out of the park'. We headed out to the discount store and chose these ornaments: Let me give you one word of advice.  Take the time to remove the caps from your ornaments and hot-glue them back on .  I made an ornament wreath a few years ago and left out that important step. Many of the ornaments fell off and I had to re-make the wreath. Save yourself some trouble! Take a wire hanger and bend it into a circle - here's how we started: Then open up the top of the hanger and you're ready to start adding ornaments. Let give you 2 more tips.   First, when you hot-glue the caps on the ornaments, wear rubber gloves.  Many people don't have finger caps for protection and, belie...

Santa Claus Is Coming To Town

Image
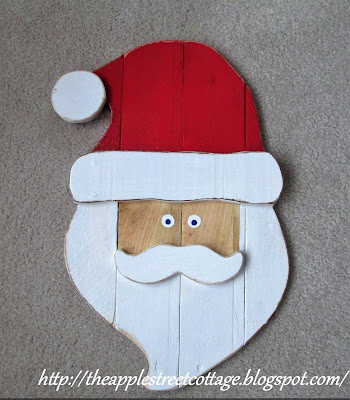
Of course he is, it's December!  The jigsaw has been getting a workout creating Christmas goodies and today I want to show you Santa. I am loving my pallet wood and things you can make with it.  I wanted a Santa so I started searching on Pinterest for ideas.  After looking at several options, I created a pattern (using the various ideas) to create my own original design.  I wanted the main piece to be 4 boards wide and I wanted to fit 2 of them on the full-length of the board.  Does that make sense?  Since my pallet wood is about 40" long, I made each Santa 19" in height. Here are the pattern pieces I drew on newsprint: After tracing them on the wood with a marker, the jigsaw got to work: You'll notice I chose 2 lighter-colored boards for the center pieces. That way I didn't have to paint Santa's face.  After sanding to smooth the wood,  I used super glue to attach the 4 main pieces and finishing nails to give it more support.   ...