Posts

Fall & the Improved Pallet Boxes

Image
Back again with the computer problems behind me...it was a little crazy, but everything seems to be settling down...Whew! Today I'm sharing the start of my Fall decorating and an update to those pallet boxes I made in July.  Click HERE for a peek at those! I chose one of them for my dining room table and as you can see, I added some lettering: Here's a closer look: On another box, I did something different: This one is currently being used in my Craft Room, but that's a story for another day! I tried a few methods to transfer the lettering.  First, the back was colored with pencil and I tried to transfer the letters - no luck.  Then I tried chalk - no luck again.  It just wouldn't transfer on the wood, so this is what I did: I partially cut out the lettering with an exacto knife and carefully painted in the partial letters, then I free-handed the rest.  It worked! If I had to make 20 of them, this may not be the most efficient method...

Last Gasp of Summer

Image
Fall has officially arrived, but I picked this hydrangea the other day, right before I started decorating the front porch with mums! This is not going to be my typical post since I've had major computer issues for the past several days.  My laptop decided it would be fun to freeze every page I tried to load.  Fortunately, I have tech-savvy husband who got right to work on it.  Long story short, he had to take it back to 'factory'.  I saved most of the important stuff on the cloud, and was able to save a lot more before the computer was wiped.  Now, I'm in the process of getting everything back to the way I like it.  My biggest issue is getting Pinterest to load properly.  It started right before things started to freeze and it still isn't right.  Whenever I open it,  the page starts to load, but as I scroll down, the pins start to form a single line down the right side.  It's so frustrating!  Is anyone else having issues...

Here, Kitty, Kitty....

Image
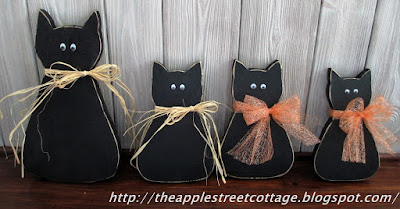
The jigsaw has been getting a workout.  Last week I shared the Pallet Pumpkins and this week, it's Black Cats! I love Fall and I'm not really into scary Halloween decorations, so these little cuties are right up my alley.  I had the wood sitting in a pile, so, the first thing I did was draw myself a pattern. As you can see, I thought the bottom should be a little broader, so I had to add pieces to the original pattern.  After that was done, I placed it on a piece of wood and traced it with a marker. Out came the clamp and the jigsaw. Once the cat was completely cut out, everything was sanded and it looked like this: Now, came the easy part: paint, distress, embellish.  As you can see from the first picture, I made 3 different sizes and dressed up some wtih raffia and others with tulle ribbon.  I can't decide which is cuter! Which one do you like better? I'm really enjoying my jigsaw and before you know it, I'll be sharing some Christm...

Pumpkin Time!

Image
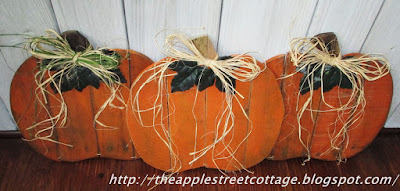
It's September and that means Fall is here or just around the corner. Since I still have a good bit of pallet wood to play with,  I decided pumpkins were next on the list.  I layed down 4 pieces of wood and was able to fit 3 pumpkins on them. I don't have a tutorial this time, since the pattern came from  Her Tool Belt .  - Great Site! I made a few minor changes from the one on Amy's blog.  First, I didn't cut out leaves.  I don't have a scroll saw and I like my fingers!  I wired each piece together from the front to the back so the wire is smooth on the front.  She used a paint layering technique, I just used orange paint, distressed the pieces, and rubbed a little dark stain over them. A couple of leaves from an old garland were glued on and a raffia bow was tied around the stem.  Pumpkins complete! Now, if you take a close look at the center pumpkin, you'll see that I painted and distressed it, no stain.  I like variety! ...

Wicker Telephone Table & My Husband Is A Decorator

Image
I saw this telephone table on a fb yard sale site.  The sale was starting the next morning at 9:00 and someone had already asked about it (even though the post said, "No questions, just show up").  I figured this person would be an early bird, so I moved on. The next morning found me still thinking about it.  It was already past 8:30 and it was a half-hour drive to this yard sale. We hopped in the car. I figured if it was meant to be, it would still be there and, if I didn't go, I'd be kicking myself.   We got there about 9:15 and it was still there....in all of its pink-sparkly glory! Even the fabric on the cushion was sparkly.  Yikes! I practically ran over to it (my husband told me to slow down!) and snapped it up for $30.  It's 2-pieces, so it slid easily into our car.  I was doing the Happy Dance!  Here's a look from another angle: Those pink sparkles were not my style, so I grabbed a few cans of Blue Ocean Breeze spray pai...

Jewelry Organizer Revisited

Image
Today we're taking a look back at a project I completed last year.   This jewelry organizer started out as a key rack: Anyone remember these? The full story can be found HERE .   This was an easy makeover and I'm pretty sure you'll be on the look-out for an old key rack now! Have a wonderful week, my friends - be sure to share, pin, and comment...I LOVE comments! Featured at: Party In Your PJs Linking to: Snickerdoodle Sunday Happiness is Homemade Small Victories Sunday DIY - Pleasure of the Northwest That DIY Party Inspire Me Monday Amaze Me Monday Over the Moon Merry Monday Motivational Monday Inspire Me Tuesday Dishing It & Digging It Make It Pretty Monday Two Uses Tuesday Party InYour PJs Creative Spark Home & Garden Thursday Idea Box Shabbilicious Friday Handmade Hangout Sweet Inspiration Friday Favorites Best of the Weekend Saturday Shuffle

New Craft Cabinet

Image
I'm in the process of moving my Craft Room from the basement to the spare bedroom.  In addition, I'm downsizing and purging the "stuff" I really don't need or use anymore.  It's quite a task! In order to help with the process I bought an unfinished cabinet to store the "stuff" I want to keep.  Naturally I remembered to take a 'before' picture when I got to this part: Yep, doors, drawers, & hardware, all removed!  What can I say? So, I found a pic online: I used that beautiful Peacock chalk paint that I talked about in The Ugly Duckling post . Since this cabinet was bare wood, I read that it should be given a coat of shellac or primer.  Since there was no shellac in the house, I used primer, which raised the grain of the wood.  For a brief moment, I thought about sanding it with 220, but decided against it. This is chalk paint, after all! Two coats of Peacock Chalk Paint and the color was gorgeous. There were ...