Upcycled Mail Sorter
This post may contain affiliate links.
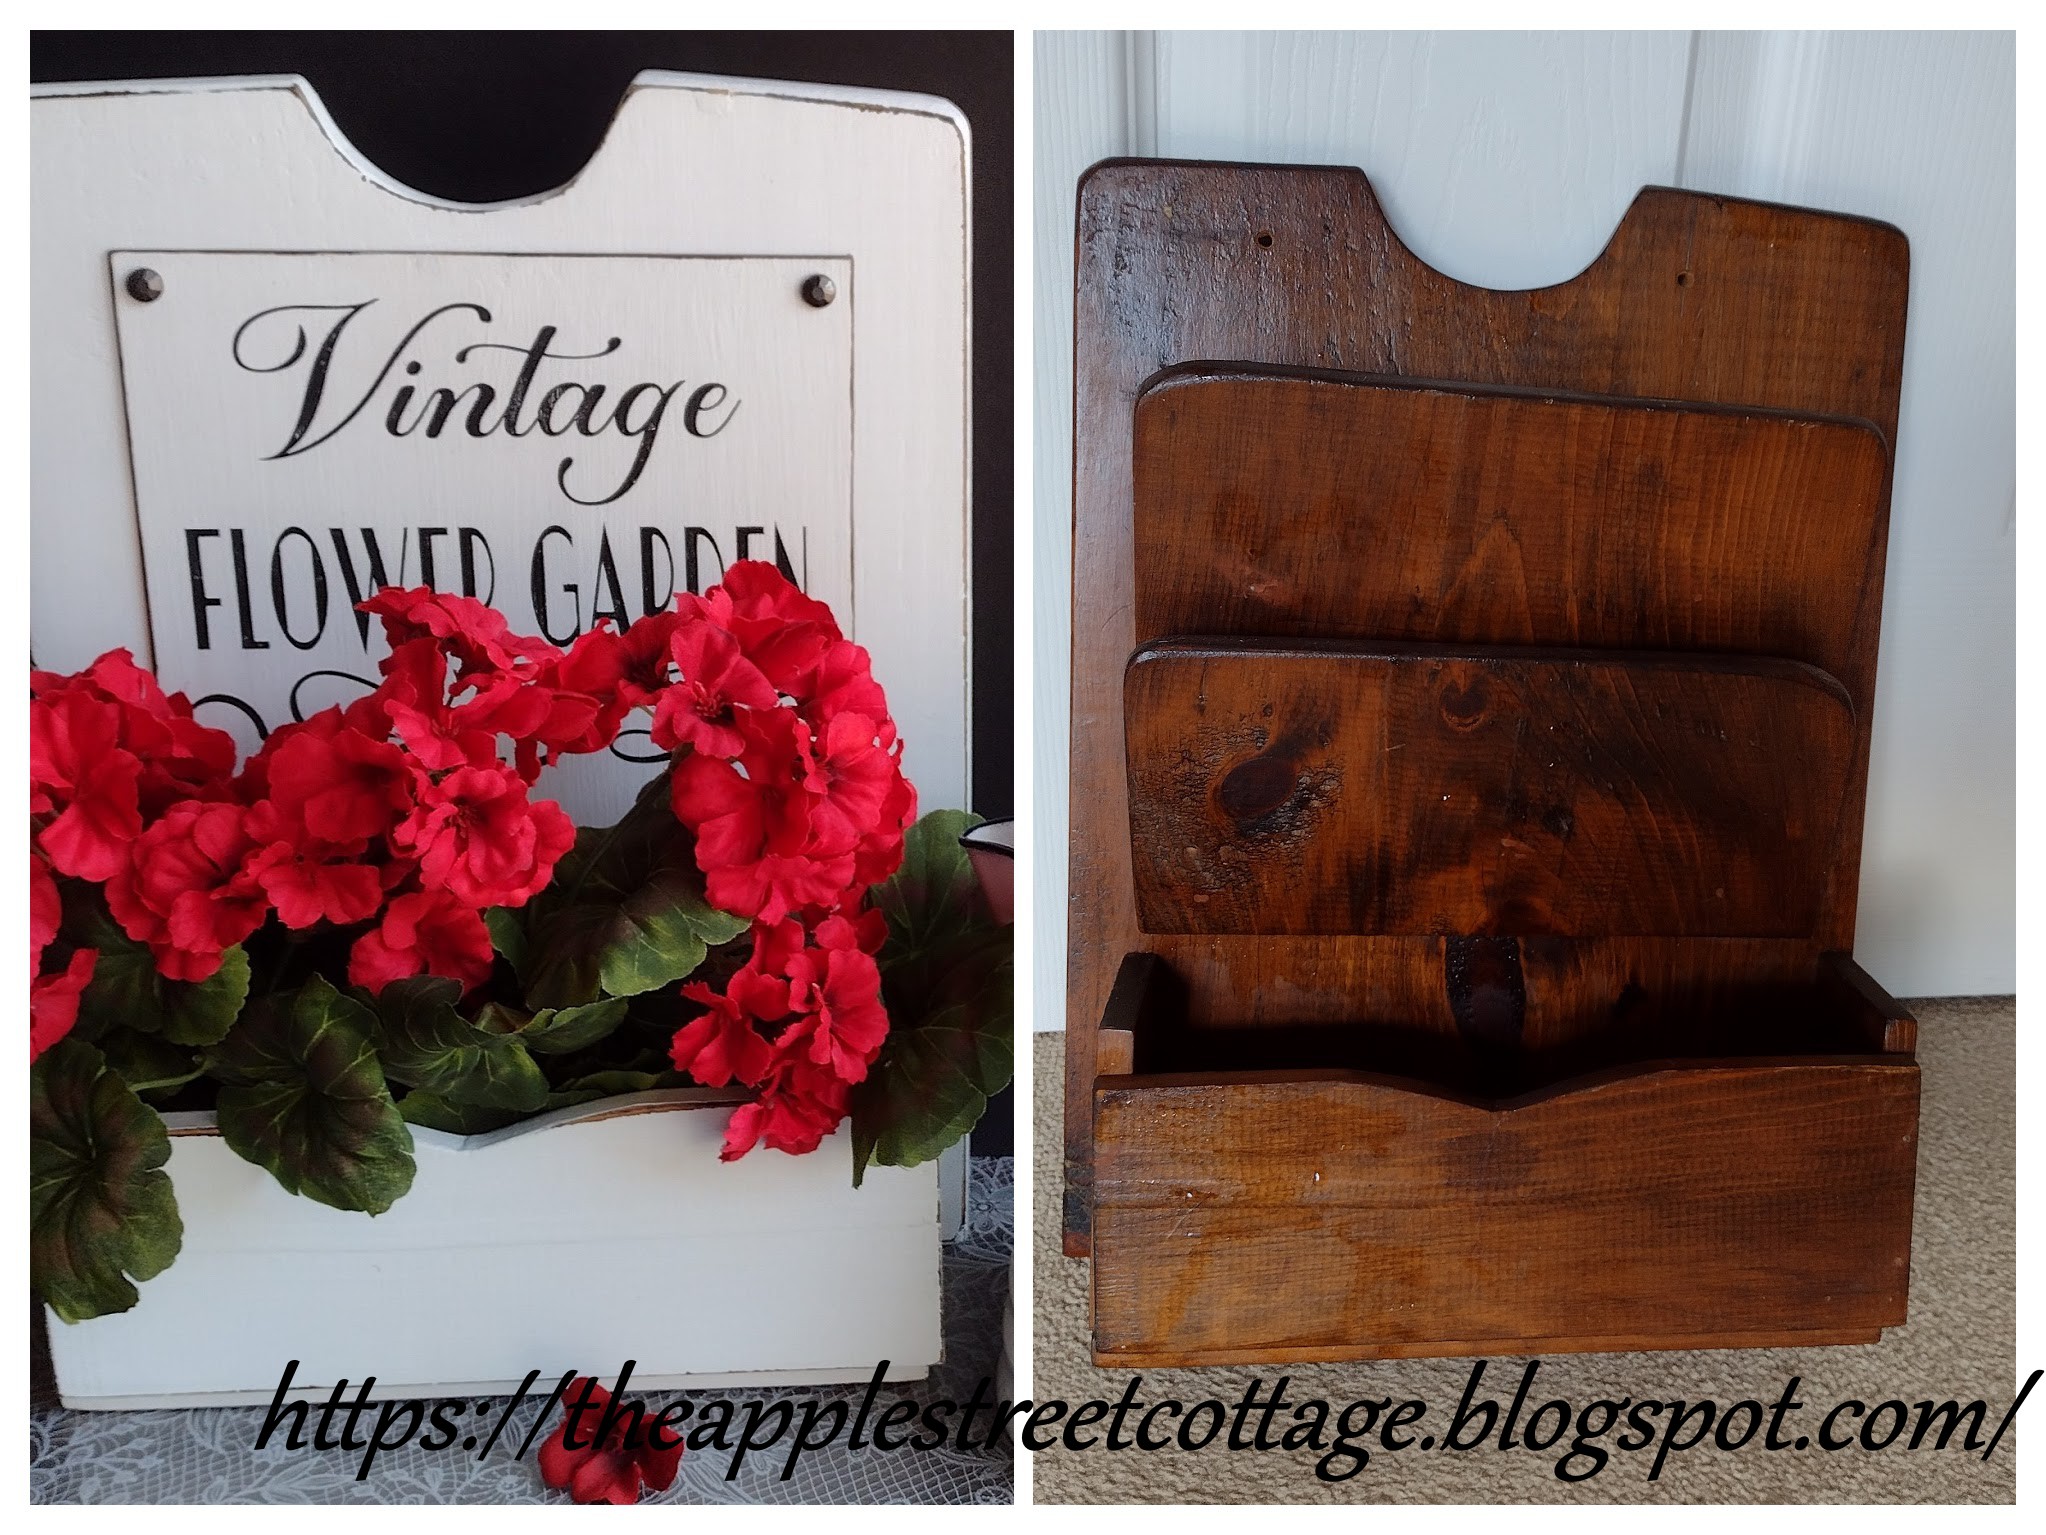
Now, let's talk about this Marketplace find!
To say this mail sorter was humble would be an understatement. Check out those GIANT knots in the wood.

The first step in giving it a makeover was to take it apart.

There were numerous holes, dents, and scratches. There was also a fair amount of dirt. YUCK!

I hoped to keep the cute little box attached until I noticed that it wasn't centered.

Off with its head!...I mean, time to remove it!

Since there were so many holes, dents, scratches, etc. I decided the new look would be a bit rustic or shabby. I filled as many of the imperfections as I could with wood filler, sanded, and gave it 2 coats of spray paint/primer that was sitting on my shelf.

Then both pieces were given 2 coats of white chalk paint.

The edges were distressed with a sanding sponge.

I discovered some of those edges were a little light in color for my taste, so I touched them up with a little antiquing medium.

Everything was waxed and before I went any further, I attached a sawtooth hanger to the back.

I also reattached that cute little box to the bottom with nails and completely forgot to take a picture! Oops!
The next step was to create the sign. I used some Bass Wood and cut it to size with a utility knife.

Then it was 'stained' with some antiquing medium on a rag.

Chalk paint went right over it.

I designed my graphic on Design Space and cut it with my Maker using stencil vinyl.

Using a stencil brush and craft paint, it started to take shape.

If you've been visiting the Cottage for a while, you know my trick to stenciling with no bleeding - dry-brush the first coat. I then gave it 2 more coats and peeled-off the stencil.

Time to distress the edges of the sign, and guess what? The wood was too light! So I added some antiquing medium to darken the edges.


Much better!
Time to wax - and I noticed something. The wax removed a little of the black craft paint. I liked it!

Some wood glue attached it to the (former) mail sorter and I used some hammered nail stick-ons to finish the look.

The transformation was complete. Time to decorate!

I chose red geraniums for 3 reasons:
1. I wanted a real 'pop' of color.
2. They've been in my stash for several years.
3. I have a dear friend who LOVES red - this one's for her!

The lesson to be learned today is - Never pass up something that is outdated, ugly, and dirty. Look past those negatives and make it into something pretty!

Before you run off, don't forget this is a blog hop and the rest of the team has some amazing upcycle/recycle/did-it-over projects to share with you. The links are all listed below:
Featured at:


.jpg)


Ann, it's just perfect! Thanks for the stenciling tip, too. I hate fuzzy stencil lines. I'm also intrigued by your stencil machine. I don't have one and every year I think hmmm, maybe I need one. Maybe this year I really do!! Thanks for hosting...this was a fun one. I really enjoyed the theme!! Happy Weekend!!
ReplyDeleteThank you, Kim. I use this technique every time and it never fails me. As for the Cricut Maker, I love it. There are SO many wonderful projects you can do with it!
DeleteCute project/makeover! Thanks for hosting this hop!
ReplyDeleteThanks, Patti. This hop is always a pleasure to host!
DeleteWhat an amazing vision you had for this piece and it looks stunning now! Love how the wax aged the wording. Thanks for hosting; can't wait to hear what our theme is for next time!
ReplyDeleteThe wax was a pleasant surprise. It fit right in with my vision for the piece! Always a pleasure to host!
DeleteVery cute! I'm not sure I would have seen a super cute flower box in that old mail sorter but your vision turned out beautifully!
ReplyDeleteThis one told me right away what it wanted to be. I just love projects like that!
DeleteThis is beautiful, Ann! And what a transformation! From mail sorter to flower box! You certainly had your thinking cap on when you "did over" this one! Great job!
ReplyDeleteThank you, Gail. In all honesty, the mail sorter did all the work....I knew exactly what it would become as soon as I saw it!
DeleteYou really did see the potential in this sad looking mail sorter. It is SO pretty now, the white paint with those vibrant red geraniums is just gorgeous.
ReplyDeleteIt really was sad, wasn't it? I'm so happy it has a new life now!
DeleteThis is just beautiful! I'd love to have this in my home. In fact I have a similar thing that I haven't touched yet because I didn't know you could dismantle it... time to investigate! Lovely work!
ReplyDeleteRachel - Tea and Forget-me-nots
Thank you, Rachel. By all means, take yours apart. The potential is just waiting!
DeleteThat is one amazing transformation Ann! You totally gave that old mail sorter a new lease on life. I love it as a flower box, and the geraniums are perfect.
ReplyDeleteThank you, Tuula. It really needed all the help it could get!
DeleteAwesome makeover! Those mail racks are easy to find now people don't really get lots of mail any more. You vision to see beyond the rack rack is great. I will buy one next time i see one.
ReplyDeleteThank you, Anita. They are showing up more and more. I hope you find one soon!
DeleteTHat's really beautiful. I want to try that! #YourMoment
ReplyDeleteThank you, Lydia!
DeleteBeautiful makeover Ann. I usually pass on similar items at the thrift store because I never know what to make out of them. This is a such a lovely idea!
ReplyDeleteI tend to do the same thing, Donna, but once in a while, this happens!
DeleteWow, what a great makeover ~ perfection! I like the extra touch of adding the hammered nail heads.
ReplyDeleteAww, thanks, Allyson.
DeleteYour post is so wonderful! I was super inspired by your creativity. I would love to invite you to link up your project at Whimsy Home Wednesdays to inspire others and have a chance to be featured https://fifthsparrownomore.com/whimsy-home-wednesday-blog-link-party-no-32/
ReplyDeleteThanks, Kristin. I've already linked-up and I'm looking forward to visiting a few others!
DeleteThat is LOVELY!
ReplyDeleteThank you, Joanne!
DeleteBeautiful make over! Thank you for sharing with SSPS, we appreciate it! Pinned.
ReplyDeleteThank you so much, Melynda!
DeleteI love it.
ReplyDeleteI would never have seen this when looking at the original mail sorter. You’ve got some good imagination!
It looks really fresh!
Thank you for sharing this post at the Sunday Sunshine Blog Hop 62!
Laurie
Thank you, Laurie. It was fun making it into something new!
DeleteWhat a wonderful makeover Ann! The new look is like it was always meant to be. I need to follow your stenciling tips, and I enjoy being a messy crafter too!
ReplyDeleteMy stenciling technique works every time! Messy and crafting go hand-in-hand, right??
DeleteVery cute flower box. So fun to see your creative skills. Thank you for sharing at Love Your Creativity.
ReplyDeleteThank you so much, Linda!
DeleteHow clever! It's beautiful. Pinning! :) Visiting from Grace at Home.
ReplyDeleteThank you for the pin, Jennifer. I appreciated it!
DeleteEXCELLENT find and makeover! Featuring when my link party opens.
ReplyDeleteThank you so much, Carol. This was a fun one!
DeleteSuch a fantastic idea! I would have never thought to do this. I need to carry you around in my pocket and whip you out every time I see something and have no clue what to do with. Thank you for linking this on Farmhouse Friday. I'm featuring it tomorrow. pinned
ReplyDeleteThank you, Cindy. I don't think I'm pocket-sized, but I can send you my number!
DeleteThis is such a cute upcycle project! For $5, you can't go wrong. It turned out adorable!!
ReplyDeleteThank you. It was a fun project!
DeleteAnn,
ReplyDeleteI can not even tell you just how much I LOVE this idea!! What an amazing transformation and you can use it for every Holiday!!! I will be on the look out for something I can do this to!!! Thanks for sharing!!! Stay cool!
Hugs,
Deb
Thank you, Debbie! It's one of my favorites. I hope you find what you're looking for soon!
Delete