This post may contain affiliate links.
I wasn't looking for another dress form.
I didn't NEED another dress form.
But when I spotted her, I knew SHE needed ME!
Welcome to the 'Do It Over' Designers blog hop. We are a group of bloggers who love to recycle/upcycle/DIY. I'm happy to host this hop and I hope you'll visit everyone to see what they have to share with you. Their links will be listed at the end of this post.
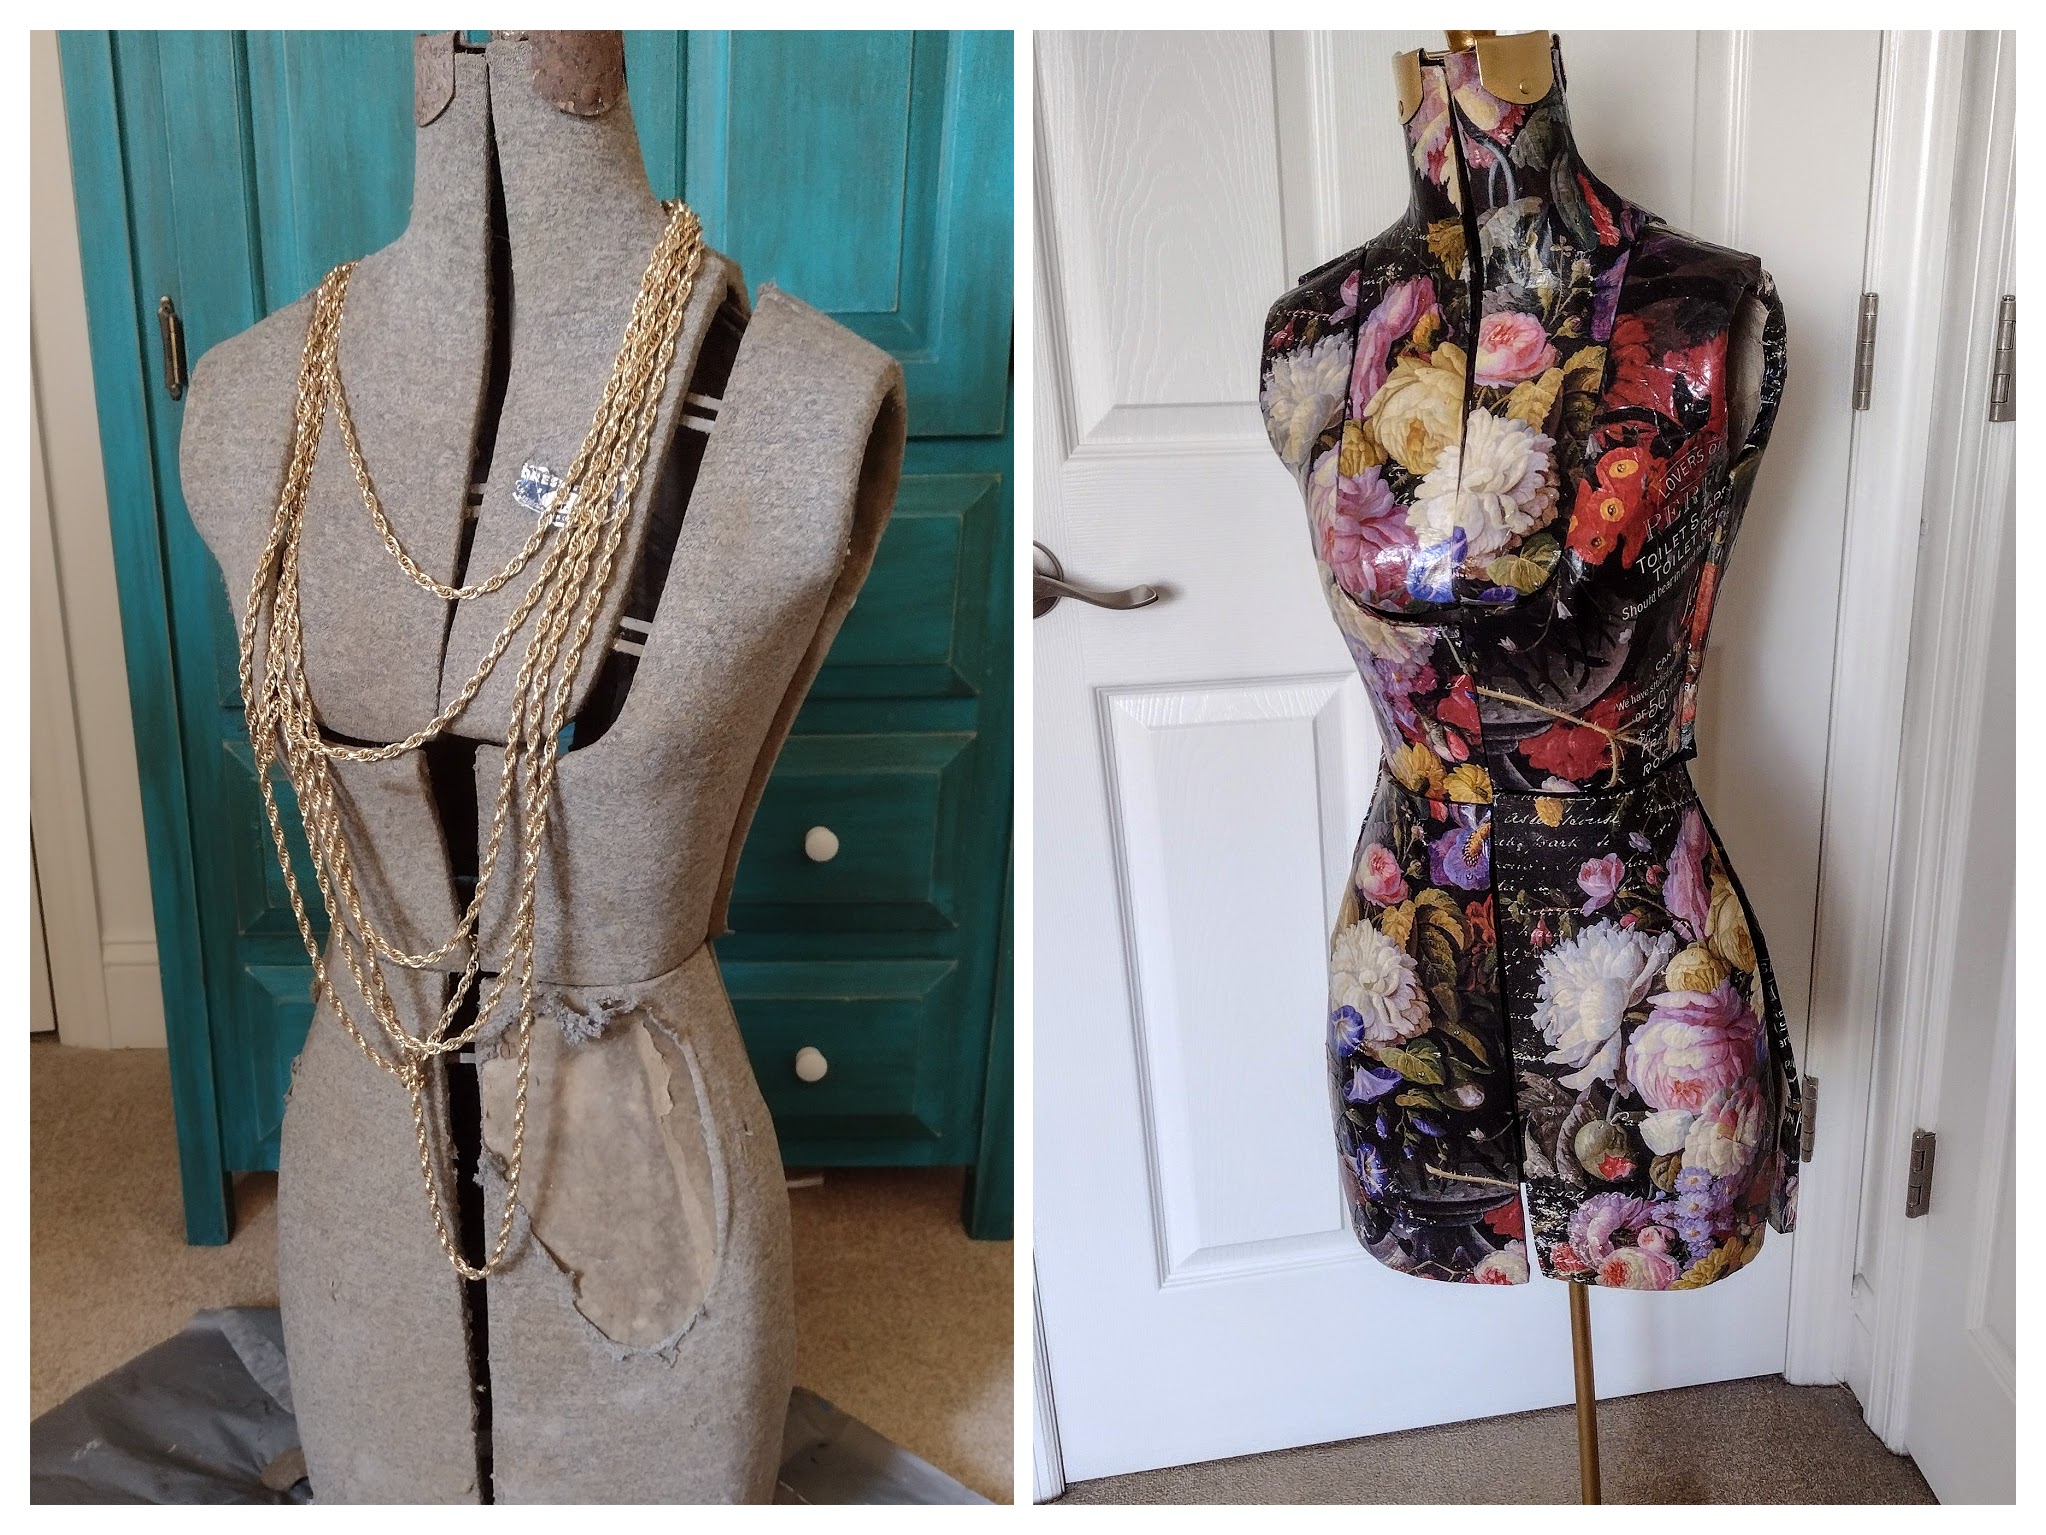
It all started at a random yard sale that my husband and I came across one Saturday afternoon. There were many relics that were discovered in an old barn - this dress form included. What made her unique was the fact that she was found under the floor - in the dirt.
She was dirty, torn, and eaten away by who knows what -
-mice?
-rats?
And let's not forget the rust.
Miraculously, part of her tag still was attached.
It now lives on the inside.
Let's face it. Most would consider her a 'Lost Cause', but I love a challenge and someone once dubbed me the 'Queen of Lost Causes" so I haggled with the guy and took her home for $15. He even included the Mr. T gold chains for free! Ha!
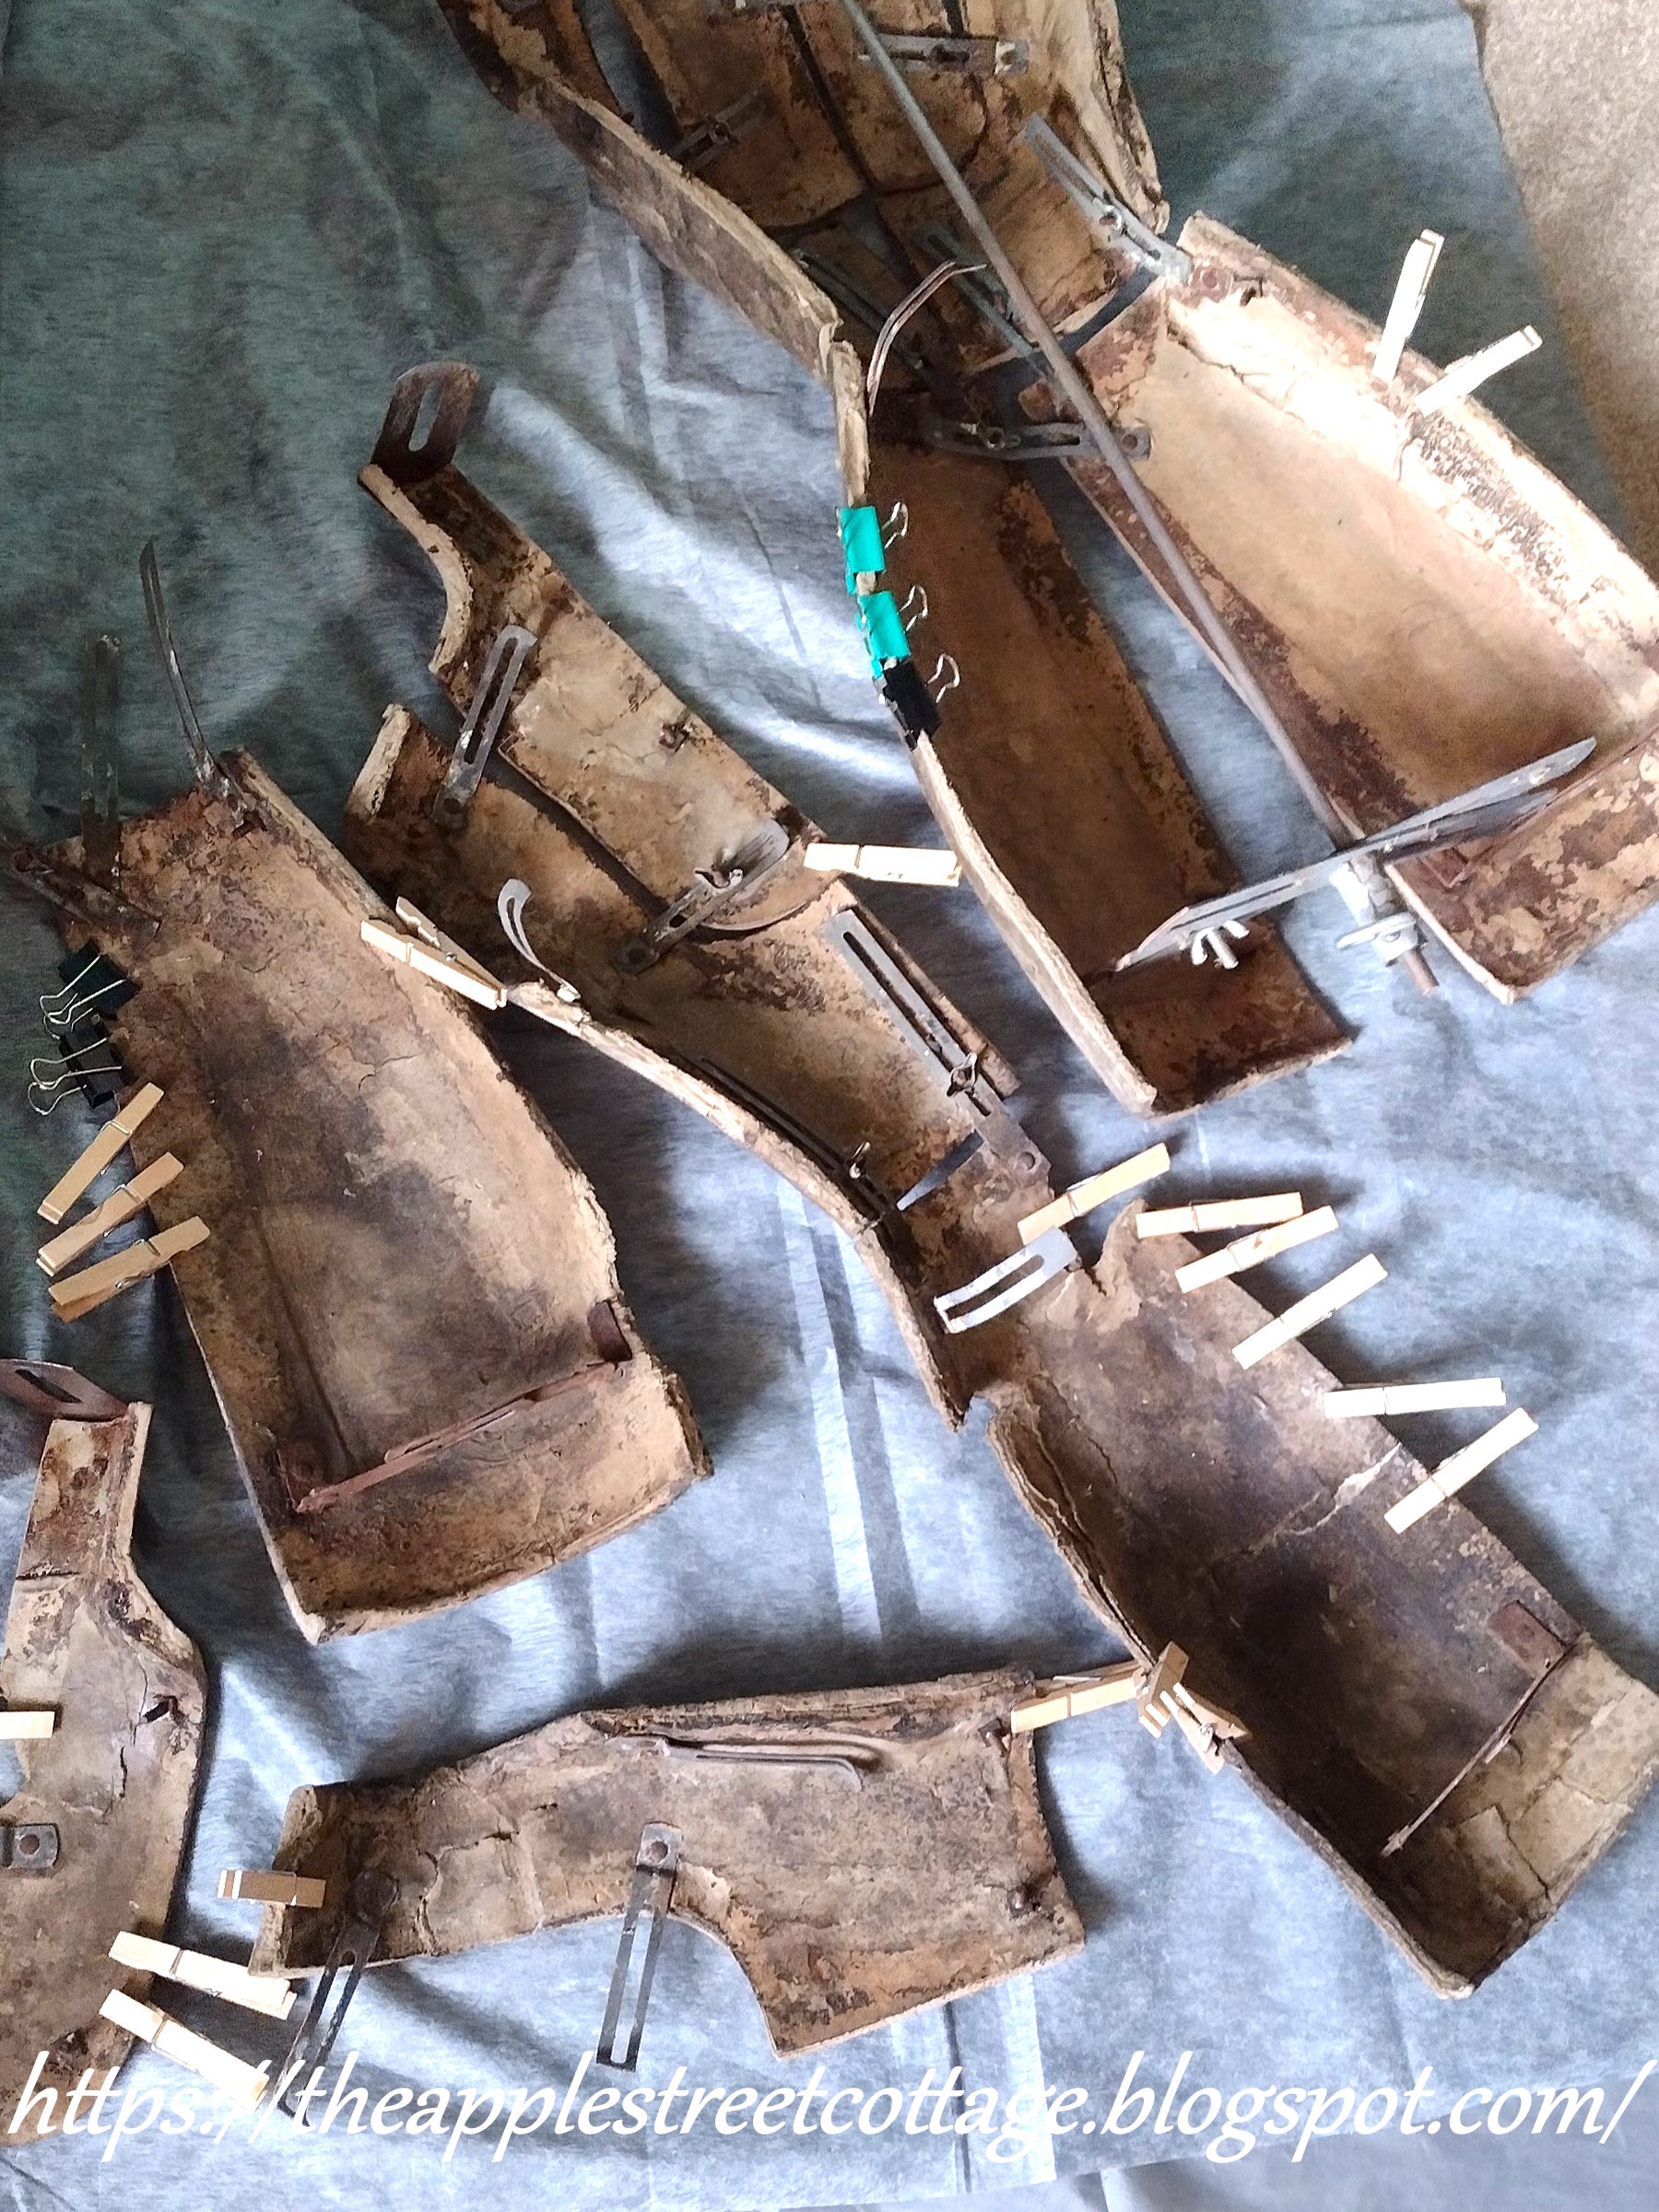
Let me be crystal clear: I had absolutely NO IDEA WHAT I WAS DOING, but I was going to use my instincts to take her apart and rebuild her to the best of my ability.
Due to the amount of dirt, the first step was putting on a mask.Was I glad I did that!
After getting her partially apart, the dirt was evident.
The fabric was torn off (it mostly disintegrated as it was touched) and the parts were vacuumed and wiped (gently) with hot water and vinegar. I'm sure the black stains were mold and you can see the bag on the lower left with the fabric and other debris (mouse nests?) I found inside.
I disassembled as many of the parts as I could. The wing nuts were all rusted. I was able to get some of them free, but not all of them, so I let those stay as they were. I didn't want them to break and create more problems than I already had.
It was time to start the repairs. Once the fabric was off I could see that she was basically made of very thick cardboard with lots of layers - that were all separated from laying on the wet ground. Out came the glue... LOTS and LOTS of glue - in SO many places!
How do you like my fancy clamps?
After all the gluing and clamping was complete, it was time to repair the holes. I used some cardboard:
Cracker boxes:
And paper mache' made with glue and water.
It was a big job and remember, I had no idea what I was doing - but it worked!
Once the holes were repaired she looked much better. Sadly, the other issue was the unevenness of the surface. After laying on the wet ground for who knows how long, the cardboard went from wet to dry many times leaving the surface quite rough in spots. There was no way I was going to sand these parts smooth since I was sure there was still mold in those layers, and I didn't know if it would even work. So, I left them 'as-is'.
I went on to sand as much rust off the knob and its brackets as I could...
I'll show you that picture at the end, but let's talk about that mold issue...it was time to seal it in. I grabbed my craft paint and painted both the outside and inside. You can really see the roughness of the surface:
Left to dry:
After the paint was dried, everything was given 2 coats of
Polycrylic. I wanted no chance of any mold spores escaping.
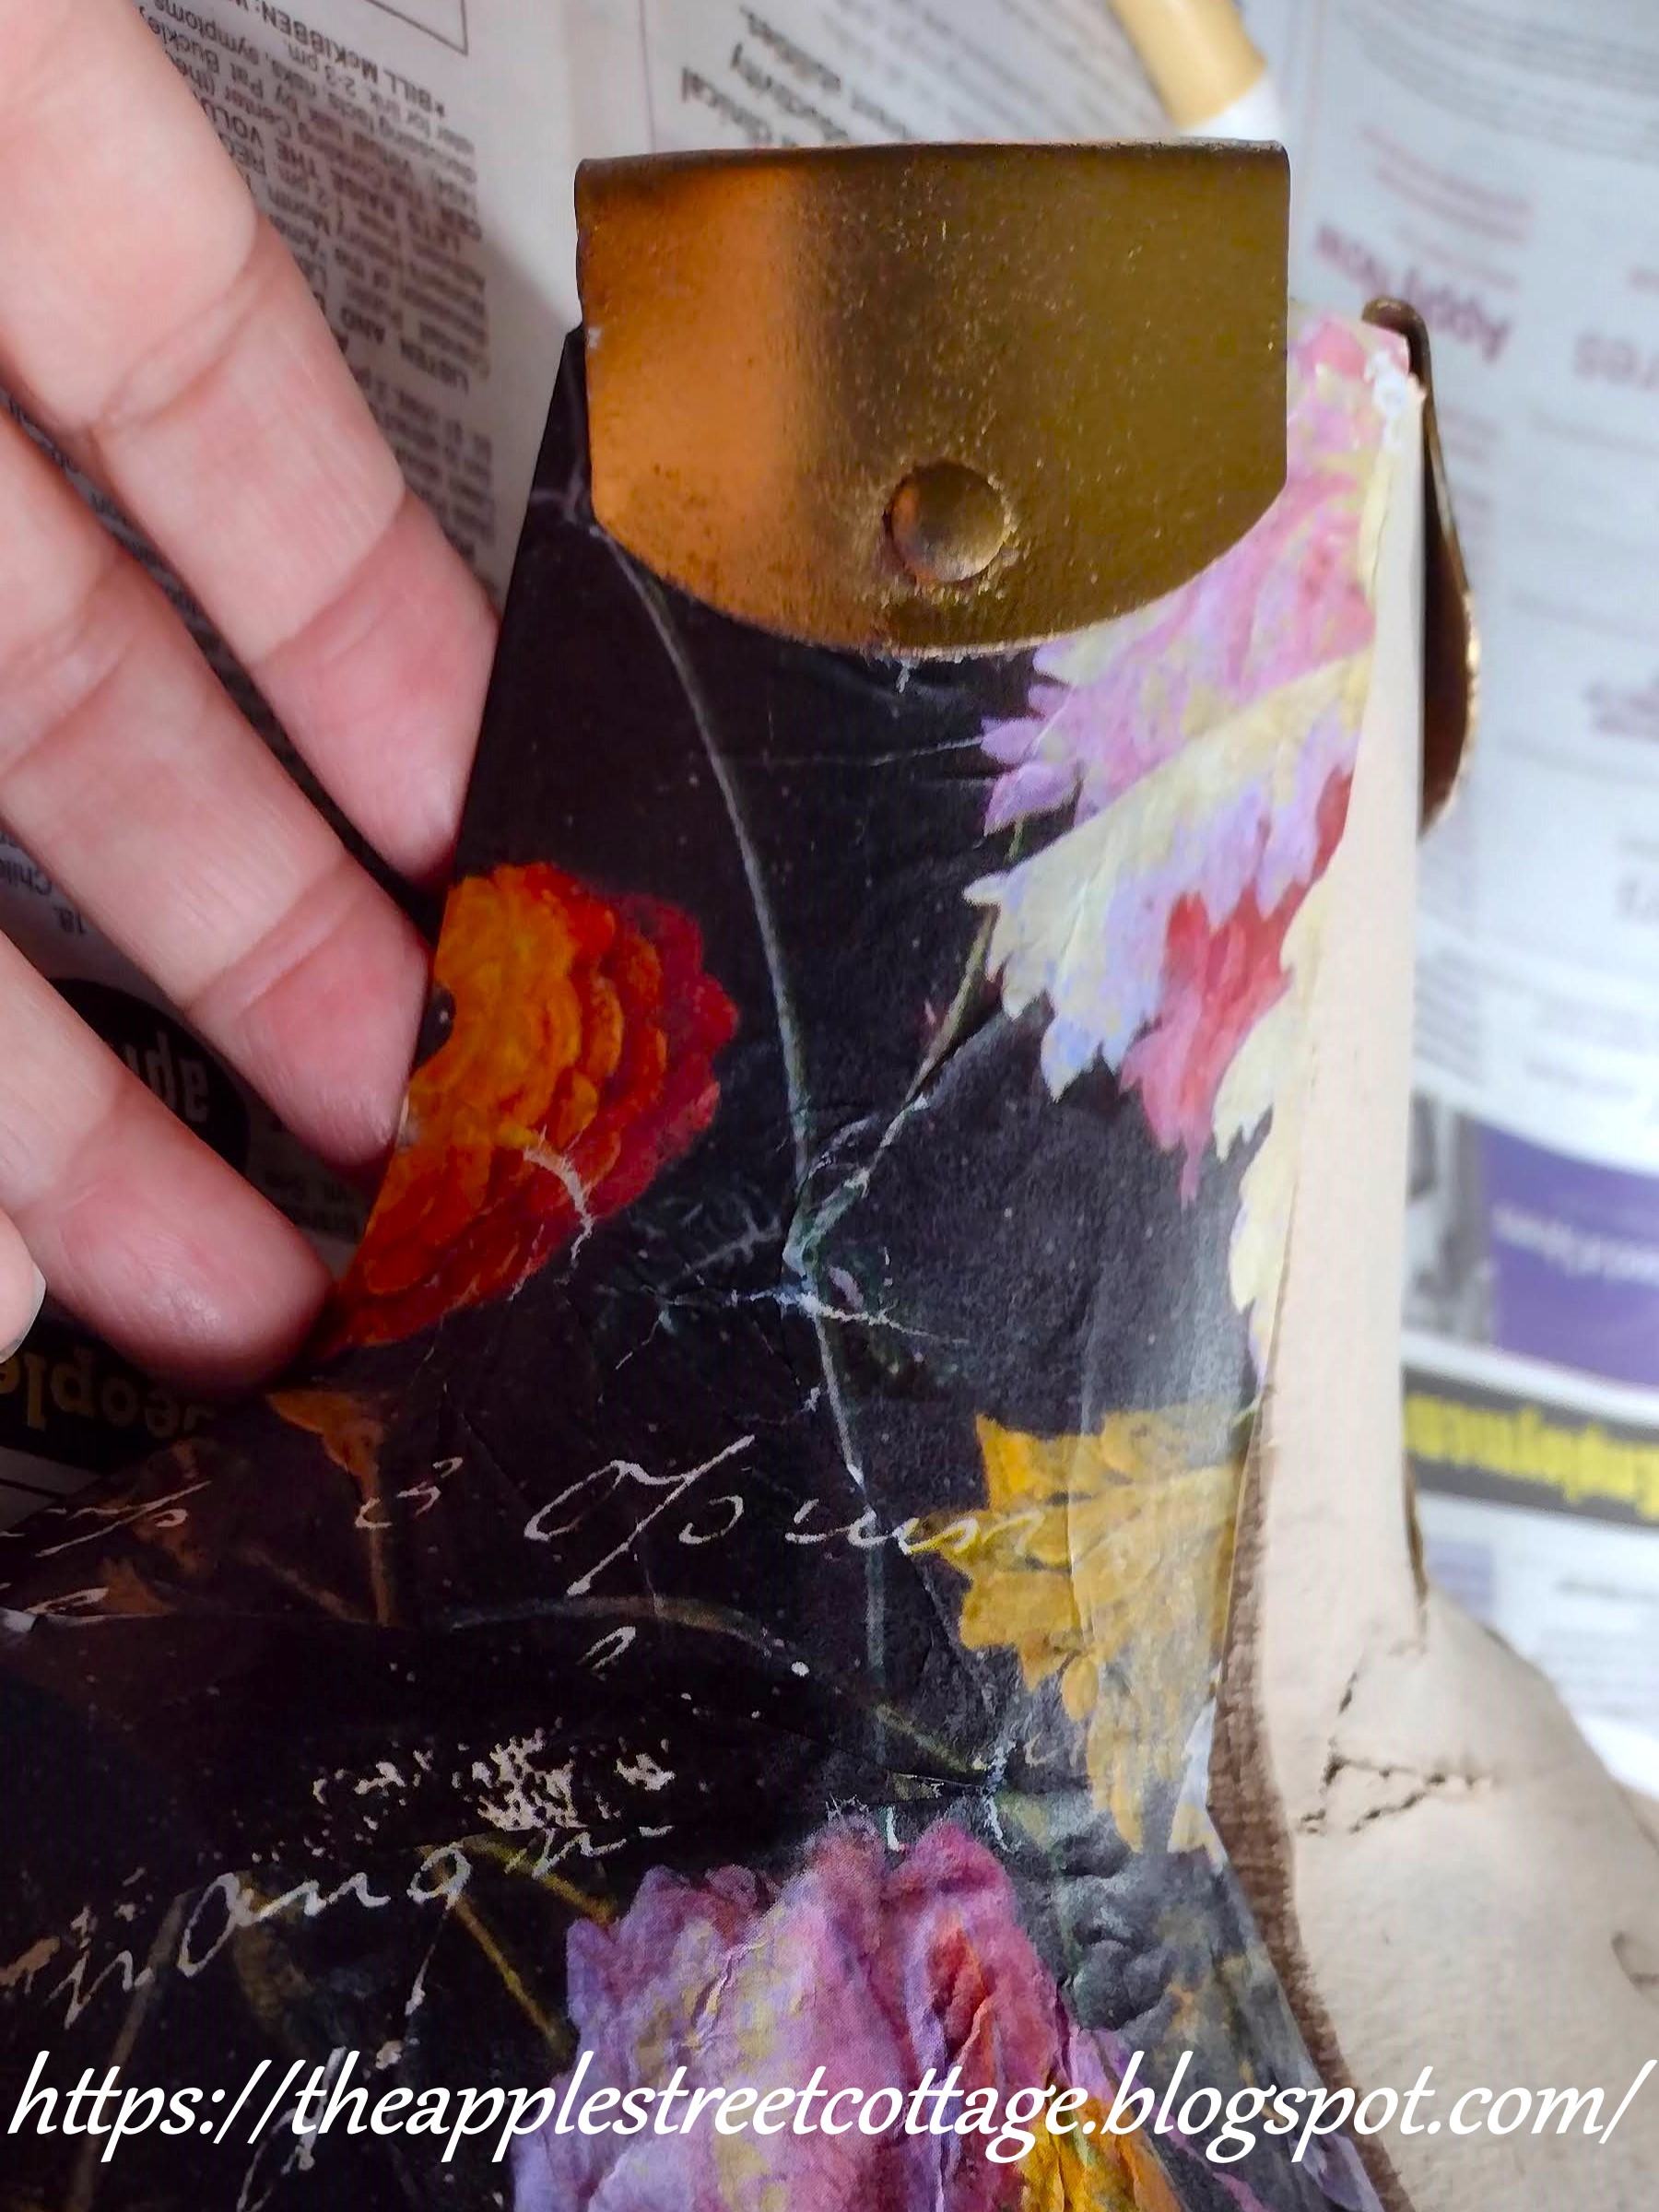
Finally, it was time to start making her pretty. Since she was a bit 'distressed' I used a distressed tissue paper from Zazzle and
Mod Podge. One section at a time, the Mod Podge was painted on and the tissue paper placed over it. It was smoothed with plastic wrap. The pictures of this process are not here due to lots of curved surfaces and sticky fingers. I do have a tutorial on my technique that you can read
HERE.
The tissue was wrapped around the edges and sealed down on the inside with more Mod Podge.
Here you can see the the folding - trimming - smoothing of the paper over the curves.
Some parts were a real challenge and it just took time to smooth things down.
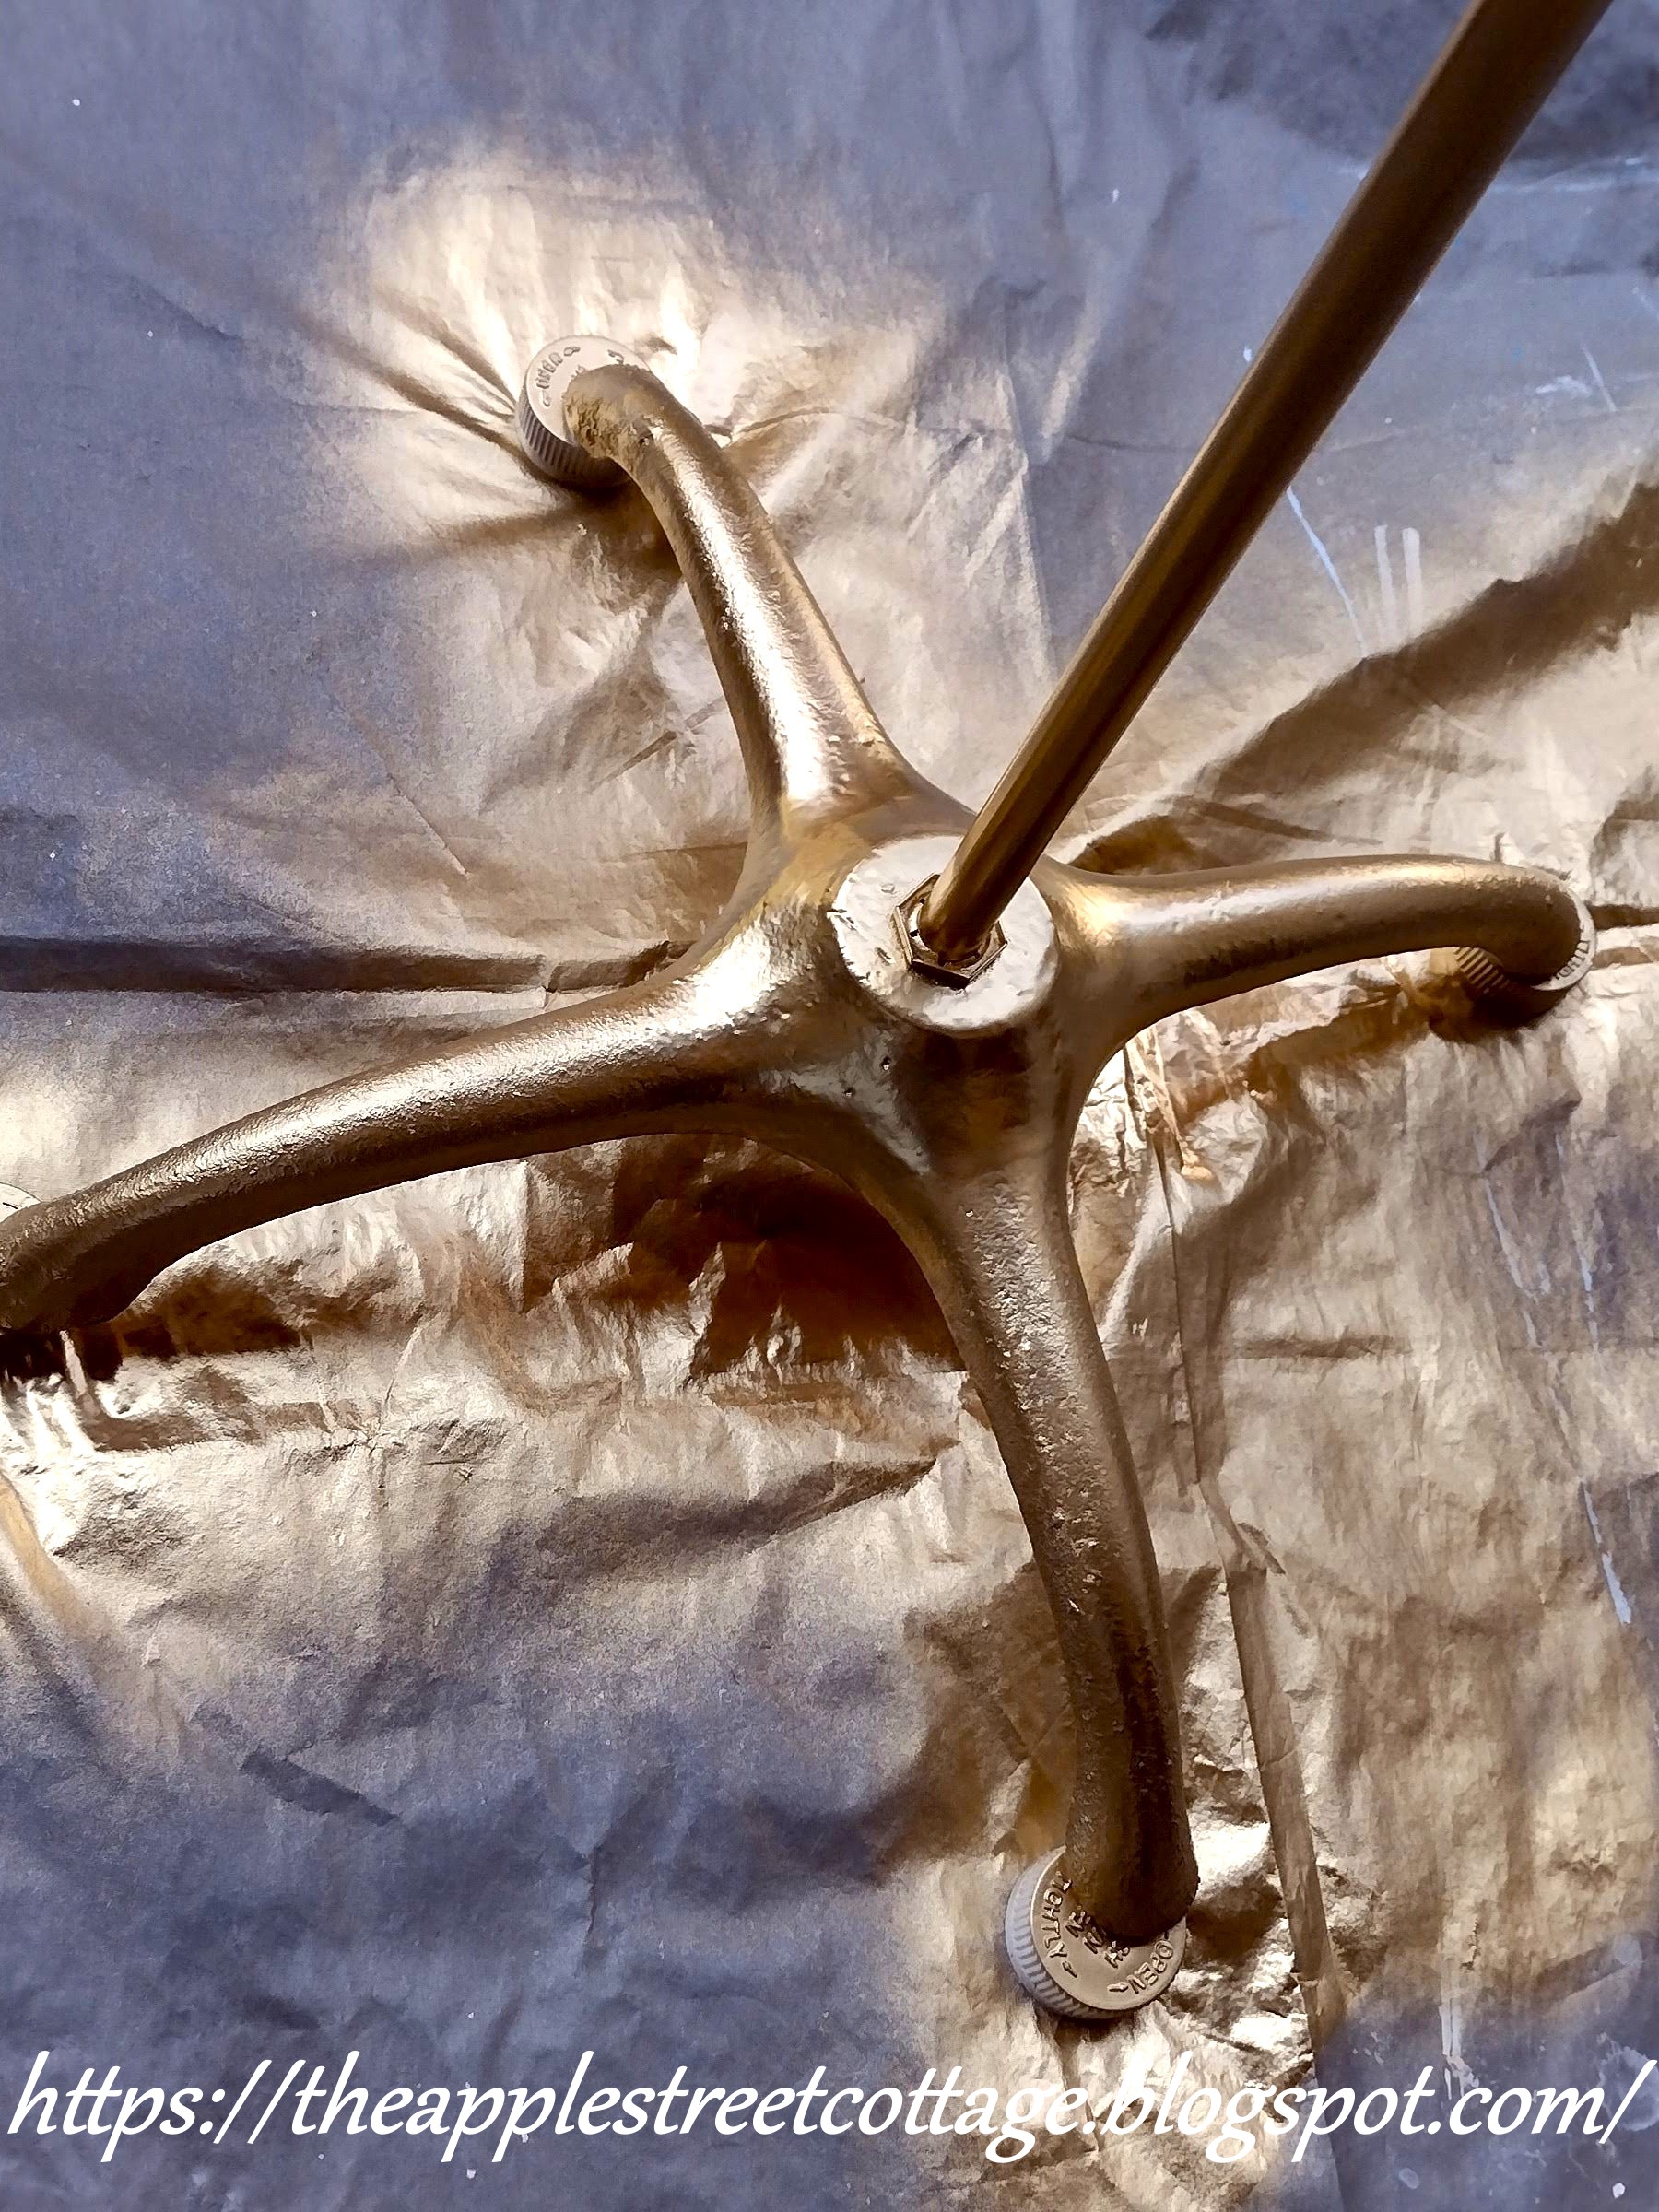
The last thing that needed attention was the stand. It also was a bit rusty.
A light sanding took care of the rust and it was given 2 coats of gold spray paint.
So much better!
It was time to reassemble her. I forgot to take pictures of this - probably because I was so nervous about it. Many of the brackets and wingnuts were fragile and I had my fingers crossed they would all go back together again.
The 4 back pieces were assembled and then the 4 front ones.
So far, so good.
That was the easy part.
I could see what I was doing.
To attach the front and back, I had to reach up from the bottom of the dress form and reattach the wingnuts by 'feel'. It took time and patience since many wanted to cross-thread.
Next, the adjustment rod had to be fed though holes at the bottom of the dress form and then through the hole at the top....another test of patience! Here it is at the bottom:
You can also see the adjustment key. The gold stand was added:
You can see how the rod extended all the way through the dress form.
It went through the holes of the knob brackets at the top and screwed into the bottom of the knob.
Once she was place on the stand and her key tightened for height, she was done!
Let me share some before and after shots.
Remember that big hole in her side?
How about that rusty knob?
And who could forget the rusty stand?
Yes, I think she needed me, even if I didn't know what I was doing!
Is she perfect? Absolutely not! But she looks so much better than she did before.
Now she needs a name. As you know, I already have one dress form named Rosie. She's a bit sassy - or maybe I should just say she has an attitude!
This Gal is different. She has had a major transformation so I'm trying to think of the names of women who have overcome great adversity. Clearly, she has.
If you have a suggestion, please feel free to share it in the comments.
I really do love my 'Lost Cause' projects. If you'd like to see more of them, here are two of my favorites:
I hope you'll pin, share, comment, and follow. If you click on those 3 little lines at the top left of the blog (on the Home page), you'll see where to find me...or click on the icon below to share.
Before you run off, don't forget this is a blog hop and the rest of the team has some amazing upcycle/recycle/did-it-over projects that you don't want to miss! The links are all listed below:


.jpg)


That is an impressive transformation!
ReplyDeleteThank you so much!
DeleteAnn, this transformation was definitely a work of LOVE! I would call her Lovey! You certainly did an amazing job of restoring this dress form! I would have thrown her out - but then again - I would never have bought her! Lol! But you are the QUEEN of restorations and you persevered to re-create a lovely addition to your dress form collection!
ReplyDeleteThank you so much, Gail. It was definitely a 'learn as you go along' project. Clearly I love a challenge! lol
DeleteOh gosh Anne; AMAZING work! Would you believe I have the exact same form in comparable condition? I took it apart and stored it in the garage because I was just too overwhelmed by the amount of work necessary to tackle it. But now? I'm so inspired and excited to dig it out this Spring and bring mine back to life too. I have a few ideas (slightly different) on how to tackle it now thanks to you.
ReplyDeleteYou do?? What are the odds? Have fun with it, Sara. This is a project that (in one sense) tells you what to do - based on the damage. I'm looking forward to reading about your dress form!
DeleteWow, you had quite the challenge, but she turned out totally refreshed. Using cardboard pieces was a very clever way to fill in the missing pieces. It makes you wonder why the dress form was under the floor. Maybe kids played with her.....hmmmm.
ReplyDeleteI sure did, Allyson. My guess is she was tossed out when no one was using her anymore and she just languished in an old barn until the floor collapsed. If she could only talk.....
DeleteWell, I think this transformation is the very definition of the term labor of love!! My goodness, I'm exhausted just looking at the photos. Wow. I'm so impressed with the way you repaired each part and how you literally rebuilt her from cracker boxes. Now that is what I call an upcycle!! Queen of Lost Causes for sure...long may she reign!
ReplyDeleteThank you, Kim. I should have warned everyone that the post was a bit-'photo-heavy'. HaHa! It was an interesting process. As I approached each problem, I had to think about the best way to deal with it. It's amazing what you can do with cracker boxes, a stapler, and lots of glue!
DeleteThis queen needs a crown. There has to be one in a thrift store somewhere! lol
Wow, you put so much work into this transformation. I’m so impressed that you could see the end result. Great job. -Rachel
ReplyDeleteThank you, Rachel. It was a long process, but I'm so pleased with the result!
DeleteWo, was für eine Verwandlung! Du hast sehr viel Zeit und Mühe in das Teilchen gesteckt. Ich bin total beeindruckt und finde das so toll. Du hast ein tolles Stück und es gibt ein Stück weniger Müll. Auch das gehört für mich zum achtsamen Umgang mit Ressourcen. LG, Claudia
ReplyDeleteThank you so much, Claudia. I love to upcycle things as much as possible, and I just couldn't resist her!
DeleteThis is an amazing project Ann. Talk about persistence and endurance at the same time. She looks stunning now though because you put in the work and love for bringing her back. Can't wait to see what you name her.
ReplyDeleteThank you so much, Donna. This really was a labor of love....now if I could just find the right name for her!
DeleteWoah! She really did NEED you! What a transformation, she looks so classy and sophisticated now. How lovely to rescue such a poor old dear and make her better than new. I think she's a Gloria maybe, Gloria Estefan had that terrible accident didn't she? Or Malala after Malala Yousafzai the nobel prize winner (who I met at an airport once!)
ReplyDeleteYes, she really was a mess. Thanks for the name suggestions, Julie. I'll add them to my list!
DeleteWow! This looks like a huge project, and you did a wonderful job with this dress form. A real labor of love! She turned out beautifully. Thank you for sharing this post in the Talent-Sharing Tuesdays Link-Up 58.
ReplyDeleteCarol
www.scribblingboomer.com
It was a big project, Carol but I really loved the process!
DeleteYou did an amazing job of refurbishing this piece. I’m very impressed. Thank you for sharing and I hope you enjoy it for years to come.
ReplyDeleteThank you so much, Christy. I just love her!
DeleteWow Ann, what a makeover this was! Isn't she a beauty. Thank you for sharing with Whimsy Home Wednesday!
ReplyDeleteThank you. I think she's beautiful, too!
DeleteWow, Ann, she's lovely! All the effort you put in paid off.
ReplyDeleteThank you so much!
DeleteThank you for sharing this Your Moment Blog Hop!
ReplyDeleteMy pleasure, Julie!
DeleteI think Harriet would be a good name- for Harriet Tubman!
ReplyDeleteThat's a good one - I'll add it to my list!
DeleteWow! That is quite the makeover. My mother was a seamstress so we had lots of dress forms all around our house growing up... thankfully we never had to repair or rebuild them though.
ReplyDeleteThank you, Joanne. I'm sure your dress forms never saw the inside of a barn!
DeleteWonderful project. You were so determined and succeeded. Love how the dress form turned out. I am happy to feature your Junior Dress Form at Love Your Creativity.
ReplyDeleteThank you, Linda. There were some real challenges and that was half the fun! Thank you so much for the feature!
Delete