Make Your Own Placemats
I've been wanting to make some placemats for the kitchen table for two reasons: 1. They look pretty and 2. They protect the table finish. So, I chose some pretty fabric and got started.
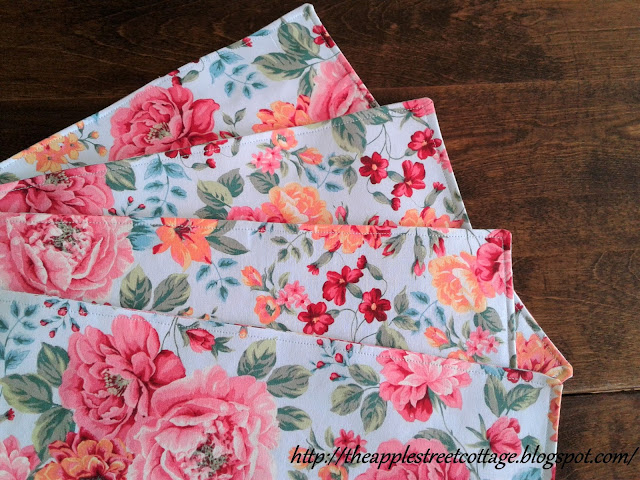


After washing & drying the fabric, the first step is to decide the size of your placemats. I like plenty of room after the plate is put on it so the finished size was 12" x 20". That means the fabric was cut to 13" x 21" to allow a half-inch seam allowance.

After the fabric was cut, fusible interfacing was ironed-on to give the placemats a little body.

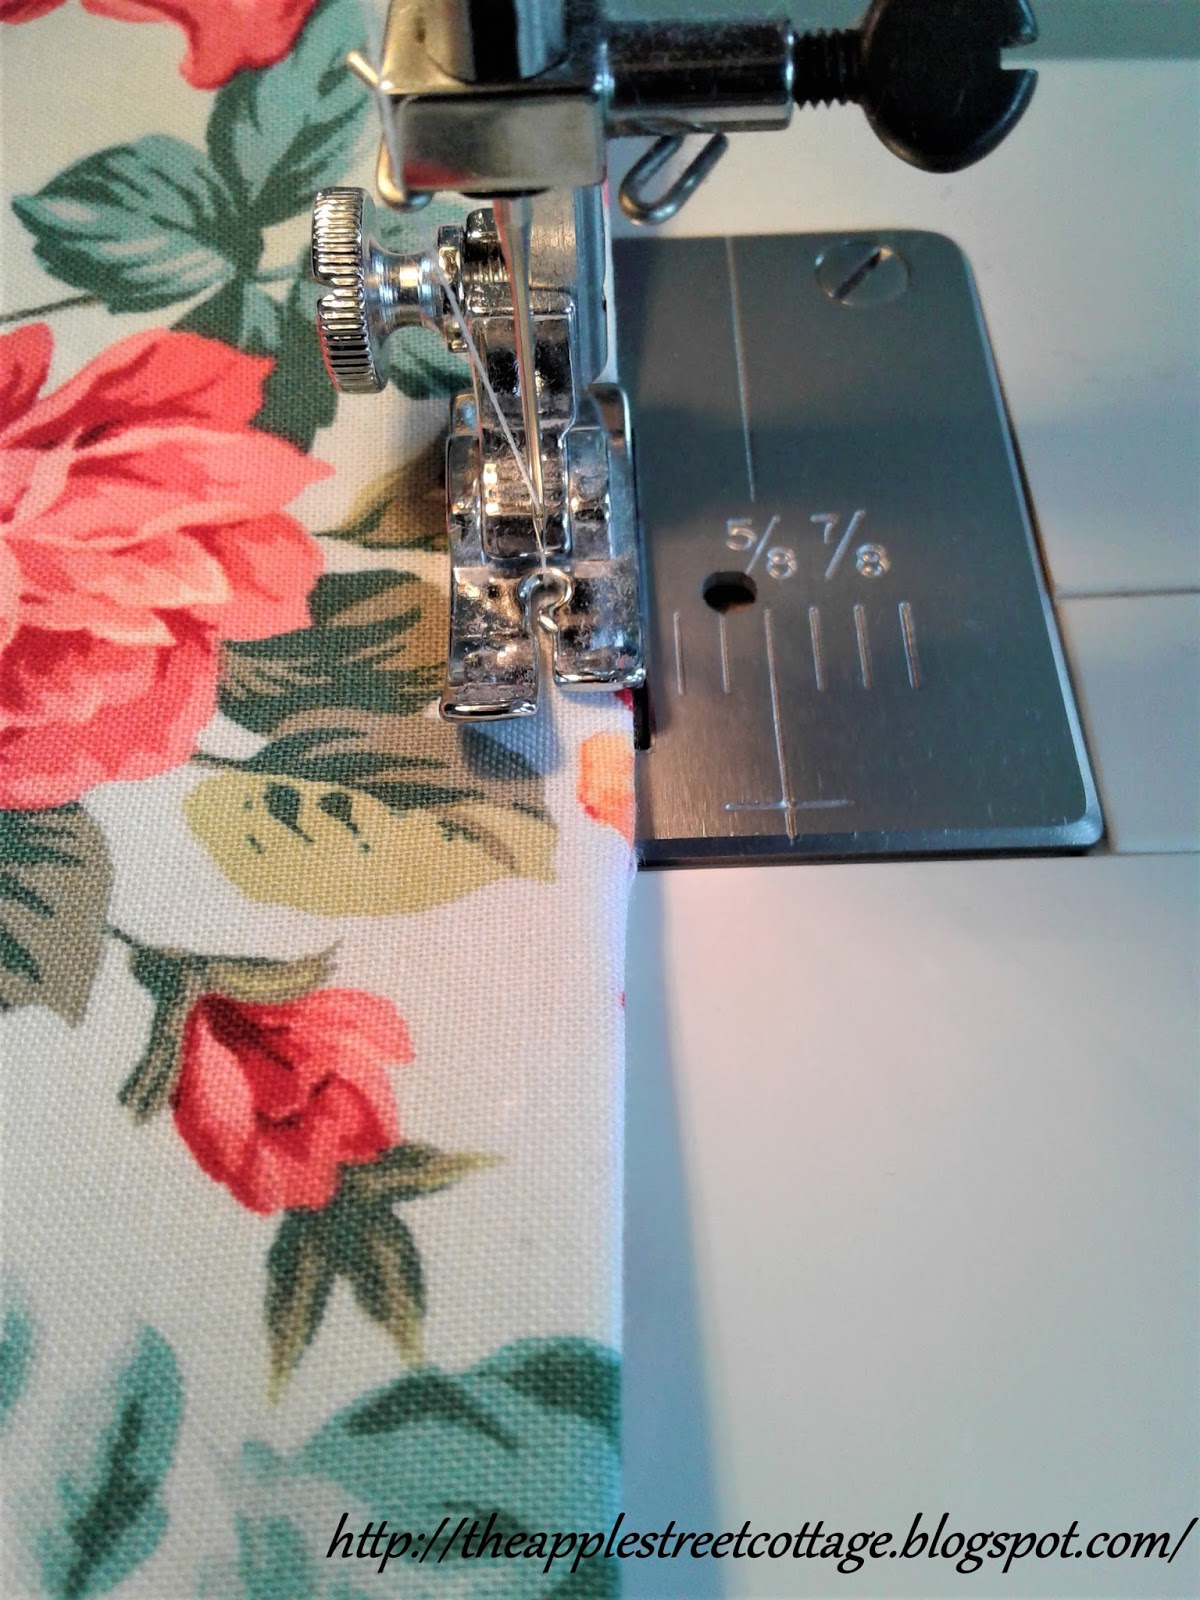
With the right sides of the fabric together, the pieces were pinned. I allowed a 7" opening along one of the long sides for turning.

You can see the marks for the opening.
Using a half-inch seam allowance, the placemats were stitched.

The corners were clipped and the seam allowance trimmed.


I left a little 'extra' for the opening. It made it much easier to fold under and top-stitch closed.

The placemats were turned right side out and pressed.

The next step was to top-stitch them along the edge, sealing up the the opening used for turning.
At this point, they were almost done, The last step was to spray them with scotch-guard to protect them from stains...because you KNOW what's going to happen the first time I serve spaghetti!

They really brighten things up, but I'm sure you're wondering why I don't have them all decked out with pretty plates and glassware...well, that stuff is still all packed away in a storage unit. 😞 Hopefully, that will be remedied soon - fingers crossed!
As always, thank you for stopping by. I hope I've inspired you to make some placemats for your table. If you can sew a (fairly) straight line, you can do this!
Have a great weekend.
Ann
I hope you'll pin, share, comment, and follow. If you click on those 3 little lines at the top right of the blog, you'll see where to find me!
Featured at:


Thank you for showing just how easy this is!
ReplyDeleteMy pleasure, Stacey...thanks for stopping by!
DeleteGreat tutorial! Best way to use up fabric or to get the design scheme you're looking for. Visiting from Over the Moon party.
ReplyDeleteThank you, Victoria. I'm so glad you stopped by - come back again soon!
DeleteI made some placemats for us YEARS ago, they were from upholstery fabric so it already had some body and I didn't need to use interfacing. They just wash and wash but they are a little bit tired now, I love your pretty fabric, I'm inspired to make us something a little prettier now!
ReplyDeleteHappy to inspire, Julie. I can't wait to see your new ones!
DeleteThese are beautiful! Pinned.
ReplyDeleteThank you, Donna. I appreciate the pin!
DeleteHave a great week.
I've been wanting to make placemats, but I'm not a great sewer. This tutorial is perfect. Thanks for sharing on Sunday's Best.
ReplyDeleteFortunately, Rhonda, you don't have to be a great sewer to make these!
DeleteThank you for taking the time to visit the Cottage.
Thank you for the tutorial and I love the fabric.
ReplyDeleteThank you, Sandra. I'm so glad you stopped by - come back again soon!
DeleteSo very pretty and great for spring! Thanks for sharing on To Grandma's House We Go!
ReplyDeleteThank you, Chas!
DeleteThank you for the tutorial, I am not a sewer but have want to do some place mats.
ReplyDeleteI would like to see a picture of the back of your place mats. I got confused when you said
you ironed on the fusible interfacing but then you said ...with right sides of the fabric together you
pinned them together. If the backing is the fusible interfacing--what right sides of what fabric
did you pin together? Is there another piece of fabric that you backed the decorated front piece with?
Also is your fabric just cotton or is it something heavier? It is really pretty! Can you use the same
fabric for napkins or what should be used. Sorry for all the questions, Just trying to learn.
See I told you I am not a sewer!
I understand how this can get confusing, Joan. No apology needed for the questions, let me try to clarify.
DeleteThe fabric I used is 100% cotton and I used it for the front and the back. I ironed the fusible webbing to the wrong side of one of the 2 pieces. After that was done, I took the right side (the side of the fabric you want to see) of the other piece (the one with no webbing) and placed it against the right side of the piece with the webbing on the back of it. In other words, the two pretty sides were facing each other. When they were pinned together, I saw the white webbing on one side and when I turned it over, I saw the wrong side of the other piece of fabric. Does that make sense?
I wish you lived nearby, I'd come over and help you make your placemats. If I can explain anything else, let me know. I'm happy to help!
Thanks so much for stopping by the Cottage.
DeleteAnn, that was what I was missing, what I didn't see was that there was another floral piece.
Thanks so much for your help.
You're welcome - happy to help!
DeleteI hope you'll visit the Cottage again soon - I love having visitors!
One other thing. Wash your fabric before you cut it! Otherwise, the first time you wash the finished placemats, the fabric will shrink, but the interfacing won't and you stand a good chance of ending up with misshapen placemats. That would be so frustrating, especially for someone who doesn't sew much.
DeleteAnn, the instructions were perfect! Reminds me that I need to make some.
Joan DR, you can do it!! Have fun!
Good point, Nancy, I completely forgot to mention that I washed the fabric (and dried it) first. I'm off to edit my post!
DeleteThank you so much for stopping by - come back again soon!
These are lovely and I love the floral design. I'm not really good at sewing but I could give these a try. Stopping by from #BloggersPitStop and have a great day!
ReplyDeleteSue from Sizzling Towards 60 & Beyond
Thank you, Sue. They really are easy to make...glad you stopped by!
DeleteMy Mom who's an excellent sewer has always tried to pass it along to me but lately, well, I'm beginning to get it, hope it's not too late lol ;) I might just start with this, thanks! Dropped by from #BloggersPitStop but happy to be here anytime! Hope this weekend treats you kindly. :)
ReplyDeleteIt's never to late and this is a great project to start with...sewing straight lines! Good luck with your placemats...thanks for stopping by.
DeleteThis looks so interesting and fun for kids. Thanks for sharing with us :)
ReplyDeleteKhadija
https://creativekhadija.com/
Thank you, Khadija. It is a wonderful project for beginners!
DeleteI am off to pin this, Ann! Fabulous tutorial. I have rudimentary sewing skills and have always wanted to make my own, but chickened out. Thanks for the post. Love it and love your pretty placemats!!
ReplyDeleteYou can do it Kim!! And thanks for sending me over here!
DeleteThank you, Kim. Believe me, I'm NO seamstress, so I go for the easy sewing projects!
DeleteSo glad you stopped by! Happy Sewing!
These turned out lovely, Ann! Thanks for sharing at Vintage Charm!
ReplyDeleteThank you. Happy to share!
DeleteHi Anne, what lovely placemats, very pretty. It's when I see projects like this that I wish I'd taken more notice when Mum tried to teach us to sew.
ReplyDeletePopped over from #sweetinspiration
xx