The Flag Story
I have to be honest, this is a project that was 2 years in the making. When we went to visit the kids for the 2016 holidays, my daughter's boyfriend showed me this flag (to be). It's approximately 3' x 4' and he wanted a distressed, antique look; he asked me for my thoughts. I got him started by painting the field of blue, but this was his project and I didn't want to 'take over'. Well, it sat for a year until we returned for the 2017 holidays...the project was now mine and my daughter's to complete!


It was built by a friend with 13 pieces of pine. Perfect for the 13 stripes on a flag. We got started by taping:

We started with the white stripes. The first step was dry-brushing the edges to prevent bleed-through. Each stripe ended up with 3 coats of white craft paint.


The white stripes were then taped, and the red stripes were applied using the same technique.

The painting was done!

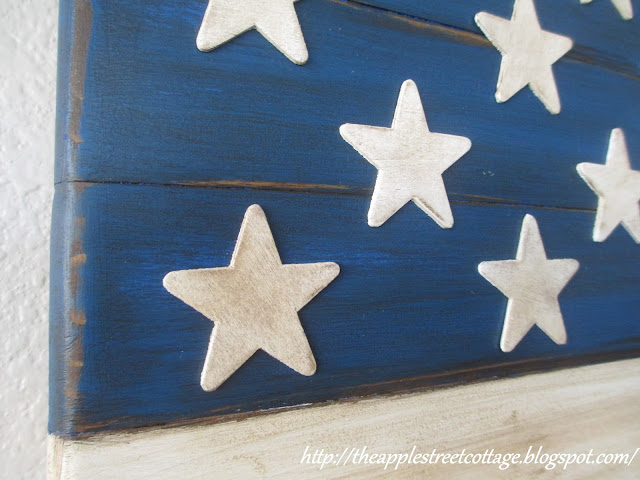
Next came the distressing and my daughter left this step to me. I used 60 grit sandpaper for many of the edges and 220 for the rest. There were no rules with this step, I just kept sanding until I was happy with the look.


Now it was time to 'antique' it. We used antiquing medium that you can buy in the craft store. We worked as a team on this part. I brushed it on and my daughter followed with a dry and a damp cloth. The idea is to 'play with it' until you get the coverage/look you want. The entire process took about 15 minutes!

Before & after wiping with a cloth.

Time for a 'close-up'

Done!

If you've been following me at the Cottage, you already know it isn't a project unless I forget to take pictures...the next step has no pictures...You're welcome...HaHaHa!!
We bought wooden stars at the craft store and I painted them with white craft paint. After they dried, they were antiqued and distressed. It was time to place them on the field of blue:

I did this part too, while my daughter took the picture. Believe it or not, there was no measuring involved in this step. I started placing the stars 'by eye' and before I knew it, it was done. Out came the glue!

The only thing left was a couple of coats of matte sealer...project complete!


After a year, the flag is now done and hanging on the wall. Everyone is happy with how it turned out and I can't wait to see what next year's project will be!
Thank you for stopping by the Cottage. I hope you'll pin, share, comment, and follow! If you click on those 3 little lines at the top right of the blog, you'll see where you can find me.
Have a great week!


I love it! I think I'd like to make one to hang outside. Are you available?? LOL
ReplyDelete:) gwingal
Thank you, Nikki, and, sure, I'm available! Through the power of technology, I can be there in an instant! 😉
DeleteThanks for stopping by - have a great week!
Beautiful, beautiful flag! I would love to have one just like it. Thank you for sharing how you made it on Party in Your PJs. Pinned to my DIY board!
ReplyDeleteThank you, Teresa...always happy to share!
DeleteHave a great weekend.
It turned out great! Thanks for sharing at Vintage Charm!
ReplyDeleteMy pleasure!
DeleteOh bless him, he really didn't get very far did he?!
ReplyDeleteIt looks great now it's finished, just the right amount of distressing without overdoing it.
I'm also a queen of photo forgetting, when you are in the zone it can be hard to remember to keep stopping to take more shots, I'm sure we can work it out from what you've described!
No, he didn't! I was so glad we were able to finish for him. I'm so glad I'm not alone in forgetting photos. My daughter took most of the pics for this post, but, naturally, I did the starts while she was at work...so, you know what happened there! LOL
DeleteThank you so much for stopping by!