Posts

Showing posts from January, 2018

Not Quite What I Planned...

Image
Today's post is a bit different, due to plans changing.  I had a wonderful project to share and wasn't quite done with the post when I turned the wrong way.  I pulled a muscle in my back and it hurts to take a deep breath and move.  So, here I am with my muscle relaxers, an ice pack, and ibuprofen...not quite what I planned.   I promise to be back next week, but in the meantime, allow me to tell you how touched I am by everyone who stops by.  This blog was started three years ago to tell the story of our little house and so much has happened since then...cleaning, painting, projects...the list goes on and on.  The most exciting thing was that people actually read the posts and left me comments!  How about that? I know I'll never be famous with thousands of followers, but I can't begin to tell you how much I appreciate every pin, share, and comment.  Thank you from the bottom of my heart! That being said, I need another ice pack...see yo...

The Flag Story

Image
I have to be honest, this is a project that was 2 years in the making.  When we went to visit the kids for the 2016 holidays, my daughter's boyfriend showed me this flag (to be).  It's approximately 3' x 4' and he wanted a distressed, antique look; he asked me for my thoughts.  I got him started by painting the field of blue, but this was his project and I didn't want to 'take over'.  Well, it sat for a year until we returned for the 2017 holidays...the project was now mine and my daughter's to complete! It was built by a friend with 13 pieces of pine.  Perfect for the 13 stripes on a flag.  We got started by taping: We started with the white stripes.  The first step was dry-brushing the edges to prevent bleed-through.  Each stripe ended up with 3 coats of white craft paint. The white stripes were then taped, and the red stripes were applied using the same technique.   The painting was done! Next came the distress...

A Mermaid 'Tail'

Image
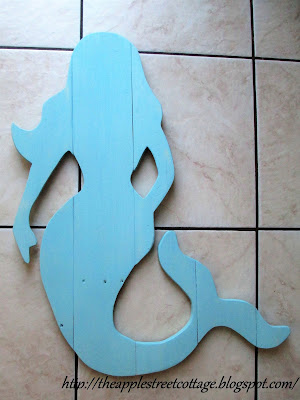
This mermaid was my daughter's Christmas present.  She's loved mermaids since she was a little girl (remember Ariel?) and even has a Pinterest board dedicated to them.   I started by looking at LOTS of images on the internet.  I had an idea of what I was looking for and started drawing the different elements like the hair and tail.  When I was done, she was about 3 feet tall.  I got out pallet wood and started 'fitting' her on the wood. The goal was getting her to fit on as few pieces of wood as possible.  Once I was happy with the layout, I traced the pattern with a marker. Out came the jigsaw and before you knew it, she was completely cut out. The wood from this pallet was very light, almost white and I thought about just putting a light stain on her; but, since blue was a color in my daughter's house, I went with that.  I used chalk paint, some light distressing and clear wax.   In case you're wondering how...

The Alohomora Key Rack

Image
Happy New Year and welcome back!  I hope you had a wonderful holiday.  We spent the holidays in the southwest with our children and the grand dogs.  In between two Thanksgivings (yes, two!), Christmas, the New Year, and lots of cooking, baking, dinners, visits, and laughter, my daughter and I managed to find some time for projects.   She's a huge Harry Potter Fan and was inspired by a key rack on Pinterest.  She sent me the picture and asked if I had a piece of wood and any old keys. After finding a pine board and some antique keys in my stash of goodies, it was time to help her 'make it her own'.  Let's get started... First, the board was sanded and given 3 coats of black acrylic paint.  After that dried, the edges were taped (by 'eye') and the center was painted with 3 coats of white craft paint.    The paint dry over-night, and everything was distressed with 220-grit sandpaper. Using a Harry Potter font found on-lin...