Jammin' in the Summertime!
We've had some perfect days with temperatures in the mid to upper 70s, along with a few hot, humid days with a few scattered showers. Yes, it's summer and that means it's time to make jam!
Every summer, when my children were small, we'd head to the strawberry fields near our house to pick sweetest, most beautiful strawberries. You were allowed to eat as you picked, and I'm sure my kiddos ate more than they actually picked - you could tell by the red stains around their mouths! That was OK because we headed home with several pounds of berries and I got right to work making jam - you can't get fresher than that!


Inspire Me Monday
Merry Monday
Inspire Me Tuesday
Show & Share
Make It Pretty Monday
Wow Me Wednesday
Homemade & Handcrafted
Party In Your PJs
Grandma's House
Home & Garden Thursday
Creatively Crafty
Thursday Favorite Things
No Rules Weekend
Feathered Nest Friday
What To Do Weekends
Friday Favorites
Create, Bake, Grow & Gather
Friday at the Fire Station
Every summer, when my children were small, we'd head to the strawberry fields near our house to pick sweetest, most beautiful strawberries. You were allowed to eat as you picked, and I'm sure my kiddos ate more than they actually picked - you could tell by the red stains around their mouths! That was OK because we headed home with several pounds of berries and I got right to work making jam - you can't get fresher than that!

These days, my children are grown and still want jam, so I buy my berries and get to work. Let me show you how I do it.
Gather what you need: a few pounds of strawberries, jars & lids, fruit pectin, and sugar - LOTS of sugar!
First you have to sterilize your jars and lids. If you have a dishwasher, send the jars through a wash and dry cycle. If you don't, boil them in a pot for at least 10 minutes. Put the lids and bands in another pot to boil, as well.

In one bowl, measure 7 cups of sugar - I told you it was a lot! Set that aside.
I like chunky jam, so I cut my berries up and mash them with a potato masher in a bowl. If you don't like chunks of berries you can put them in the blender or food processor. You'll need 5 cups.
Put the crushed berries in a pot with one package of fruit pectin. (You can add a tsp of butter to help with foaming.) Bring that mixture to a boil and boil for 1 minute.

Now, add the sugar and bring to a boil again.

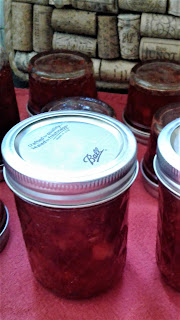
Once you get there, boil again for 1 minute and remove from the heat and start filling your jars - like this:

I leave a little room at the top (1/4") wipe the top edge and thread, and put the lid and band on right away. I tighten the band as tight as I can get it and immediately turn the jar upside-down on a towel.

When all the jars are filled, I wait about 20 minutes and turn the jars right-side-up. That when I hear the 'ping' of the jars sealing. You will know they're sealed when you press on the lid and it doesn't move up and down.
Now, here are a couple of tips:
Tip #1:
Wear your kitchen rubber gloves because those jars are HOT! Save your hands!
Tip #2:
Use tongs to remove your jars and lids from boiling water - refer to Tip #1!
I'm sure many of you are saying, "Ann, you're supposed to put those jars in the canner and boil them again." I've heard that too, but, honestly, I've been making my jam like this for over 20 years and have never had a problem.
Now I'm not saying you have to use my method, and if you have any doubt, get yourself a canner and boil those jars.
What I will tell you is there is nothing like homemade jam on your toast or english muffin in January! 😉
So, do you make jam? Do you have a specialty? I'd love to hear about it!
Have a great week and thanks for stopping by - I hope you'll follow me and keep up with 'all the latest' at the Cottage!
Linking to:
Over the MoonMerry Monday
Inspire Me Tuesday
Show & Share
Make It Pretty Monday
Wow Me Wednesday
Homemade & Handcrafted
Party In Your PJs
Grandma's House
Home & Garden Thursday
Creatively Crafty
Thursday Favorite Things
No Rules Weekend
Feathered Nest Friday
What To Do Weekends
Friday Favorites
Create, Bake, Grow & Gather
Friday at the Fire Station


My Nan always made all sorts of jam and I remember helping her with the process sometimes. I made blackberry jam at school once but boiled it for too long and it was so thick it had to be sliced with a sharp knife! that kind of put me off but you make it all seem pretty simple. I'm inspired, I may have another go - what's the worst that can happen?!
ReplyDeleteThe worse thing I've ever had happen is not having it 'jell'. When I tipped the jar it was still pretty runny, so I dumped it all in the pot again with another package of pectin and brought it to a boil. It boiled for 1 minute and put in newly sterilized jars. It was fine - just don't reuse the lids!
DeleteGive it a try - you'll be glad you did when January comes around!!!!
Let me know how it goes. 😊
I am going to try your recipe with raspberries, because I have lots of them. Thank you for sharing!
ReplyDeleteRaspberry jam sounds delicious! Do you have raspberry bushes?
DeleteThat seems easy enough for me to do. Last year a neighbor gave me some, maybe I'll wait a little longer before I try....
ReplyDeleteOnce you start making jam, you're hooked! I also give it as gifts at Christmas. Give it a go, Barbara!
DeleteThat looks so good... I haven't made jam, of any kind, for a while and need to do it again.... store bought jam is nothing like homemade! :)
ReplyDeleteI couldn't agree more - there is nothing like homemade jam.
DeleteI'm so glad you stopped by!
This look yummy! #handmadeMonday
ReplyDeleteMy family says, "Yes, it is!"
DeleteI remember making jam with a friend. She introduced me to the turn the jars over and let them seal them self method. Boy is that easier than boiling them in a pressure cooker to seal them. It was so easy that I made lots of jam after that. Nothing like fresh jam!
ReplyDeleteA friend taught me how to make jam, too, and you are right, it's much easier! I hope you still make it, Theresa.
DeleteThanks for stopping by - be sure come back again soon!
Ann, I so enjoyed reading about and seeing pictures of your jamming. I'm waaaayy too hot to be making jam this month, but I'd sure like to be eating some homemade jam! Marmalade is my specialty, which is good for me because I make it in January when it's not hot!
ReplyDeleteThank you, Jean...and you're right, it IS hot, but, I must confess, I had the AC going!! I've never made marmalade, but making it in January sure is enticing.
DeleteI'm so glad you stopped by the Cottage. Come back again soon!